Job Setup
1. SETUP
The Setup option lets you set up the following information:
- Jobs Setup
- Job Posting Groups
- Journal templates
- Job Types
- Categories – Cost and Revenue
- Activities
- Adjustment Types
Although it is likely that this information will already be set up in your system, you may need to add or adjust this information as your company grows and changes.
2. JOB SETUP
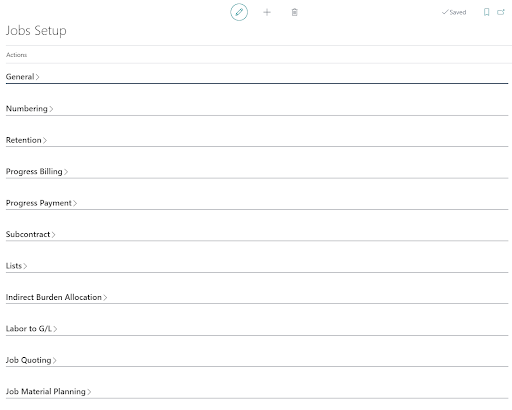
Search for Jobs Setup from search option and click on the relevant option. Below page will open showing all fast tabs.

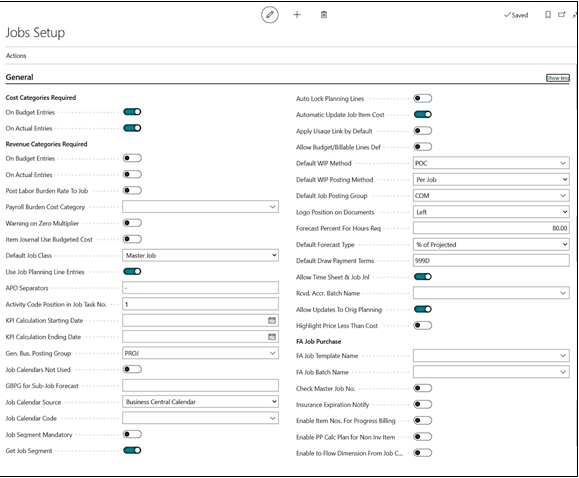
3. General Fast Tab:
| FIELD | DESCRIPTION |
|---|---|
| Cost Categories Required: | Toggling this option “on” will require Cost Categories on Budget entries, Actual entries, or both. |
| Revenue Categories Required: | Toggling this option “on” will require Revenue Categories on Budget entries, Actual entries, or both. |
| Default Job Class: | Optional default Job Class defined on job card to Master Job, Sub Job, Change Order or Extra Work. |
| APO Separators: | The symbol that will be used to separate the Activity, Process, Operation and Section task codes. Typically, this is a dash (-) |
| Activity Code Position in Job Task No.: | Specifies the positioning of the activity in the job task number |
| KPI Calculation Starting Date: | Starting date of the Key Process Indicator (KPI) |
| KPI Calculation Ending Date: | Ending date of the Key Process Indicator (KPI) |
| Gen. Bus. Posting Group: | Default general business posting group to be used on a job |
| Job Calendar Not Used: | Check this field when job calendars are not to be used. |
| GBPG for Sub-Level Job Forecast: | General business posting group for the sub-level jobs to be included in job forecast worksheet posting (when done from master job) and job profit analysis report |
| Job Calendar Source: | Choose the source of the calendar to be as: Base Navision Calendar or Job Calendar |
| Job Calendar Code: | Select the calendar code for jobs as per the calendar source selected. |
| Job Segment Mandatory | Specifies that the job segment is mandatory for every transaction related to job |
| Get Job Segment: | Only Used when using Job Segment Take Off Functionality |
| Auto Lock Planning Lines | Specifies that you want the program to lock the Planning Lines |
| Automatic Update Job Item Cost: | Specifies that cost changes are automatically adjusted each time the Adjust Cost – Item Entries batch job is run. The adjustment process and its results are the same as when you run the Update Job Item Cost Batch Job. |
| Apply Usage Link by Default: | Specifies whether job ledger entries are linked to job planning lines by default. Select this check box if you want to apply this setting to all new jobs that you create. |
| Allow Budget / Billable Line Def.: | Specifies whether job lines can be of type Both Budget and Billable by default. Select this check box if you want to apply this setting to all new jobs that you create. |
| Default WIP Method: | Specifies the default method to be used for calculating work in process (WIP). It is applied whenever you create a new job, but you can modify the value on the job card. In ProjectPro it is kept as POC |
| Default WIP Posting Method: | Specifies how the default WIP method is to be applied when posting Work in Process (WIP) to the general ledger. By default, it is applied “Per Job” but can be changed to “Per Job Ledger Entry”. |
| Default Job Posting Group: | Specifies the default posting group to be applied when you create a new job. This group is used whenever you create a job, but you can modify the value on the job card. |
| Logo Position on Document: | Specifies the position of your company logo on business letters and documents. It can be set to Left, Right, Center, or No Logo. |
| Forecast Percentage for Hours Req.: | Indicates at what percent of your budget should trigger hours to finish by project managers. Example: If the Forecast Percentage is set at 80%, when actual cost exceeds 80% of budget, then the hours to finish field is required in Job Forecast Worksheet. |
| Default Forecast Type: | Select the type of Job Forecast calculations based on: % of Budget or % of Projected. % Of Projected is the recommended option, if using the Job Forecast Tool. |
| Default Draw Payment Terms: | Payment terms to be set for vendors as a default when using “Pay when Paid” business process. The “Pay when Paid” is the term of paying your vendors when your customer pays you. This is typically set in ProjectPro to 999D |
| Allow Time Sheet & Job Jnl.: | This enables users to enter resources on the Job Journal even though their resource card is set to “allow time sheet entry”. Standard Business Central does not allow this process. |
| Rcvd. Accr. Batch Name: | Specifies the Rcvd. Accr. Batch Name |
| Allow Updates to Orig Planning | Specifies the Allow Updates to Original Planning |
| Highlight Prices Less Than Cost: | Will highlight the planning lines in red, italicized font to indicate that your price is less than your cost |
| FA Job Purchase | It comprises of 3 fields, namely: –
|
| FA Job Template Name | Specifies the job journal template for FA posting with job. |
| FA Job Batch Name | Specifies the Job journal batch based on the template selected on prior field. |
| Check Master Job No. | Specifies the Check Master Job No. |
| Insurance Expiration Notify | Toggle “on” or “off” to enable notification of vendor insurance expiration. |
| Enable Item Nos. For Progress Billing | Toggling it “on” means that in Progress Billing, type Item will be updated in the line instead of the G/L Account no. Toggling it “off” means that in Progress Billing, type G/L will be updated in the lines from Job Posting Setup./td> |
| Enable PP Calc Plan for Non Inv Item | Toggle it “on” or “off” based on whether you want to include noninventory items in the PP Calculate Plan function in Requisition Worksheet. |
| Enable to Flow Dimension From Job Card | Toggle it “on” or “off” based on whether you want to update the dimensions from job card or from default General ledger setup. |
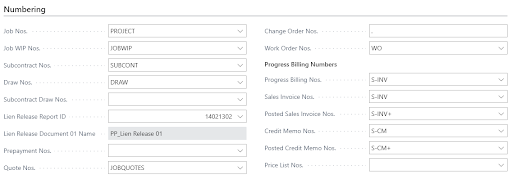
4. Numbering Fast Tab:
| FIELD | DESCRIPTION |
|---|---|
| Job Nos: | Enter the Job No. series code. |
| Job WIP Nos.: | Enter the Job WIP No. series code. |
| Subcontract Nos.: | Enter the Subcontract No. series code. |
| Draw Nos.: | Enter the Draw No. series code. |
| Subcontract Draw Nos.: | Enter the Subcontract Draw No. series code. |
| Lien Release Report ID: | Enter the report number for the Lien Release Report. |
| Lien Release Document 01 Name: | The Lien Release Report name displays from the ID entered. |
| Prepayment Nos.: | Enter the Prepayment No. series code. |
| Quote Nos.: | Enter the Quote No. series code. |
| Change Order Nos.: | Enter the Change Order No. series code. |
| Work Order Nos.: | Enter the Work Order No. series code. |
| Progress Billing Nos.: | Enter the Progress Billing No. series code. |
| Sales Invoice Nos.: | Enter the Sales Invoice No. series code for Progress Billing |
| Posted Sales Invoice Nos.: | Enter the Sales Invoice No. series code for Progress Billing |
| Credit Memo Nos.: | Enter the Credit Memo No. series code for Progress Billing |
| Posted Credit Memo Nos.: | Enter the Posted Credit Memo No. series code for Progress Billing |
| JFW Batch Document No’s: | Specifies the code for the number series that will be used assign numbers to JFW Batch Document Nos. |
5. Retention Fast Tab:
Once you have determined if your company will be using retainage receivables and /or payables, you must establish the Sales Retention and Purchase Retention Periods.

| FIELD | DESCRIPTION |
|---|---|
| Sales Retention Period: | Represents the aging of the retention portion of the receivable. The ‘1Y’ means one year from the document date for establishing retention receivable due dates. |
| Purchase Retention Period: | 1Y represents the due date for the retainage portion of the billing to be one year from the billing date of the contract billing. |
| Retention Receivable Ledger: | Select the Retention Ledger for Retention Receivables. This is the standard selection for retention receivable tracking. |
| Retention Payable Ledger: | Select the Retention Ledger for Retention Receivables. This is the standard selection for retention receivable tracking. |
| Calc Receivable Retention Before Tax: | Select the Retention Ledger for Retention Receivables. This is the standard selection for retention receivable tracking. |
| A/R Retention Calc Method | Out of the options available select the one that aligns best with your business practices. Option 3 is the suggested option for ProjectPro.
|
| A/P Retention Calc Method | Out of the options available select the one that aligns best with your business practices. Option 3 is the suggested option for ProjectPro.
|
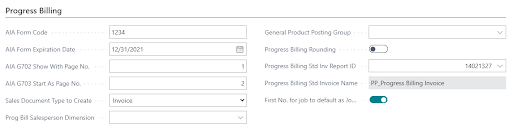
6. Progress Billing Fast Tab:
| FIELD | DESCRIPTION |
|---|---|
| AIA Form Code: | Enter your AIA license (subscription no.) to print G702 and G703 pages |
| AIA Form Expiration Date: | Enter your AIA license (subscription no.) expiration date. |
| AIA G702 Show with Page No.: | If you want to show the report with page number, please the page number here. |
| AIA G703 Start as Page No.: | If you want to show the report with page number, please the page number here. |
| Sales Document Type to Create: | This is the setting for whether you want the progress billing to create either a Customer Sales Order or a Customer Sales Invoice. |
| Prog. Bill Salesperson Dimension: | Default dimension to be taken for Salesperson in case of Progressive billing. |
| General Product Posting Group: | Sets a default General Product Posting Group that is used during the Customer Invoice process. |
| Progress Billing Rounding: | Select this option if you would like all progress billing sales amounts to nearest whole dollar. This can also be selected on progress billings for individual billings. |
| Progress Billing Std Inv Report ID: | Enter the report number for a standard Invoice. The ProjectPro default report number is 14021327 |
| Progress Billing Std Inv Report Name: | Automatically updates the Name of The Report entered above |
| First No. For Job to Default as Job No.: | Check this field to have the Job No. match your Progress Billings No. |
7. Progress Payment Fast Tab

| FIELD | DESCRIPTION |
|---|---|
| Purchase Document Type to Create: | This is the setting for whether you want the progress payment to create either a Vendor Purchase Order or a Vendor Purchase Invoice. |
| Prog. Payment Purchaser Dimension: | Default dimension to be taken for Purchaser in case of Progress Payment |
| General Product Posting Group: | Sets a default General Product Posting Group that is used during the Vendor Invoice process. |
| Progress Billing Rounding: | Select this option if you would like all progress payment amounts to be rounded to the nearest whole dollar. |
| Progress Billing Std Inv Report ID: | Enter the report number for a standard Payment. The ProjectPro standard report is 14021342 |
| Progress Billing Std Inv Report Name: | Automatically updates the Name of The Report selected above |
| Progress Payment Enable | Toggle to unable Progress Payment in Subcontract Order |
8. Subcontract Fast Tab:

| FIELD | DESCRIPTION |
|---|---|
| Subcontract Default UOM: | Select the default UOM for all subcontracts |
| Subcontract Unit of UOM: | Select the best suitable option for Subcontract use of UOM |
| Unapply Usage Link on Subcontract | Toggle this “on” if you want to use usage links related to Subcontracts |
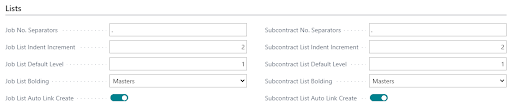
9. Lists Fast Tab:
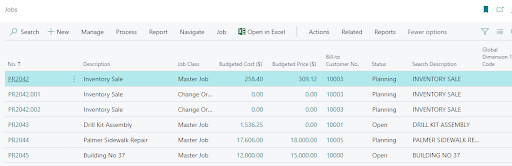
This is the setting for how you want the Job list to show. The Job list is one of the most used lists within Dynamics-BC.
| FIELD | DESCRIPTION |
|---|---|
| Job No. Separators: | The symbol used to differentiate Master Jobs from Sub-Level Jobs. Example: 9600, 9600.01, 9600.02, etc. |
| Job List Indent Increment: | The view of indented sub-level Jobs under master Jobs. |
| Job List Default Level: | Indicates how many levels of Job sub-levels you want the list to default too. See sample list below. |
| Job List Bolding: | Indicates what level is displayed in bold, if any. |
| Job List Auto Link Create: | This should always be ON. This enables a job list table to be populated with the links between the various job classes. |
| Subcontract No. Separators: | The symbol used to differentiate Master Subcontractor from Sub-Level. Example: SUB101, SUB101.01, SUB101.02, etc. |
| Subcontract List Indent Increment: | The view of indented sub-level Jobs under master Jobs. |
| Subcontract List Default Level: | Indicates how many levels of subcontract sub-levels you want the list to default too. See sample list below. |
| Subcontract List Bolding: | Indicates what level is displayed in bold, if any. |
| Subcontract List Auto Link Create: | This should always be ON. This enables a subcontract list table to be populated with the links between the various job classes. |
10. Indirect Burden Allocation Fast Tab
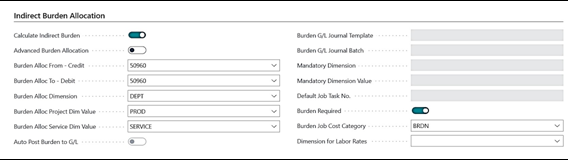
| FIELD | DESCRIPTION |
|---|---|
| Calculate Indirect Burden: | Check this field if indirect burden is required. |
| Advanced Burden Allocation | Specifies the Advanced Burden Allocation |
| Burden Alloc. From – Credit: | Select the credit G/L account for burden allocation. This G/L account is usually from the “Indirect Job Cost” section of your Chart of Accounts. |
| Burden Alloc. To – Debit: | Select the debit G/L account for burden allocation. This G/L account is usually from the “Direct Job Cost” section of your Chart of Accounts. |
| Burden Alloc. Dimension: | Select the dimension for burden allocation. This indicates which dimension is being used for burden. |
| Burden Alloc. Project Dim Value: | Based on the dimension above, set the project dimension value |
| Burden Alloc. Service Dim Value: | Based on the dimension above, set the service dimension value |
| Auto Post Burden | Specifies that you would like burden to be automatically posted to your G/L account when toggled “on” |
| Burden G/L Journal Template | Specifies the Burden G/L Journal Template to be used. This is only available if you are using Advanced Burden Allocations. |
| Burden G/L Journal Batch | Specifies the Burden G/L Journal Batch to be used. This is only available if you are using Advanced Burden Allocations. |
| Mandatory Dimension | Specifies the Dimension to be mandatory while processing the Subcontracts. This is only available if you are using Advanced Burden Allocations. |
| Mandatory Dimension Value | Specifies the Dimension Value to be mandatory while processing the Subcontracts. This is only available if you are using Advanced Burden Allocations. |
| Default Job Task No. | Specifies system should ask the Default Job Task No. while processing the Subcontract. This is only available if you are using Advanced Burden Allocations. |
| Burden Required: | Turn ON if burden is required for all jobs. |
| Burden Job Cost Category: Dimension for Labor Rates |
Select the job cost category for Burden calculations.
If you are requiring a dimension for Labor Rates, please specify here. |
11. Labor to G/L Fast Tab:

| FIELD | DESCRIPTION |
|---|---|
| Post Job Labor to G/L: | When labor is posted through the Job Journal, you can create a General Ledger Journal entry by toggling this ON. |
| Labor Allocated to Job-Debit: | This is the General Ledger account to post job cost – labor value |
| Labor to Job Offset-Credit: | This is the General Ledger account that is the offset to the labor posted to the G/L. |
| Labor to Job Batch Name: | Typically set to “Default” or “Labor” |
| Job Cost Category for Rev. Labor. Entry: | Select the job cost category to be used for posting reversals of labor entries. |
Job Quoting Fast Tab:

| FIELD | DESCRIPTION |
|---|---|
| Use Default Tasks: | If you want to use default job task lines on each new job and job quote creation, select the required option. |
| Billing Job Task Nos.: | Define the billing Job task number you would like to default on each job. |
| Total Task Nos.: | Define the Task to be used for totaling for the Job. |
| Item Quote Costs: | Toggle it “on” or “off” to select cost from Quote cost field from Item Card |
| Labor Rate: | Toggle it “on” or “off” to select Labor rate based on Job type for the type – Person as defined in Labor by Task page |
12. Job Material Planning Fast Tab:

| FIELD | DESCRIPTION |
|---|---|
| Use Job Mat’l Plan Active: | To allow the use of Job Material Planning toggle this ON |
| Job Mat’l Planning Location: | To set a default location for Job Material Planning select from your locations list in the drop down. |
| Expanded Job Material Planning: | Toggle this “ON” to use G/L accounts on the JMP worksheet. |
| Purchase Document Type to Create: | Select the purchase document to be created from JMP as to Vendor Purchase Order or Vendor Purchase Invoice. |
13. Job Forecast Worksheet Fast Tab

| FIELD | DESCRIPTION |
|---|---|
| GBPG for Sub-Level Job Forecast: | Specifies the GBPG to use for Job Forecasts |
| Allow Posting Date on JFW As of Date Filter: |
Allow Posting Date on JFW As of Date Filter: |
| Forecast Amount Rounding: | This allows you to identify to what decimal you would like forecasts rounded to. ProjectPro suggests 0.01 as the setting. |
| Required GM% Var. for JFW Comments: | Enter the GM% that will trigger a notification that a comment must be entered to explain the variance in month-to-month GM% |
| Enable Forecast Budget Cost on Contract Date | Specifies the value of the Enable Forecast Budget Cost on Contract Date field. |
14. Revenue Recognition Fast Tab:

| FIELD | DESCRIPTION |
|---|---|
| Rev. Rec. G/L Journal Template: | Specifies the Rev. Rec. G/L Journal Template to be used |
| Rev. Rec. G/L Journal Batch: | Specifies the Rev. Rec. G/L Journal Batch to be used |
| Additional Dimension: | Specifies the Additional Dimension to be used in Rev Rec. if applicable |
| Additional Dimension Value: | Specifies the Additional Dimension Value to be used in Rev Rec. if applicable |
| Rev. Rec. Default Job Task No. | Specifies the Rev. Rec. Default Job Task No.to be used if applicable |
| Auto Run Revenue Rec POC Batch | To enable auto posting of Revenue Res POC Batch |