Adding a Job
The first step in opening a Job is create a Job card.
The Job card contains basic information about the Job, such as the description, customer information, pertinent dates, the Job’s posting group, and many other job specific details. Once you have created the Job card, you can enter a budget through the Job Planning Lines. If your company is not using default job tasks, you may be required to add Job Tasks to each job card before you can enter your budget.
If your role center is ProjectPro manager, you can select the Jobs option from your home screen.

Alternatively, you can select the search icon at the top right of your screen and search “Jobs”. selecting the Jobs Option.
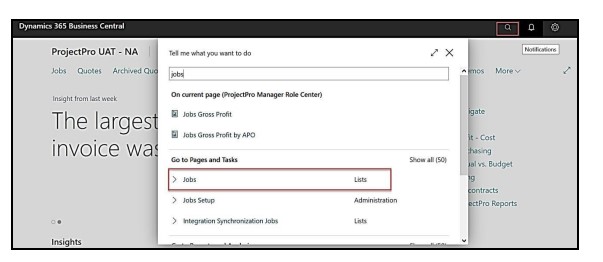
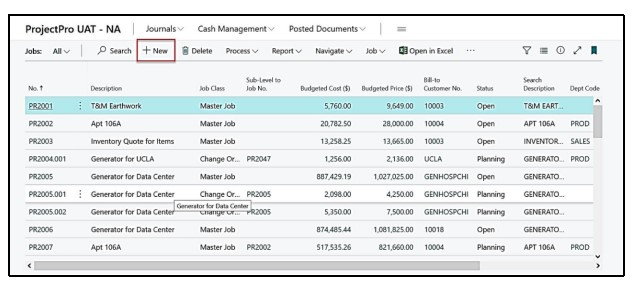
For both options above, you will be taken to the Jobs List. This is a complete list of all jobs your company has. This includes jobs that have been marked completed.
To create a new Job, select the “New” option from the ribbon.
A blank job card will appear.
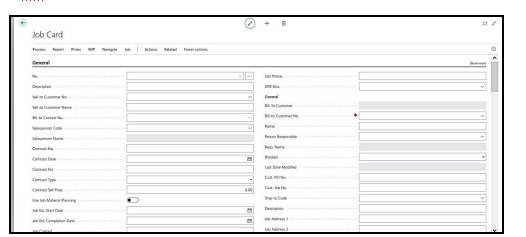
To assign a Job number, click in the No. field and press ENTER or TAB to let the program assign the next Job number in your number series. Alternatively, if your company allows manual Job number entry, you can type in the Job number you would like to assign.
Note: If your company has default tasks set up, you will receive the following prompt after you press enter or tab.
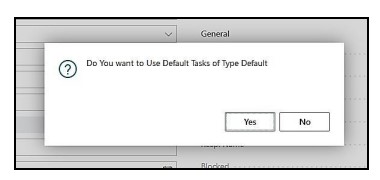
Select “Yes” to use the default tasks or “No” to select them manually.
Fill in the various Job fields. Skip fields you do not need. Your window might look slightly different from the window shown above because of your ability to customize windows. Below are the fields on a Job card. General Tab
|
FIELD |
COMMENTS: |
|
No.: |
Job number – manual or automatic |
|
Description: |
Enter Job description |
|
Sell-To Customer No.: |
Enter customer to be billed for this Job |
|
Sell-To Customer Name: |
Name defaults from the Bill-To Customer No. entered |
|
Bill-To Contact No.: |
Enter main Bill-to contact. (Only used if you don’t use the CRM Contact above) |
|
Salesperson Code: |
Enter Salesperson Code for this Job |
|
Salesperson Name: |
Name defaults from the Salesperson Code entered |
|
Contract No.: |
Enter the Job contract number |
|
Contract Date: |
Enter contract date. Note: this date is critical for Progress Billing, especially when you are issuing change orders |
|
Contract For: |
Short description of contract |
|
Contract Type: |
Select the Type of Contract 1. Blank 2. Contract Fixed 3. Contract Not To Exceed 4. Time And Material 5. Contract Fixed – AIA |
|
Contract Sales Price: |
Enter Total Contract value here |
|
Use Job Material Planning: |
If you are using the Job Material Planning module for this job, toggle this option “on” |
|
Job Est. Start Date: |
Enter date that Job is expected to start. |
|
Job Est. Completion Date: |
Enter date that Job is expected to end |
|
Job Contact: |
Enter the Job Contact Name |
|
Job Class: |
Assign a Job Class: Master Job, Sub-Job, Change Order, or Extra Work. Note: When creating a new Job, the default Job Class will be a Master Job |
|
Sub-Level to Job No.: |
If this Job is a subordinate to another job, then indicate what job has a higherlevel. Note: When creating change orders from your Master Job, this link will automatically be created |
|
Exclude from job forecast: |
|
|
Manager: |
Select the Manager for this job. |
|
Manager Name: |
Name defaults from the Manager entered above |
|
Estimator: |
Select the Estimator from this job, if applicable |
|
Estimator Name: |
Name defaults from the Estimator entered above |
|
Default Job Retention: |
Enter retention percentage to be held on Progress Billings |
|
Manager Job Status: |
Enter status of Job as: Estimating, Quoting, Verbal Approval, Approval, Planning, Running, Hold, Completed, Billed, Paid, and Closed. Note: this status is for informational purposes only. |
|
Job Status Date: |
Date of manager Job Status change will automatically be entered |
|
WIP Method |
Percentage of Completion (POC) is the recommended option for ProjectPro |
|
WIP Posting Date |
|
|
DFR No. |
Select the DFR No. Series to generated DFR nos. automatically for the job |
|
Job Phone: |
Phone number contact on job site if applicable |
|
Bill-To Customer: |
|
|
Bill-To Customer No.: |
This field will default to the selected Sell-To Customer No. Change if required. |
|
Name: |
The program automatically fills in the name of the Bill-to Customer Selected above |
|
State: |
The program automatically fills in this field from the Bill-to Customer card |
|
Address: |
The program automatically fills in this field from the Bill-to Customer card |
|
Address 2: |
The program automatically fills in this field from the Bill-to Customer card |
|
State: |
The program automatically fills in this field from the Bill-to Customer card |
|
Zip Code: |
The program automatically fills in this field from the Bill-to Customer card |
|
City: |
The program automatically fills in this field from the Bill-to Customer card |
|
Country: |
The program automatically fills in this field from the Bill-to Customer card |
|
Contact: |
Enter the contact for the Bill-to customer, if required |
|
Phone No.: |
Enter the Phone number of the customer |
|
Mobile Phone No.: |
Enter the Mobile number of the customer |
|
E-Mail: |
Enter the E-Mail of the customer |
|
Person Responsible: |
Use this field to identify a person responsible for the job |
|
Blocked: |
This field allows you to block certain actions on the job. 1. <Blank> = All actions are allowed. 2. Posting = You can work with planning lines, but the job is blocked for posting. Choosing this option means that you cannot post any usage or sale on the job. 3. All = All actions are blocked. |
|
Last Date Modified: |
This field shows when the job card was last modified. When you change information on the job card, the program automatically updates the Last Date Modified field to show the current system date. |
|
Cust. PO No.: |
Enter the customer’s purchase order number for the Job. |
|
Cust. Job No.: |
Enter the customer’s job no. if available. Prints on AIA Forms. |
|
Ship-to Code: |
Select a location code for the Job site. |
|
Description: |
This field contains a short description of the job. The description appears on the journal lines and planning lines when you enter the number or the search description in the No. field. This will default from the Description entered earlier in the set-up process. |
|
Job Address 1: |
Enter Job address. If you have selected a ship-to code, this field will automatically fill in. |
|
Job Address 2: |
Enter Job address 2. If you have selected a ship-to code, this field will automatically fill in. |
|
Job City: |
Enter Job City. If you have selected a ship-to code, this field will automatically fill in. |
|
Job State: |
Enter Job State. If you have selected a ship-to code, this field will automatically fill in. |
|
Job Country: |
Enter Job Country code. If you have selected a ship-to code, this field will automatically fill in. |
|
Job Type: |
Job Types are part of Job Posting Groups. These are user defined codes. (See Job Setup) |
|
Gen. Prod. Posting Group: |
Assign the general product posting group for the job |
|
Gen. Bus. Posting Group: |
Assign the general business posting group for the job |
|
Locked Planning Lines Exist: |
If Job Planning Lines have been locked, this will be toggled “on” |
|
Project Manager: |
Select Project Manager for the Job. |
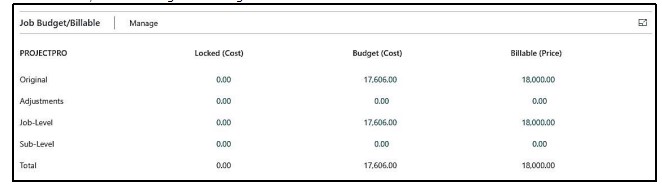
This shows a summary of the current budget and billable Job Planning Lines for each level of a job, along with the original, “Locked” costs, if Locked budgets are being used.
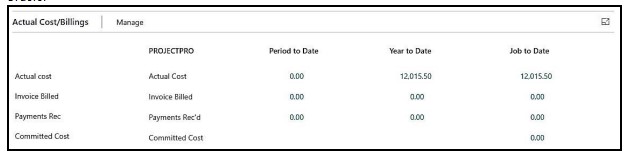
This provides real-time statistics for job costs, billings to date, payments received against the job, and any committed costs. Committed costs are the total of all outstanding Purchase Orders and Subcontract Purchase Orders.
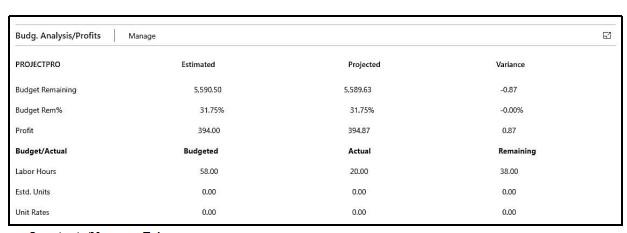
Job Budget Analysis Tab
This provides a summary view of how your job is performing against the budget in both dollars and units.
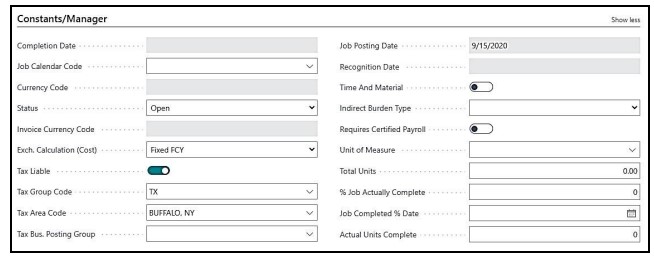
Constants/Manager Tab
|
FIELD |
COMMENTS |
|
Completion Date: |
Date is automatically assigned when the Job Status is changed to “Completed” |
|
Job Calendar Code: |
Select Job Calendar Code, if applicable |
|
Status: |
Status of the Job. Note: this status will dictate your ability to post against this job. If you mark the job Complete you will not be able to change the status back to open. |
|
Revenue Recognized |
|
|
Tax Liable: |
Yes or No |
|
Tax Group Code: |
Select your tax group code. (Sample: NT for non-taxable or TX for taxable) |
|
Tax Area Code: |
Select the tax area code that applies to this job. |
|
Tax Bus. Posting Group: |
Used for VAT Tax Setup if applicable |
|
Line Type |
Select what job planning line type to be automatically generated when processing Apply Usage Link |
|
Job Posting Group: |
Here you can assign a job posting group code to a job. Job posting groups determine which G/L accounts you post to when you run the Job Post WIP to G/L batch job. The Job Posting Group that you set up on the Job Card will be used as default Job Posting Group on the Job Tasks. |
|
Tax Prod. Posting Group: |
Used for VAT Tax Setup if applicable |
|
Allow Budget / Billable Lines: |
Place a checkmark in this field if you wish to create Both Budget and Billable Planning Lines for this job. |
|
Use % Billing Format |
|
|
Progress Billing No.: |
Enter progress billing no. assigned to this job. Note: when creating the first progress billing for the job you are prompted with an option to update the Job Card with this information. |
|
Progress Billing CO: |
Indicates if the Progress Billing should be considered a Change Order in AIA and Progress Invoice Reports. |
|
Job Posting Date: |
Date of the last posted transaction |
|
Recognition Date: |
Date of last recognition. |
|
Time and Material: |
Toggle “on” if your job is being tracked/invoiced as Time and Material |
|
Indirect Burden Type: |
Indirect burdens may be turned on for projects and service work. If admin, then no indirect burden value will be applied. |
|
Requires Certified Payroll: |
To indicate if the job requires certified payroll reporting. Typically, this applies to government or state funded projects. |
|
Unit of Measure: |
Enter the unit of measure for work units |
|
Total Units: |
Enter the total units of work for this Job. |
|
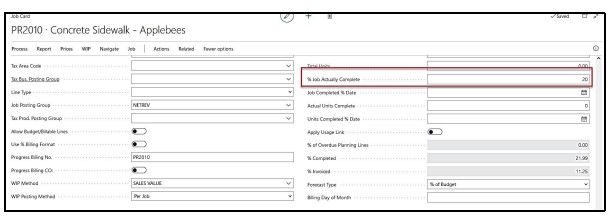
% Job Actually Complete: |
Enter the percent that the Job is complete |
|
Job Completed % Date: |
Date that the actual percentage of job completed was updated. |
|
Actual Units Complete: |
Enter the number of units of work that have been complete. |
|
Units Complete % Date: |
Date that the actual percentage of units completed was updated. |
|
Apply Usage Link: |
If you want to select and apply usage link by default to the Job this would auto populate at job planning lines if Boolean is set to yes |
|
% Overdue Planning Lines: |
Specifies the percentage of the job’s planning lines where the planned delivery date has been exceeded. |
|
% Completed: |
Calculation of the % completion for the job |
|
% Invoiced: |
Calculation of the % Invoiced for the Job |
|
Forecast Type: |
Select the forecast type. ProjectPro recommends using % of budget |
|
Billing Day of Month: |
If Billing is due on a specific day of each month, please mention here. Note: this is for informational purposes only. |
Provides a summary of Creation Date, Start Date and End Date

|
FIELD |
COMMENTS |
|
Starting Date: |
Enter the starting date of Job |
|
Ending Date: |
Enter the ending date of Job |
|
Creation Date: |
This will get updated automatically |
Foreign Trade Tab

|
FIELD |
COMMENTS |
|
Currency Code: |
By Default, the currency code for a job is based on what currency is defined on the Customer Card. If you enter a foreign currency code it results in the job being planned and invoiced in that currency. Click the drop down available to see the available currency. Note: If you want to plan the job in local currency and invoice it in a foreign currency you should not set up a currency code in this field. Instead, you can setup an invoicing currency in the invoicing currency code field. You cannot change the currency code of a job once planning lines or job ledger entries exists for a job. |
|
Invoice Currency Code: |
In this field you can select the currency code you want to apply when creating invoices for a job. Click the drop down available to see the available currency. Note: The invoice currency fields can only be modified when local currency (LCY) is entered in the currency code field. You cannot change the invoice currency code at any time during the job if you want to change the currency codes for new invoices. The invoice currency code is applied when you create a Sales Invoice or Sales Credit Memo. |
|
Exch. Calculation (Cost) |
If you have setup a job in foreign Currency Code by entering a code in the currency code field you use this field to specify how job cost values should be calculated when you change the currency date field on the planning line manually, when you change the exchange rates on the currency code fields on a job planning line or when you run the change job Planning lines dates batch Job. The options are: • Fixed LCY – The job costs in local currency are fixed. Any change in the currency exchange rate will change the value of the job costs in foreign currency. • Fixed FCY – The job costs in foreign currency are fixed. Any change in the currency exchange rate will change the value of job costs in local currency. |
|
Exchange Calculation (Price): |
If you have setup foreign currency by entering a code in the currency code field you use this field to specify how job sales prices should be calculated when you change the currency date field on a planning line manually, when you change the exchange rate in the currency code field on a job planning line or when you run the change job planning dates batch job. The options are: • Fixed LCY – The job price in local currency is fixed. Any change in the currency exchange rate will change the value of job prices in foreign currency. • Fixed FCY – The job prices in foreign currency are fixed. Any change in the currency exchange rate will change the value of job prices in local currency. Note: If exchange calculation (price) is set to fixed FCY and job specific prices are set up for resources, Items or G/L account based on unit cost factor, you need to also select fixed FCY for the Exchange calculation (Cost) field to make sure that the value of job prices in foreign currency (FCY) are fixed |
Prepayment Tab
Here you can define the Prepayment Parameters of a Job

|
FIELD |
COMMENTS |
|
Prepayment %: |
Enter the Prepayment % |
|
Prepayment Amount: |
The program automatically fills this after calculating the Prepayment % from the above field. Note: This will only calculate if you have “billable” and/or “both budget and billable” planning lines |
|
Prepmt. Contract Amount: |
The sum of all “billable” and/or “both budget and billable” planning lines |
|
Compress Prepayment: |
Specifies that prepayments on the jobs are combined if they have the same general ledger account for prepayments or the same dimensions. |
|
Prepmt. Payment Term Code: |
Enter the Prepayment Term Code, to calculate the Prepayment Payment Due Date. |
|
Prepmt. Payment Discount %: |
Enter the Prepayment Term Code, to calculate the Prepayment Payment Discount. |
|
Prepayment Due Date: |
The program automatically fills this after calculating the Prepayment Payment Term Code from the above field. |
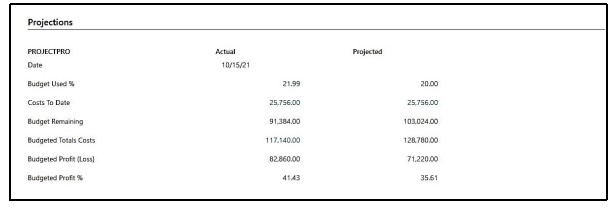
Provides analysis information based on Projected Costs vs. Actual Costs. The Projected costs remaining along with Projected profit (loss) are based on actual cost verses Projected information.
This feature will only work if you are manually entering a percentage in the % Job Actually Complete field.
|
FIELD |
ACTUAL |
PROJECTED |
|
Date: |
Work Date |
Last Date Percentage Completed was updated by users. |
|
Budget Used %: |
Percentage of Actual Cost to Date/Total Budgeted Cost |
Percentage Job Actually Completed from the Constants/Manager Fast Tab |
|
Costs To Date: |
Actual Costs to Date |
Actual Costs to Date |
|
Budget Remaining: |
Total Budgeted Cost-Actual Cost to Date |
Actual Costs to Date/(Entered Complete/100) |
|
Budgeted Total Costs: |
Total Budgeted Costs |
Actual Costs to Date/(Actual % Complete from the Constants/Manager Fast Tab/100) |
|
Budgeted Profit (Loss): |
Total Contract – Total Budgeted Costs |
Total Contract – Projected Total Costs |
|
Budgeted Profit %: |
Percentage of Estimated Profit (Loss)/Total Budgeted Costs |
Projected Profit (Loss)/Projected Total Costs |
In our example below ProjectPro has calculated that our project is 21.99% complete based on our original budget and actual costs posted to date. However, we have determined that the project is 20% complete at this time. Notice we have entered 20% in the % Job Actually Complete field.
Based on our manually added percentage you can see current projects for this project.
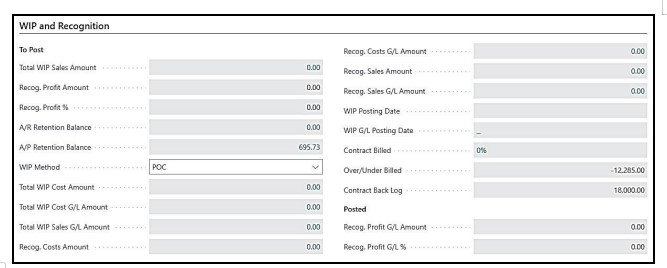
Provides analysis information based on A/R Retention Balances A/P Retention Balances, Work-in-process Balances, Job Costs Recognized (Expensed), Contract Billed, Over/Under Billed, and Contract Back Log.
|
FIELD |
COMMENTS |
|
Total WIP Sales Amount: |
Specifies the total WIP sales amount that was last calculated for the job. The WIP sales amount is the value in the WIP Sales Job WIP Entries window minus the value of the Recognized Sales Job WIP Entries window. For jobs with the Cost Value or Cost of Sales WIP methods, the WIP sales amount is normally 0. |
|
Recog. Profit Amount: |
Specifies the recognized profit amount for the job. |
|
Recog. Profit %: |
Specifies the recognized profit percentage for the job. |
|
A/R Retention Balance: |
Retention Balance in Customer card for this Job. |
|
A/P Retention Balance: |
Retention Balance in Vendor card for this Job. |
|
WIP Method: |
Specifies the WIP Method. |
|
Total WIP Cost Amount: |
Specifies the total WIP cost amount that was last calculated for the job. The WIP cost amount is the value in the WIP Cost Job WIP Entries window minus the value of the Recognized Cost Job WIP Entries window. For jobs with Sales Value or Percentage of Completion WIP methods, the WIP cost amount is normally 0. |
|
Total WIP Cost G/L Amount: |
Specifies the total WIP Cost amount that was last posted to the G/L for the job. The WIP Cost Amount for the job is the value WIP Cost Job WIP G/L Entries less the value of the Recognized Cost Job WIP G/L Entries. For jobs with WIP Methods of Sales Value or Percentage of Completion, the WIP Cost Amount is normally 0. |
|
Total WIP Sales G/L Amount: |
Specifies the total WIP sales amount that was last posted to the general ledger for the job. The WIP sales amount is the value in the WIP Sales Job WIP G/L Entries window minus the value in the Recognized Sales Job WIP G/L Entries window. For jobs with the Cost Value or Cost of Sales WIP methods, the WIP sales amount is normally 0. |
|
Recog. Costs Amount: |
Specifies the recognized cost amount that was last calculated for the job. The value is the sum of the entries in the Recognized Cost Job WIP Entries window. |
|
Recog. Cost G/L Amount: |
Specifies the total Recognized Cost amount that was last posted to the general ledger for the job. The Recognized Cost G/L amount for the job is the sum of the Recognized Cost Job WIP G/L Entries. |
|
Recog. Sales Amount: |
Specifies the recognized sales amount that was last calculated for the job, which is the sum of the Recognized Sales Job WIP Entries. |
|
Recog. Sales G/L Amount: |
Specifies the total recognized sales amount that was last posted to the general ledger for the job. The recognized sales G/L amount for the job is the sum of the entries in the Recognized Sales Job WIP G/L Entries window. |
|
WIP Posting Date: |
Specifies the posting date that was entered when the Job Calculate WIP batch job was last run. |
|
WIP G/L Posting Date: |
Specifies the WIP G/L Posting Date |
|
Contract Billed: |
Percent of Job to date invoice Billed/Total Contract |
|
Over/Under Billed: |
Invoice Price – [(Total Contract + Contract Sub-levels) * Actual Cost to Date % (up to 100%)] |
|
Contract Back Log: |
Total Contract – Invoice Billed Job to Date |
|
Recog. Profit G/L Amount: |
Specifies the profit amount that is recognized with the general ledger for the job. |
|
Recog. Profit G/L %: |
Specifies the profit percentage that is recognized with the general ledger for the job. |
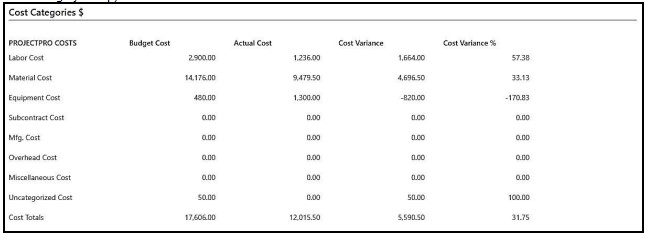
Provides Cost Category Type information based on budgeted vs. actual costs with variance and variance percentages. Uncategorized values are the result of information not assigned to a Cost Category Type (See Cost Category Setup).
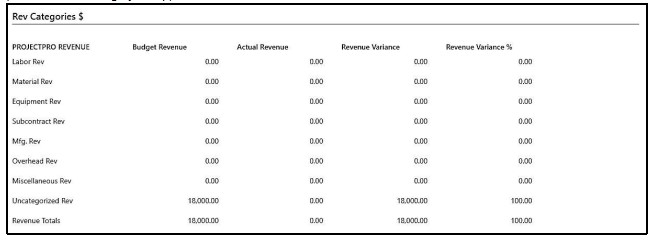
Provides Revenue Category Type information based on Contract (Budgeted Price) verses actual Job billings with variance and variance percentages. Uncategorized values are the result of information not assigned to a Revenue Category Type (See Revenue Category Setup).