Ch 06 – Project Overview
Contents
INTRODUCTION
A project, or a project, belongs to a series of business activities that combine to fulfill a high-level objective. Projects allow you to track various costs that are associated with a long-term project. They also track the profitability of the project and compare planned costs and revenues to actual project costs and revenues. The Projects application area supports common project management tasks, such as configuring a project and scheduling a resource (person or a machine that performs the business activities of a project). It also provides the information needed to manage budgets and monitor processes.
Project planning is an estimate of costs and selling prices for a project. The user can schedule the consumption/usage of items, resources, and in some cases, G/L expenses. Then, while the project is in process or after its completion, the user compares the budgeted cost and the billable prices with the actual transactions (usage or sale entries).
Before you can track Project costs, you must set up your Project. Project information includes the Project name, description, customer, starting date, posting group, revenue recognition method. From this option you can:
- Add and edit Project information.
- Close or complete Projects.
- Assign alternative prices to Projects.
- Work with Project budgets.
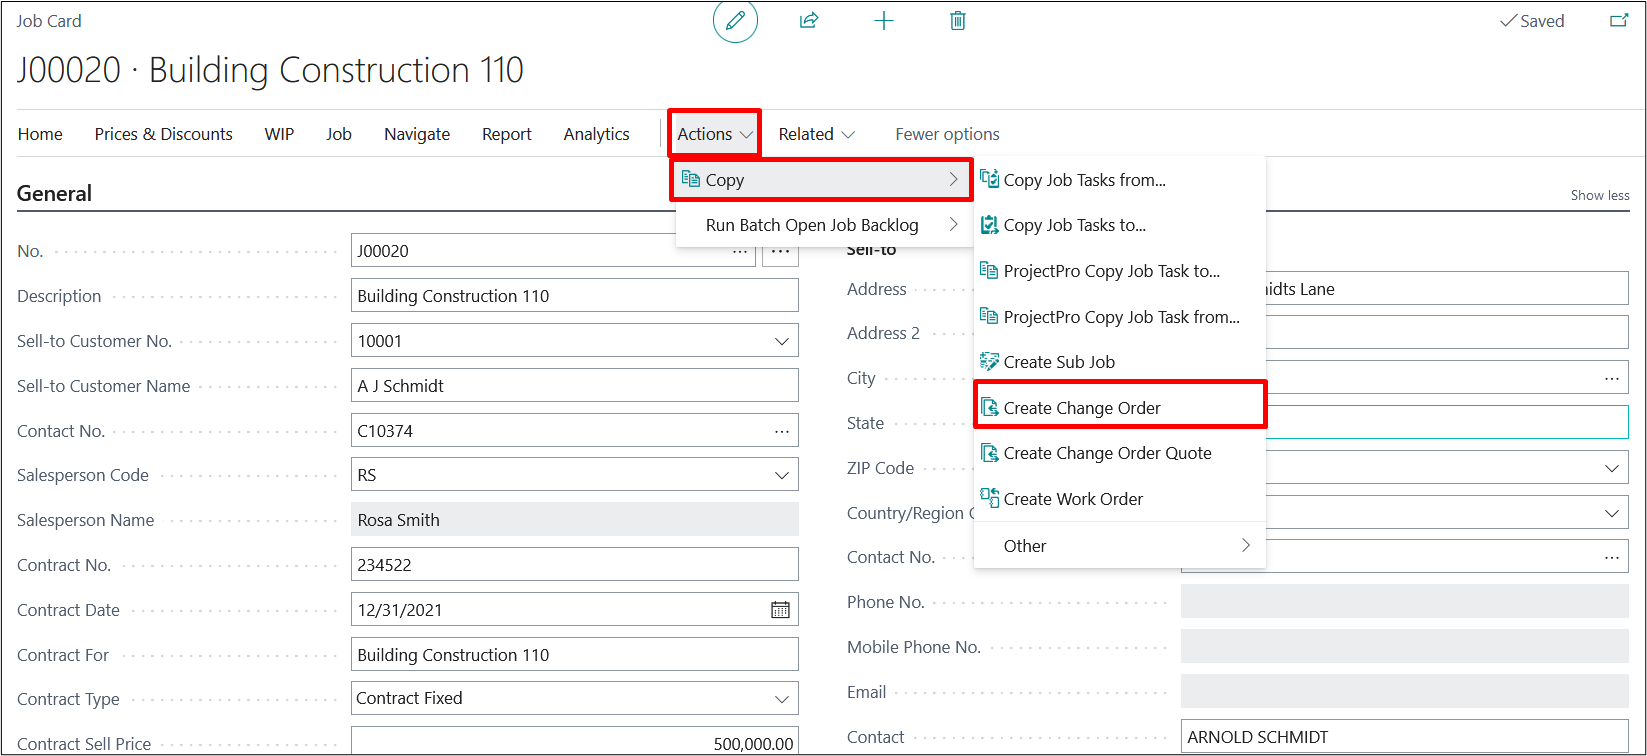
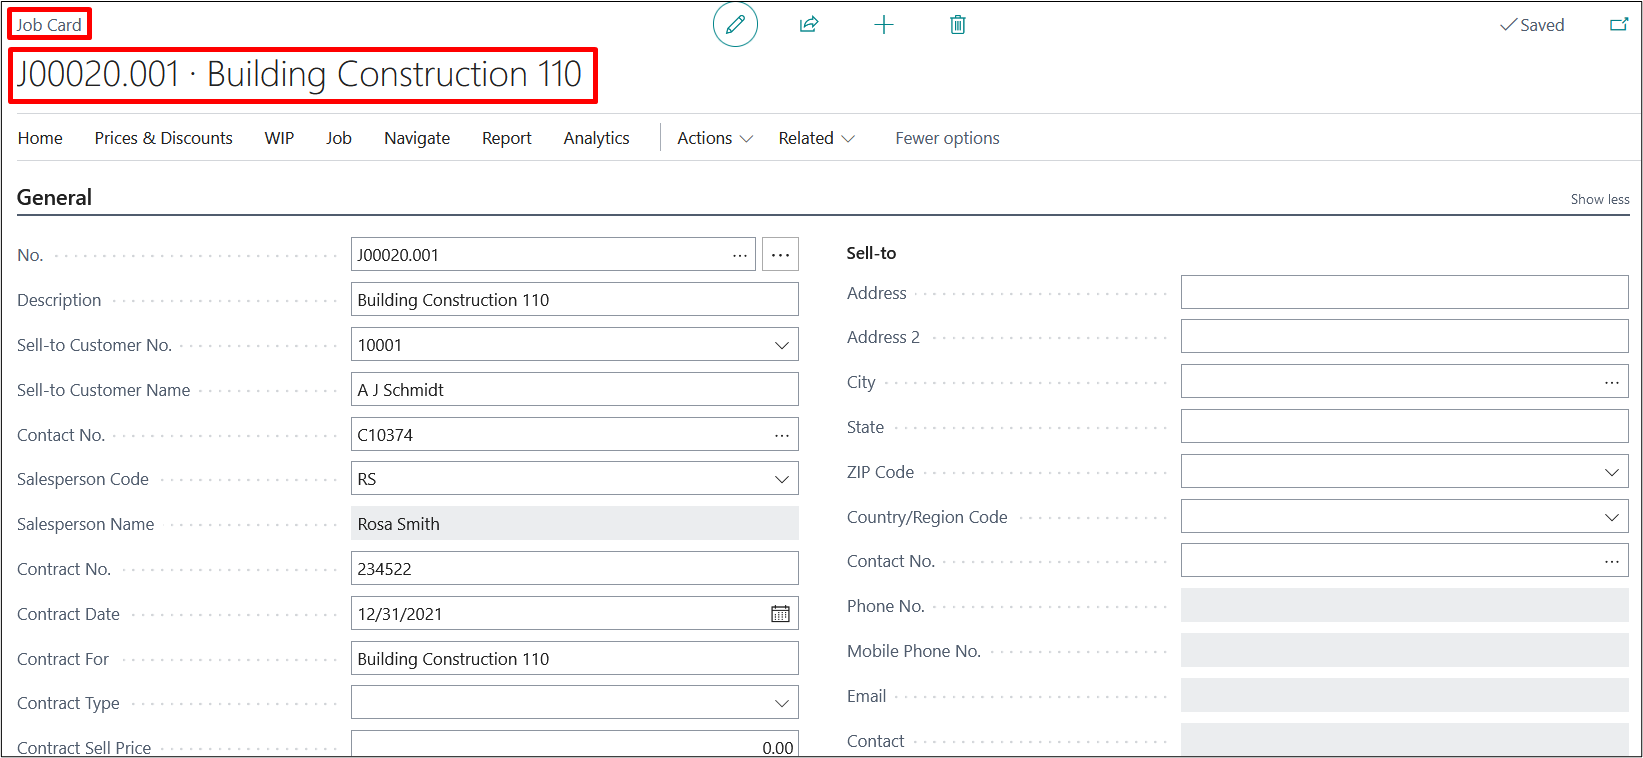
1. PROJECT CARD
Search for Projects using the search icon, and then select the related link. In the list of projects, select the “No.” field to open a project card, or create a new one using the “New” option on the ribbon.
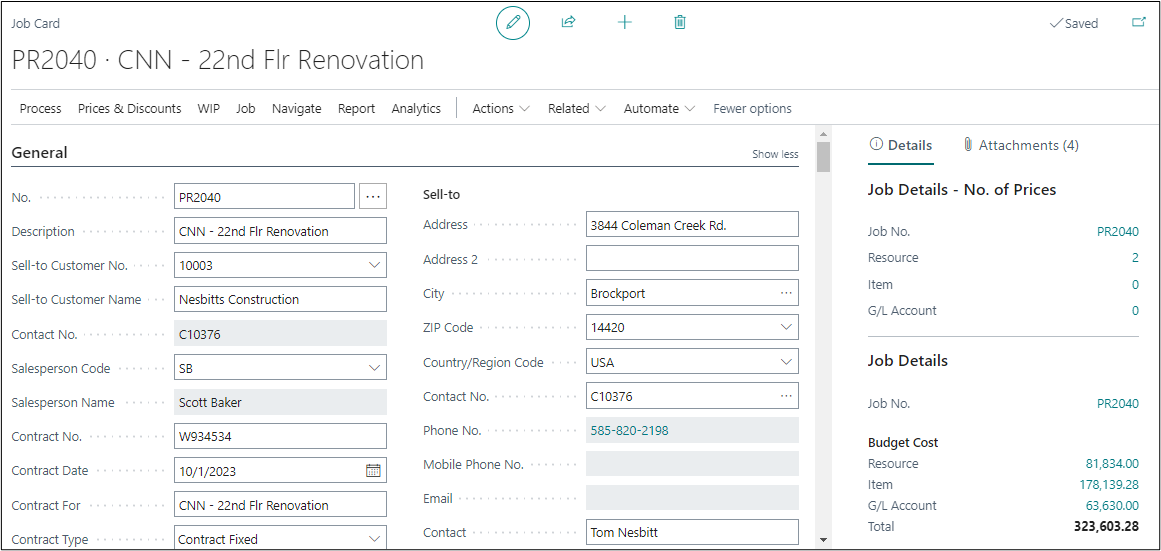
General Fast Tab
| FIELDS | DESCRIPTION |
| No. | Specifies the number of the involved entry or record, according to the specified number series or enter any number manually as per your setup. |
| Description | Specifies the short description of the project. |
| Sell-To Customer No. | Specifies the number of the customer who will receive the products and be billed by default. |
| Sell-To Customer Name | Specifies the name of the customer who will receive the products and be billed by default. |
| Salesperson Code | Specifies the code of the salesperson who is assigned to the customer. |
| Salesperson Name | Specifies the name of the salesperson who is assigned to the customer. |
| Contract No. | Specifies the no. or reference to the contract for the project. |
| Contract Date | Specifies the contract date of the project. Note that this date is critical for including change orders within a progress billing. If the date is after the progress billing date, then this specific project will not be included. |
| Contract For | Specifies the short description of the contract. By default, this gets updated with the “Description” field defined above. |
| Contract Type | Specifies the type of contract as, Contract Fixed, Contract Not to Exceed, Time and Material or Contract Fixed – AIA. Note the contract type is only used for filtering. |
| Contract Sell Price | Specifies the sales price involved with the contract. |
| Use Project Material Planning | Specifies if you want to use Project Material Planning for the project. |
| Project Est. Start Date | Specifies the estimated date for the project to get started. |
| Project Est. Completion Date | Specifies the estimate date for project to get completed. |
| Project Class | Specifies the class of the project it belongs to: Master Project, Sub Project, Change Order, Extra Work, Proposed, Template, Work Order, Change Request |
| Sub-Level to Project No. | Specifies the parent/master project, if any, of the project card you are on. |
| Seach Description | Specifies an additional description of the project for searching purposes. |
| Exclude from Project Forecast | Specifies if you want to exclude the project from the creation of project forecast, any calculations to the master project if it’s a sub-level project, and from the Percent of Completion report. |
| Manager | Specifies the unique no. of the manager assigned the project. |
| Manager Name | Specifies the name of the manager as per the Manager No. defined above. |
| Estimator | Specifies the unique no. of the estimator assigned to the project. |
| Estimator Name | Specifies the name of the estimator as per the Estimator defined above. |
| Default Project Retention | Specifies the default retention percentage for the project, if any. Note this value is used on the initial Progress Billing and Subcontract. |
| Manager Project Status | Specifies the status of the Project as per manager: Estimating, Quoting, Verbal Approval, Approval, Planning, Running, Hold, Completed, Billed, Paid, and Closed. |
| Project Status Date | Specifies the date of the manager status changed above. |
| WIP Method | Specifies the WIP Method. ***NOTE: ProjectPro do not use the BC Standard WIP Process*** |
| WIP Posting Date | Specifies the WIP Posting Date. ***NOTE: ProjectPro do not use the BC Standard WIP Process*** |
| DFR Nos. | Specifies the DFR Nos. of the Project. |
| Customer No. | Specifies the number of the customer who will receive the products and be billed by default. |
| Customer Name | Specifies the name of the customer who will receive the products and be billed by default. |
| Address | Specifies the address where the customer is located. |
| Address 2 | Specifies the additional address information. |
| City | Specifies the city of the customer. |
| State | Specifies the state, province, or county of the address. |
| Zip Code | Specifies the Zip code. |
| Country/Region Code | Specifies the country or region of the address. |
| Contact No. | Specifies the number of the contact person that the sales document will be sent to. |
| Phone No. | Specifies the telephone number of the contact person that the sales document will be sent to. |
| Mobile Phone No. | Specifies the mobile telephone number of the contact person that the sales document will be sent to. |
| Specifies the email address of the contact person that the sales document will be sent to. | |
| Contact | Specifies the name of the person to contact at the customer. |
| External Document No. | Specifies a document number that refers to the customer’s or vendor’s numbering system. |
| Your Reference | Specifies the customer’s reference. The content will be printed on sales documents. |
| Person Responsible | Specifies the person at your company who is responsible for the project. |
| Resp. Name | Specifies the name of the person responsible based on above field’s selection. |
| Blocked |
Specifies that the related record is blocked from being posted in transactions, for example a customer that is declared insolvent or an item that is placed in quarantine. The options are:
|
| Last Date Modified | Specifies when the project card was last modified. |
| Cust. PO No. | Enter the customer’s purchase order number for the Project. |
| Cust. Project No. | Enter the customer’s project no. if available. Prints on the AIA Forms. |
| Delivery Instructions | Specifies the description of the Delivery Instructions for Project Material Planning. |
| Project Type | Enter type of Project: Commercial, Government, Residential, or Service. Project Types are part of Project Posting Groups. These are user defined codes. (See Project Setup) |
| Gen. Prod. Posting Group | Mention the product posting group in which you want posting |
| Gen. Bus. Posting Group | Mention the Business posting group in which you want posting |
| Locked Planning Lines Exist | Specifies if there are any locked project planning lines exists for the project. |
| Project Manager ID | Specifies the ID of person who is assigned to manage the project. |
| Field Manager ID | Specifies the ID of the person who is assigned as the field manager of the project. |
| Project Purchaser | Specifies the purchaser assigned to the project |
| Project Purchaser Name | Specifies the name of purchaser assigned to the project. |
| Forecast Method | Specifies the Forecast Method to be used for the Project, either based on Tasks, Segments or Task Totals. Once the forecast is created/ made modifications, you will not be allowed to change the method. |
| Forecast to Include Sub Levels | Specifies if you want to include the value of the sub-level projects in the master project while performing project forecast. |
| No. of Active Crews | Specifies the number Crews linked to the that are active. |
| No. of Inactive Crews | Specifies the number Crews linked to the that are inactive. |
| Opportunity | Specifies the linked Opportunity No., if any. See BC CRM feature for details. |
| Use Project Planning Line Entries | If this is “On”, then Progress Billings will use the G/L Account during the make “Project Sales Invoice”. If this is “Off”, then the Project Posting Group Revenue Account is used. |
| Color (VJS) | Specifies the color to be used for the project on the Visual Project Scheduler. |
Project Address Fast Tab

| FIELDS | DESCRIPTION |
| Ship-to Code | Select location code for Project site to specify address. |
| Project Address 1 | Specifies the address of the project site. If Ship-to Code is selected, then the details will get updated from there. |
| Project Address 2 | Specifies the additional details of the address. |
| Project City | Specifies the city of the address. |
| Project State | Specifies the state, province, or county of the address. |
| Project Contact | Specifies the name of the contact person for the project. |
| Project Phone | Specifies the contact phone number on project site. |
| Project Zip Code | Specifies the Zip Code. |
| Project Country | Specifies the Country of the address. |
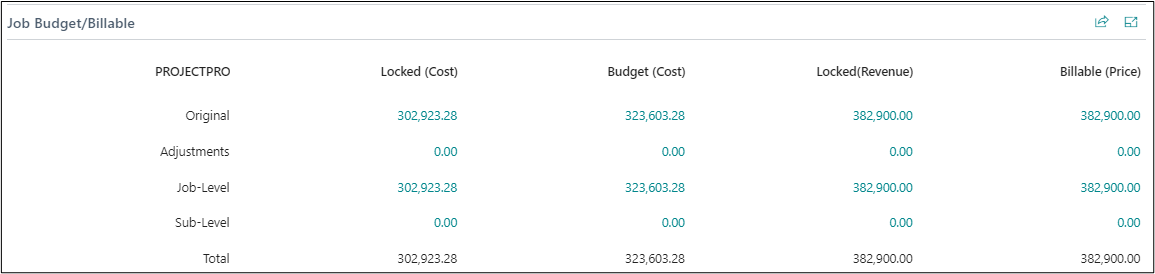
Project Budget/Billable Fast Tab
It shows the statistics of the project for defining the locked and variable Budgeted and Billable values in terms of Original, Adjustments, Project-Level, Sub- Level.
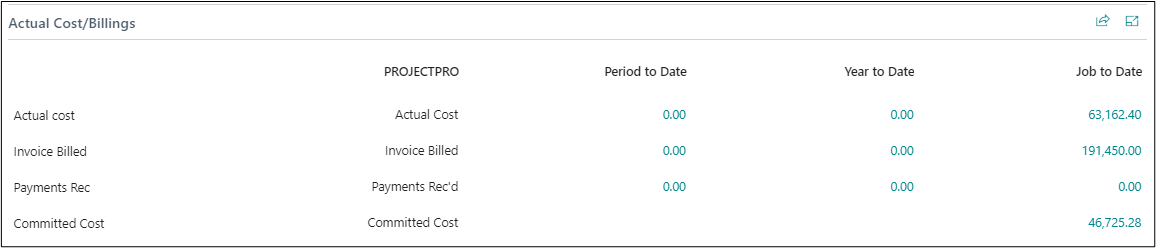
Actual Cost/Billings Fast Tab
It provides you with the statistics of the Project Status what is the actual cost incurred, invoice billed, payment received and committed cost of a project during different periods.
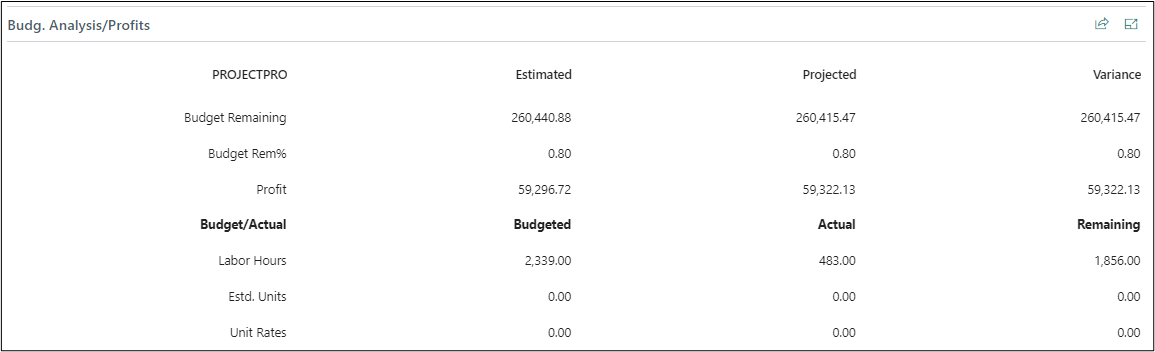
Budget Analysis/Profits Fast Tab
It provides you with an insight into analysis of project budgets defined into Estimated vs Projected along with their Variance and the budget profits into Budget vs Actual along with their Remaining cost.
Constants/Manager Fast Tab

| FIELDS | DESCRIPTION |
| Completion Date | Specifies the Date when the Project is going to be completed, this is automatically updated when the Project status is changes. |
| Project Calendar Code | Select Project Calendar Code, if applicable. By default, this gets updated from the Projects Setup, if defined. |
| Status | Specifies the current status of the project as Open, Planning, Quote or Completed. You can change the status of the project as it progresses. Final calculations can be made on completed projects. |
| Revenue Recognized | Specifies if the revenue of the project is recognized. This is auto set to true when the Project Status is marked as Completed. You can modify this Boolean if you have access to “Modify Revenue Recognized Project” on the User Setup. |
| Tax Liable | Specifies if tax is liable to the project or not. |
| Tax Group Code | Specifies the tax group code for the project. |
| Tax Area Code | Select the code of the tax area that applies to the project. |
| Use Tax | Specifies if the Use Tax is applicable to the project. |
| Tax Bus. Posting Group | Specifies the VAT business posting group for the project, if applicable. |
| Line Type | Specifies the default Line Type for the Project as Budget, Billable, order Both Budget and Billable. |
| Last Run Open Project Backlog Value | Specifies the project backlog value calculated when “Open Project Backlog Batch” was run last time. It shows the difference between the “Total Contract Price” and the “Total Invoiced Price” including Master & the Sub-Level Projects based on the Projects Setup. Note: The calculation occurs only for the Projects with Status set to “Open” or “Planning”, and the “Manager Project Status” set to “Running.” |
| Last Run Open Project Backlog | Specifies the date the Open Project Backlog batch was last run. |
| Open Project Backlog Updated | Specifies if the open project backlog has been cleared for both the master and sub-level projects. This auto-sets to True, if Last Run Open Project Backlog Value field shows zero value on running the open project backlog batch. |
| Project Posting Group | Specifies the posting group that links transactions made for the project with the appropriate general ledger accounts according to the general posting setup. |
| Tax Prod. Posting Group | Specifies the VAT product posting group for the project, if applicable. |
| Allow Budget/Billable Lines | Specifies if you can add planning lines of either with type Budget or with type Billable to the project. |
| Use % Billing Format | Specifies if you want to Use % Billing Format for the progress billing and sales invoice reports analysis. |
| Progress Billing No. | Specifies the Progress Billing No. assigned to this project. Note: when creating a progress billing you are prompted whether to update the Project Card with this information. |
| Progress Billing CO | Specifies if the Progress Billing should be considered a Change Order in AIA and Progress Invoice Reports |
| WIP Method | Specifies the WIP Method. ***NOTE: ProjectPro do not use the BC Standard WIP Process*** |
| WIP Posting Method | Select the WIP posting method as: Per Project, or Per Project Ledger Entry ***NOTE: ProjectPro do not use the BC Standard WIP Process*** |
| Project Posting Date | Specifies the date of the last posted transaction. |
| Recognition Date | Specifies the date of last time the revenue recognition was calculated for the project. |
| Time and Material | Specifies if the project is Time & Material based. Turning this ON will auto set the fields “Line Type” with option “Both Budget and Billable” and mark “Apply Usage Link” as True. |
| Indirect Burden Type | Specifies the type of indirect burden that will be applied to the project as Service or Admin. If Admin, then no indirect burden value will be applied. |
| Requires Certified Payroll | Specifies if the project requires certified payroll reporting. Typically, this would be when a government or state funds a project, a special payroll report may be required to confirm that proper wages and benefits were paid to employees. Note that this is a filter of which projects require certified payroll reporting. |
| Unit of Measure | Specifies the unit of measure for work units. |
| Apply Usage Link | Specify if usage entries from the project journal or purchase line are linked to project planning lines. Select this check box if you want to be able to track the quantities and amounts of the remaining work needed to complete a project and to create a relationship between demand planning, usage, and sales. On a project card, you can select this check box if there are no existing project planning lines that include type Budget that have been posted. The usage link only applies to project planning lines that include type Budget. |
| % Overdue Planning Lines | Specifies the percentage of the project’s planning lines where the planned delivery date has been exceeded. |
| Forecast Type | Specifies the forecast type |
| Billing Day of Month | Specifies which day of the month this project should be billed. |
Rev Rec POC Calculation Fast Tab
See Revenue Recognition chapter in the same module for further details.

| FIELDS | DESCRIPTION |
| POC Method | Specifies the Percent of Completion method you assign for Revenue Recognition of your project. The different methods available are: Blank, Budget to Actual Cost, Project Forecast, Manual Project%, Units Complete, Markup %, Gross Margin %. |
| POC Method Value | The POC Method Values will vary based on which POC method is selected. |
| Total Units | Specifies the Total Units that are used for base calculation of POC |
| % Project Actually Complete | Specifies the actual percentage of the project completion while project is open. |
| Project Completed % Date | Specifies the date on which the project completed percentage is updated. |
| Actual Units Complete | Specifies the actual unit complete of the Project |
| Units Completed % Date | Specifies the actual unit complete date of the Project |
| % Completed | This represents actual cost divided by budgeted cost without an as of date filter. |
| % Invoiced | Specifies the percentage of the project’s invoice value that has been posted as invoiced without an as of date filter. |
| POC Method Value Date | Specifies the Percent of Completion method you assign for Revenue Recognition of your project. The different methods available are: Blank, Budget to Actual Cost, Project Forecast, Manual Project%, Units Complete, Markup %, Gross Margin %. |
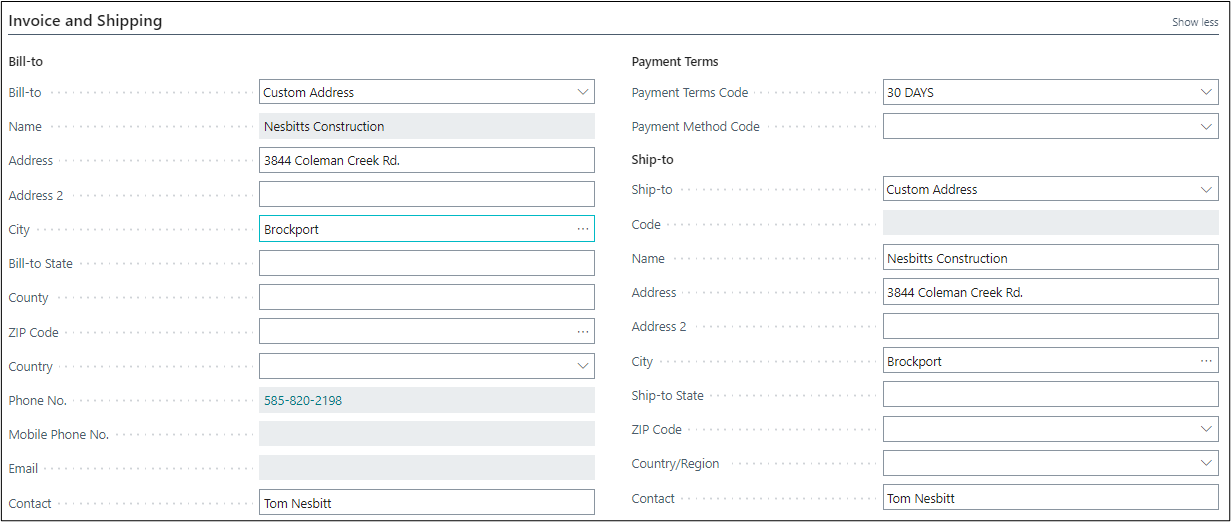
Invoice and Shipping Fast Tab
| FIELDS | DESCRIPTION |
| Bill-to | Specifies the customer that the sales invoice will be sent to. Default (Customer): The same as the customer on the sales invoice. Another Customer: Any customer that you specify in the fields below. |
| Name | Specifies the name of the customer who pays for the project. |
| Address | Specifies the address of the customer to whom you will send the invoice. |
| Address 2 | Specifies an additional line of the address. |
| City | Specifies the city of the address. |
| Bill-to State | Specifies the State code of the customer’s billing address. |
| County | Specifies the value for County. |
| ZIP Code | Specifies the ZIP Code of the customer who pays for the project. |
| Country | Specifies the country/region code of the customer’s billing address. |
| Phone No. | Specifies the telephone number of the customer contact person for the project. |
| Mobile Phone No. | Specifies the mobile telephone number of the customer contact person for the project. |
| Specifies the email address of the customer contact person for the project. | |
| Contact | Specifies the name of the contact person at the customer who pays for the project. |
| Payment Terms Code | Specifies a formula that calculates the payment due date, payment discount date, and payment discount amount. |
| Payment Method Code | Specifies how to make payment, such as with bank transfer, cash, or check. |
| Ship-to | Specifies the address that the products on the sales document are shipped to. Default (Sell-to Address): The same as the customer’s sell-to address. Alternate Ship-to Address: One of the customer’s alternate ship-to addresses. Custom Address: Any ship-to address that you specify in the fields below. |
| Code | Specifies the code for another shipment address than the customer’s own address, which is entered by default. |
| Name | Specifies the name that products on the sales document will be shipped to. |
| Address | Specifies the address that products on the sales document will be shipped to. |
| Address 2 | Specifies additional address information. |
| City | Specifies the city of the customer on the sales document. |
| Ship-to State | Specifies the state, province, or county of the address. |
| ZIP Code | Specifies the ZIP code. |
| Country/Region | Specifies the customer’s country/region. |
| Contact | Specifies the name of the contact person at the address that products on the sales document will be shipped to. |
Duration Fast Tab

| FIELDS | DESCRIPTION |
| Starting Date | Specifies the date on which the project actually starts. |
| Creation Date | Specifies the date on which you set up the project. |
| Ending Date | Specifies the date on which the project is expected to be completed. This gets updated when the “Project Status” is set to “Completed”. |
Foreign Trade Fast Tab

| FIELDS | DESCRIPTION |
| Currency Code | Specifies the currency code for the project. By default, the currency code is empty. If you enter a foreign currency code, it results in the project being planned and invoiced in that currency. Note: You cannot change the currency code of a project once planning lines or project ledger entries exists for a project. |
| Invoice Currency Code | Specifies the currency code you want to apply when creating invoices for a project. By default, the invoice currency code for a project is based on what currency code is defined on the customer card. |
| Exch. Calculation (Cost) |
Specifies how project costs are calculated if you change the Currency Date or the Currency Code fields on a project planning Line or run the Change Project Planning Line Dates batch project.
|
| Exchange Calculation (Price) |
Specifies how project sales prices are calculated if you change the Currency Date or the Currency Code fields on a project planning Line or run the Change Project Planning Line Dates batch project.
|
Foreign Prepayment Fast Tab
Here you can define the Prepayment Parameters of a Project.

| FIELDS | DESCRIPTION |
| Prepayment % | Specifies the Prepayment % of the Project to calculate the Prepayments |
| Prepayment Amount | Specifies the Prepayment Amount of the Project, here user can even enter the prepayment amount manually. |
| Prepmt. Contract Amount | Specifies the prepayment contract amount. |
| Compress Prepayment | Specifies that prepayments on the projects are combined if they have the same general ledger account for prepayments or the same dimensions. |
| Prepmt. Payment Term Code | Specifies the Payment Term Code, to calculate the Prepayment Payment Due Date. |
| Prepmt. Payment Discount % | Specifies the Prepayment Term Code, to calculate the Prepayment Payment Discount. |
| Prepayment Due Date | Specifies the Due Date for prepayment based on the Prepayment Payment Term Code defined. |
Projections Fast Tab
Provides analysis information based on Projected Costs versus Actual Costs. The Projected Costs remaining along with Projected Profit (Loss) are based on actual cost verses projected information.
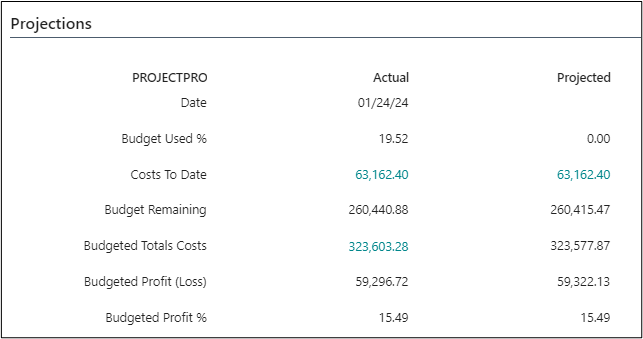
| FIELD | ACTUAL | PROJECTED |
| Date | Work Date | Last Date Percentage Completed was updated by users. |
| Budget Used % | Percentage of Actual Cost to Date / Total Budgeted Cost | Percentage Project Actually Completed from the Constants/Manager fast tab |
| Costs To Date | Actual Costs to Date | Actual Costs to Date |
| Budget Remaining | Total Budgeted Cost – Actual Cost to Date | Actual Costs to Date / (Entered Complete / 100) |
| Budgeted Total Costs | Total Budgeted Costs | Actual Costs to Date / (Actual % Complete from the Constants/Manager fast tab / 100) |
| Budgeted Profit (Loss) | Total Contract – Total Budgeted Costs | Total Contract – Projected Total Costs |
| Budgeted Profit % | Percentage of Estimated Profit (Loss) / Total Budgeted Costs | Projected Profit (Loss) / Projected Total Costs |
WIP and Recoginition Fast Tab
Provides analysis information based on A/R Retention Balances A/P Retention Balances, Work-in-process Balances, Project Costs Recognized (Expensed), Contract Billed, Over/Under Billed, and Contract Back Log.
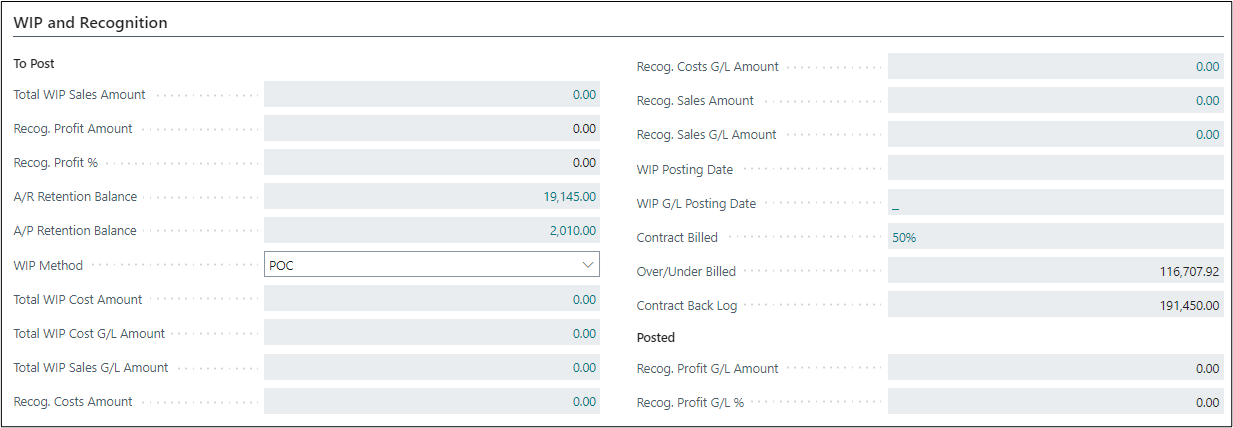
| FIELDS | DESCRIPTION |
| Total WIP Sales Amount | Specifies the total WIP sales amount that was last calculated for the project. ***NOTE: ProjectPro do not use the BC Standard WIP Process*** |
| Recog. Profit Amount | Specifies the recognized profit amount for the project. ***NOTE: ProjectPro do not use the BC Standard WIP Process*** |
| Recog. Profit % | Specifies the recognized profit percentage for the project. ***NOTE: ProjectPro do not use the BC Standard WIP Process*** |
| A/R Retention Balance | Retention Balance in Customer card for this Project. |
| A/P Retention Balance | Retention Balance in Vendor card for this Project. |
| WIP Method | Specifies the WIP Method. ***NOTE: ProjectPro do not use the BC Standard WIP Process*** |
| Total WIP Cost Amount | Specifies the total WIP cost amount that was last calculated for the project. ***NOTE: ProjectPro do not use the BC Standard WIP Process*** |
| Total WIP Cost G/L Amount | Specifies the total WIP Cost amount that was last posted to the G/L for the project. ***NOTE: ProjectPro do not use the BC Standard WIP Process*** |
| Total WIP Sales G/L Amount | Specifies the total WIP sales amount that was last posted to the general ledger for the project. ***NOTE: ProjectPro do not use the BC Standard WIP Process*** |
| Payment Method Code | Specifies how to make payment, such as with bank transfer, cash, or check. |
| Recog. Costs Amount | Specifies the recognized cost amount that was last calculated for the project. ***NOTE: ProjectPro do not use the BC Standard WIP Process*** |
| Recog. Cost G/L Amount | Specifies the total Recognized Cost amount that was last posted to the general ledger for the project. ***NOTE: ProjectPro do not use the BC Standard WIP Process*** |
| Recog. Sales Amount | Specifies the recognized sales amount that was last calculated for the project, which is the sum of the Recognized Sales Project WIP Entries. ***NOTE: ProjectPro do not use the BC Standard WIP Process*** |
| Recog. Sales G/L Amount | Specifies the total recognized sales amount that was last posted to the general ledger for the project. ***NOTE: ProjectPro do not use the BC Standard WIP Process*** |
| WIP Posting Date | Specifies the posting date that was entered when the Project Calculate WIP batch project was last run. ***NOTE: ProjectPro do not use the BC Standard WIP Process*** |
| WIP G/L Posting Date | Specifies the WIP G/L Posting Date. ***NOTE: ProjectPro do not use the BC Standard WIP Process*** |
| Contract Billed | Percent of Project to date invoice Billed/Total Contract. |
| Over/Under Billed | Invoice Price – [(Total Contract + Contract Sub-levels) * Actual Cost to Date % (up to 100%)]. |
| Contract Back Log | Total Contract – Invoice Billed Project to Date. |
| Recog. Profit G/L Amount | Specifies the profit amount that is recognized with the general ledger for the project. ***NOTE: ProjectPro do not use the BC Standard WIP Process*** |
| Recog. Profit G/L % | Specifies the profit percentage that is recognized with the general ledger for the project. ***NOTE: ProjectPro do not use the BC Standard WIP Process*** |
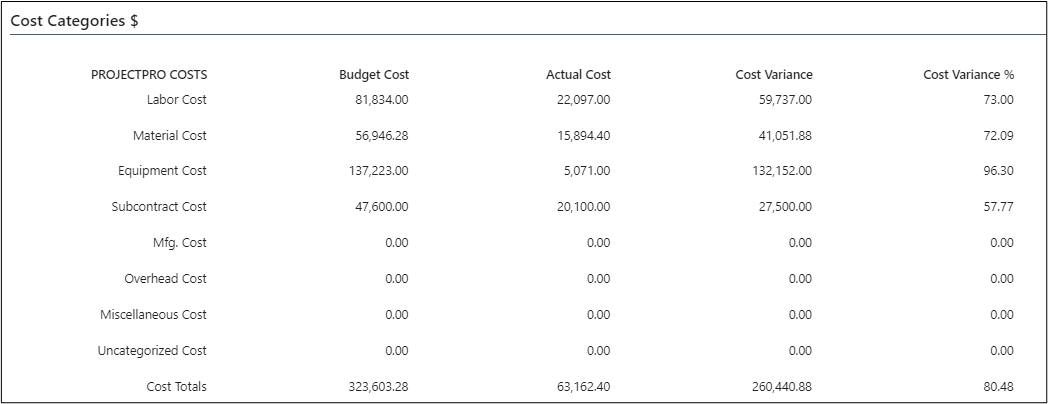
Cost Categories $ Fast Tab
Provides Cost Category Type information based on budgeted verses actual costs with variance and variance percentages. Uncategorized values are the result of information not assigned to a Cost Category Type (See Cost Category Setup).
Please note that this is not in
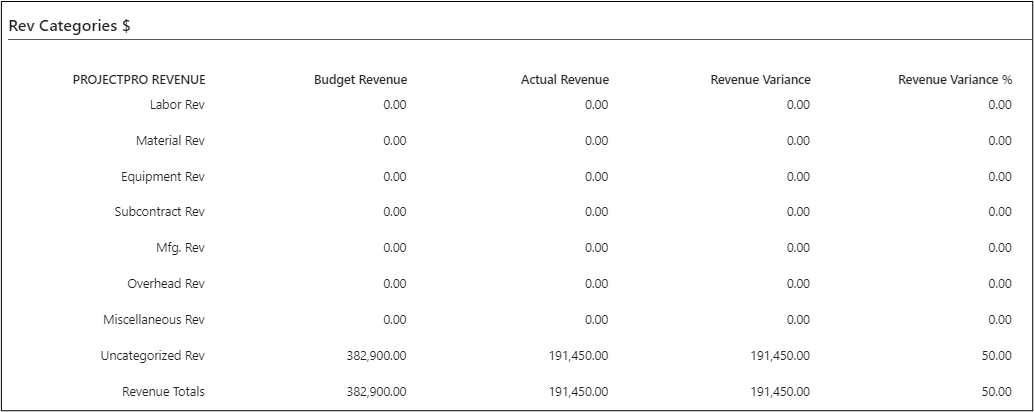
Revenue Categories $ Fast Tab
Provides Revenue Category Type information based on Contract (Budgeted Price) verses actual Project billings with variance and variance percentages. Uncategorized values are the result of information not assigned to a Revenue Category Type (See Revenue Category Setup).
Revenue Categories $ Fast Tab
Provides Revenue Category Type information based on Contract (Budgeted Price) verses actual Project billings with variance and variance percentages. Uncategorized values are the result of information not assigned to a Revenue Category Type (See Revenue Category Setup).
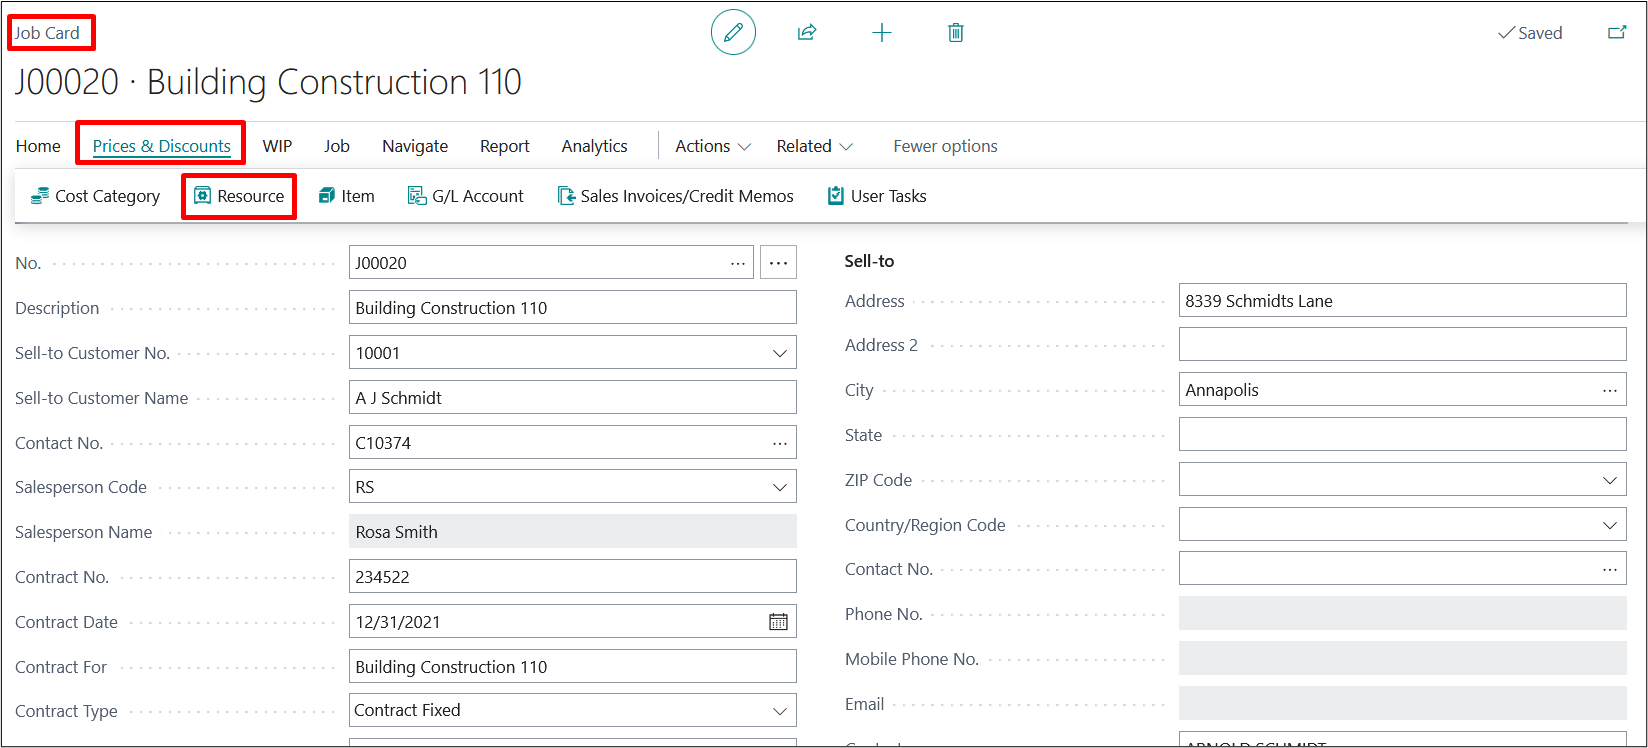
a) PROJECT RESOURCE COST/PRICE
Resources used in Projects have costs and prices. Unit prices are how much you charge customers for the resources. Dynamics-BC lets you not only set up the resource’s unit price on the resource card, but also allows you to set up alternative prices through the Resources option on the Project card.
For example, if you want to set up a specific hourly rate for a resource for a particular Project, you can set up a price for that resource and Project. The price you set up will override the price on the resource card when you use the resource for an entry in the Project journal. The following section provides instructions on how to set up alternative prices.
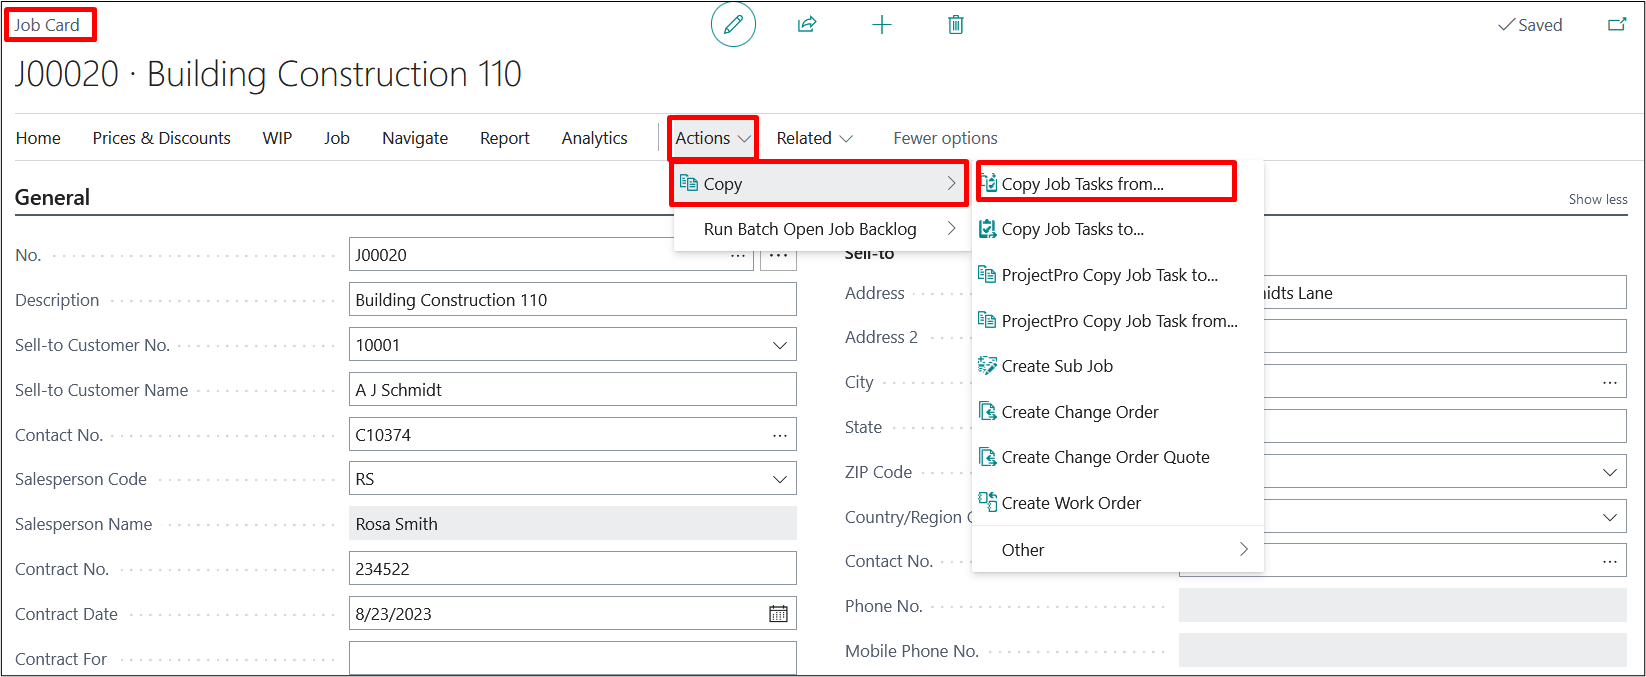
On the project card from ribbon, Prices & Discounts à Resource
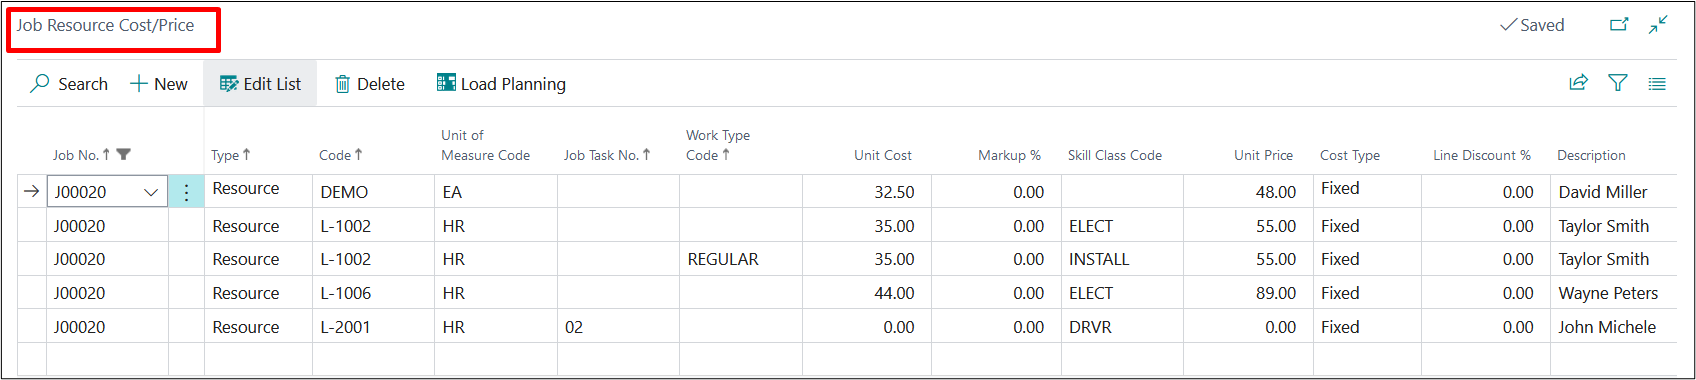
| FIELDS | DESCRIPTION |
| Project No. | This field contains the number of the project to which this resource price applies. The program fills in the number automatically. |
| Type | In this field you choose whether the price you are setting up for the project should apply to a resource, to a resource group, or to all resources and resource groups. |
| Code | This field contains the description of the resource, or resource group, you have entered in the Code field. |
| Unit of Measure Code | |
| Project Task No. | If the resource price should only apply to a specific project task, you can enter the number of that project task in this field. To see the available project tasks on the project, click the Assist Button to the right. |
| Work Type Code | If the price you are setting up applies to a specific work type, select the work type code in this field. Click the Assist Button in the field to see the available Work Type Codes. |
| Unit Cost | It defines the cost of the resource that is auto picked in case defined at the resource card |
| Mark Up % | Defines the mark up % in comparison to the cost defined at the PP unit cost |
| Skill Class Code | Mention the Skill Class Code if any |
| Unit Price | This field contains the sales price that applies to this line. This price is in the currency represented by the code in the Currency Code field on this line. Note: If the unit price is zero and you want the unit price of zero to apply for this resource, or resource group, you must place a check mark in the Apply Project Price field. |
| Cost Type | Fixed, % Extra, LCY Extra |
| Line Discount % | Specifies a line discount percent that applies to this resource, or resource group. This is useful, for example if you want invoice lines for the project to show a discount percent. |
| Description | This field contains the description of the resource, or resource group, you have entered in the Code field. |
Repeat these steps as many times as you need to set up all applicable resource prices.
b) APOS Definition
APOS stands for Activity à Processà Operationsà Sections, which means we can categorize the Tasks in a Project by these four levels to create any Task in the Task Lines we need to choose a Task and for that we can further choose the Tasks codes which are required to accomplish that Task, once we selected the Task Code as an Activity, we can select the Process Code, Process are required to accomplish the Activity, we can further choose the Operations which are required to accomplish the Process, once the Operations has been selected we can further choose the sections for the Operation selected,
Apos are basically the different levels for the Task Selected in Terms of Process, Operations & Sections.
c) Setup For Defining the APOS
d) Projects Setup
Under is a Setup to define the APOS and for that user need to search the “Projects Setup” and in Projects Setup and under the “General” fast tab there is a Boolean setup by the name “Enable User-Defined Task Type Caption”, which Specifies user to change Captions of Task Types, i.e., Activities, Process, Operation and Section.
Users need to make this Boolean as “True” after that we can define the Task Types.

To define the Apos codes we need to Create the setup for the creation of the APOS codes and for that user need to search the “Task Type Setup” in the global search column.as shown in the screen shot below.

Once we click on the result “Task Type Setup” page will open, where we can customize the APOS as per our requirements.
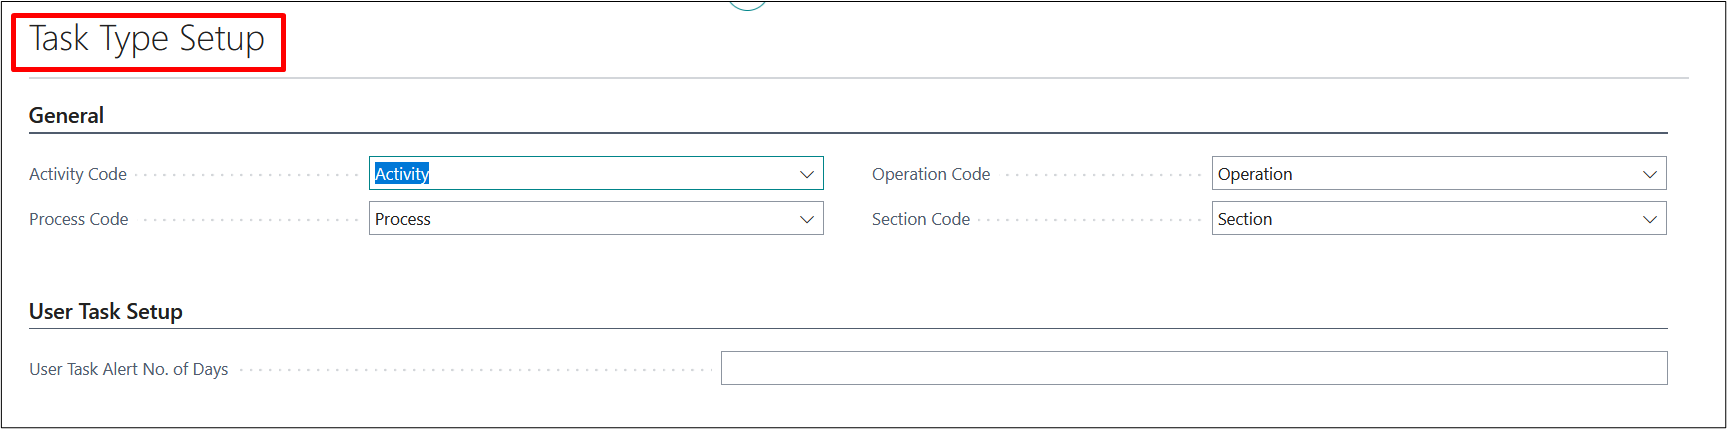
Now if we want to customize the “Apos” then we must click on the drill down option of the “Activity Code” and select the “NEW” Option.

Once we click on “New”, now we can create the “New Activity Code” here.
in below screen shot a new “Activity Code” has been created and to apply that we need to click on “OK”.
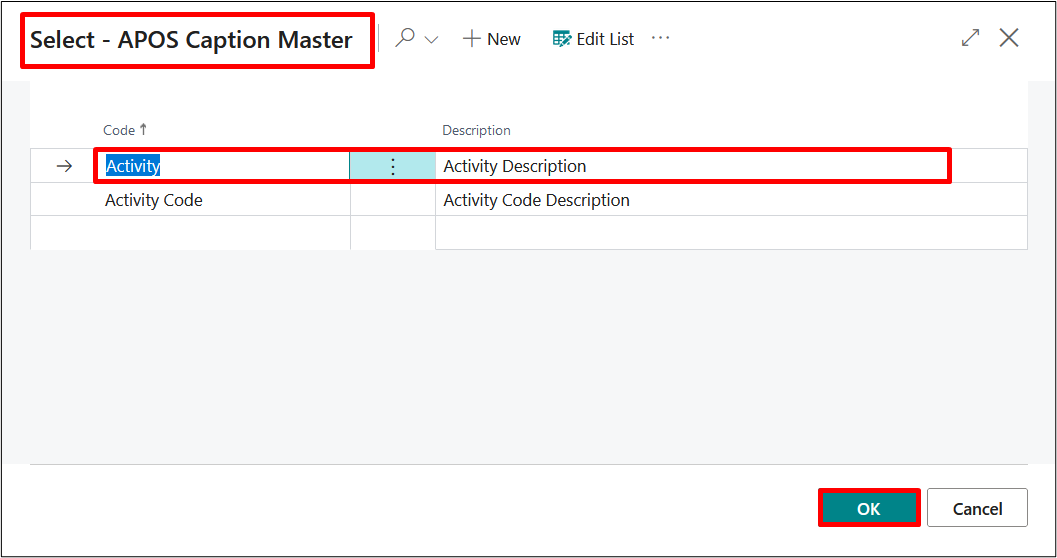
Once we click on “OK” the created Activity Code will be selected as the default while we create the New Task Line and select the Task in Activity Code.
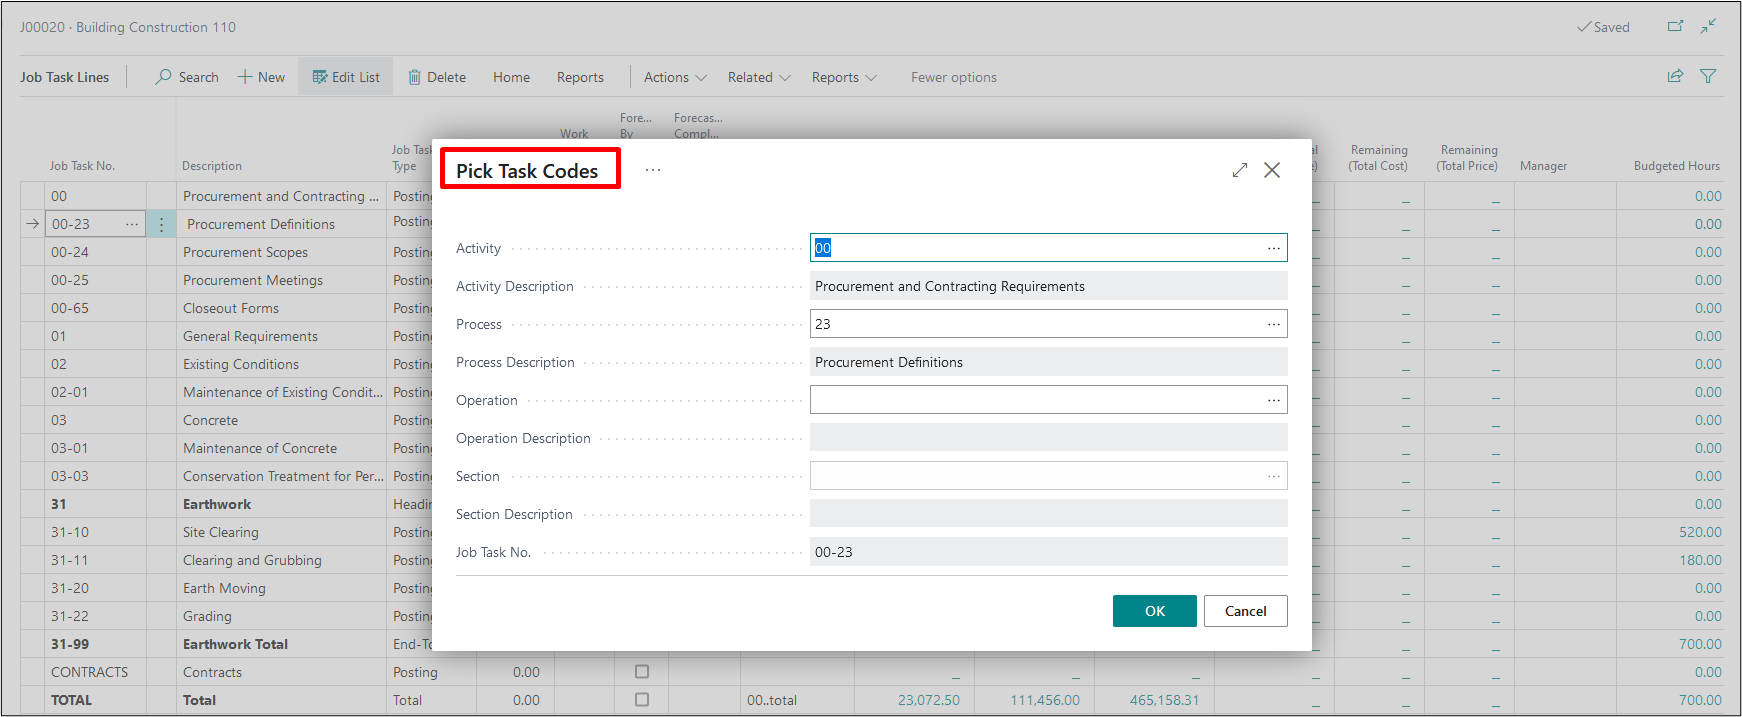
For that we need to open a Project and then click on Process à Project task Lines and by clicking on the three dots – “(…)” we will notice the Activity Code is now coming by the Customized name as Plastering.
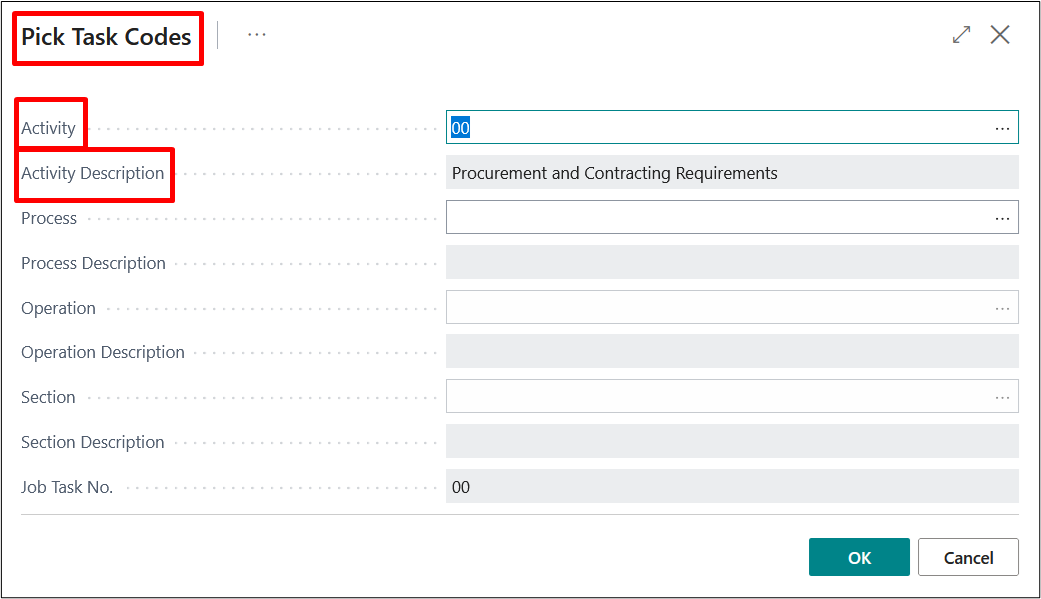
In the above screen shot “Pick Task Codes” has been highlighted because the caption of that was “Pick APOS Codes” which has been changed to “Pick Task Codes”.
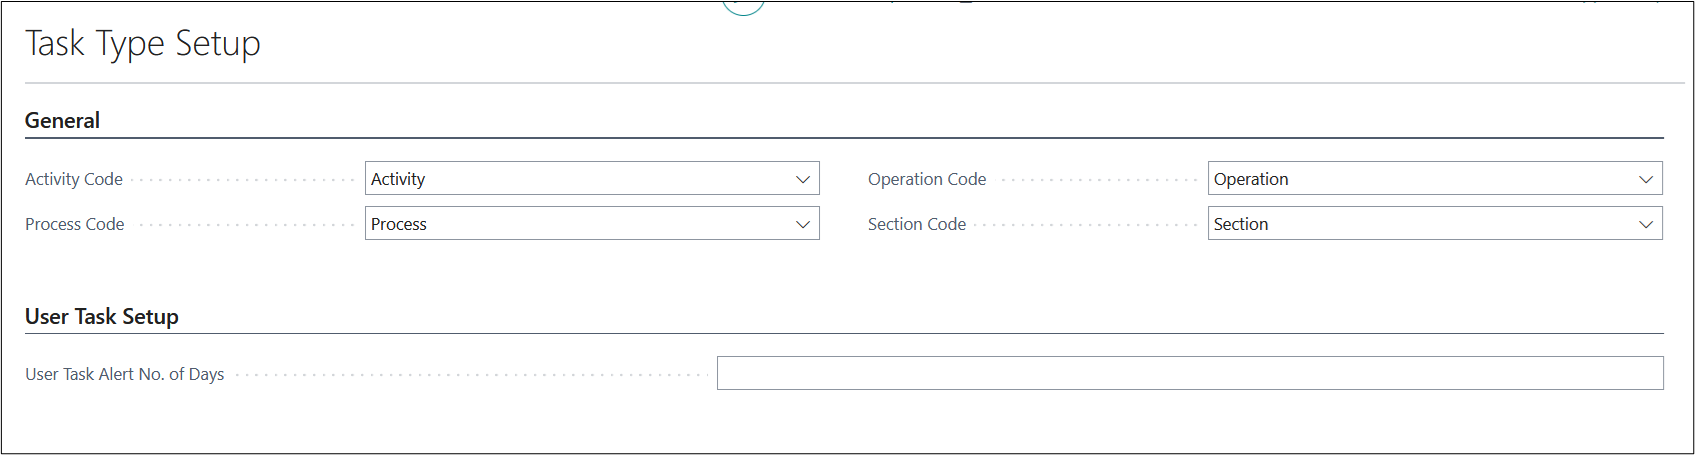
To change the Process, Operation, Section codes we need to follow the same process as in below screen shot, we have demonstrated the Changed APOS Codes.
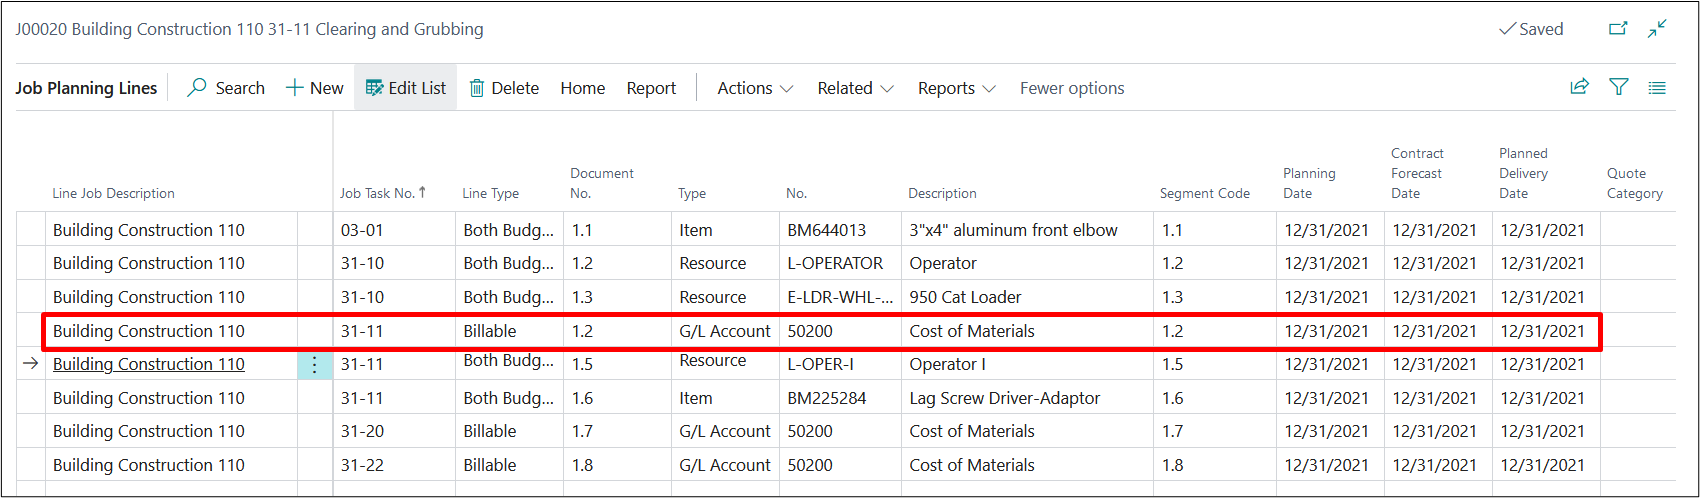
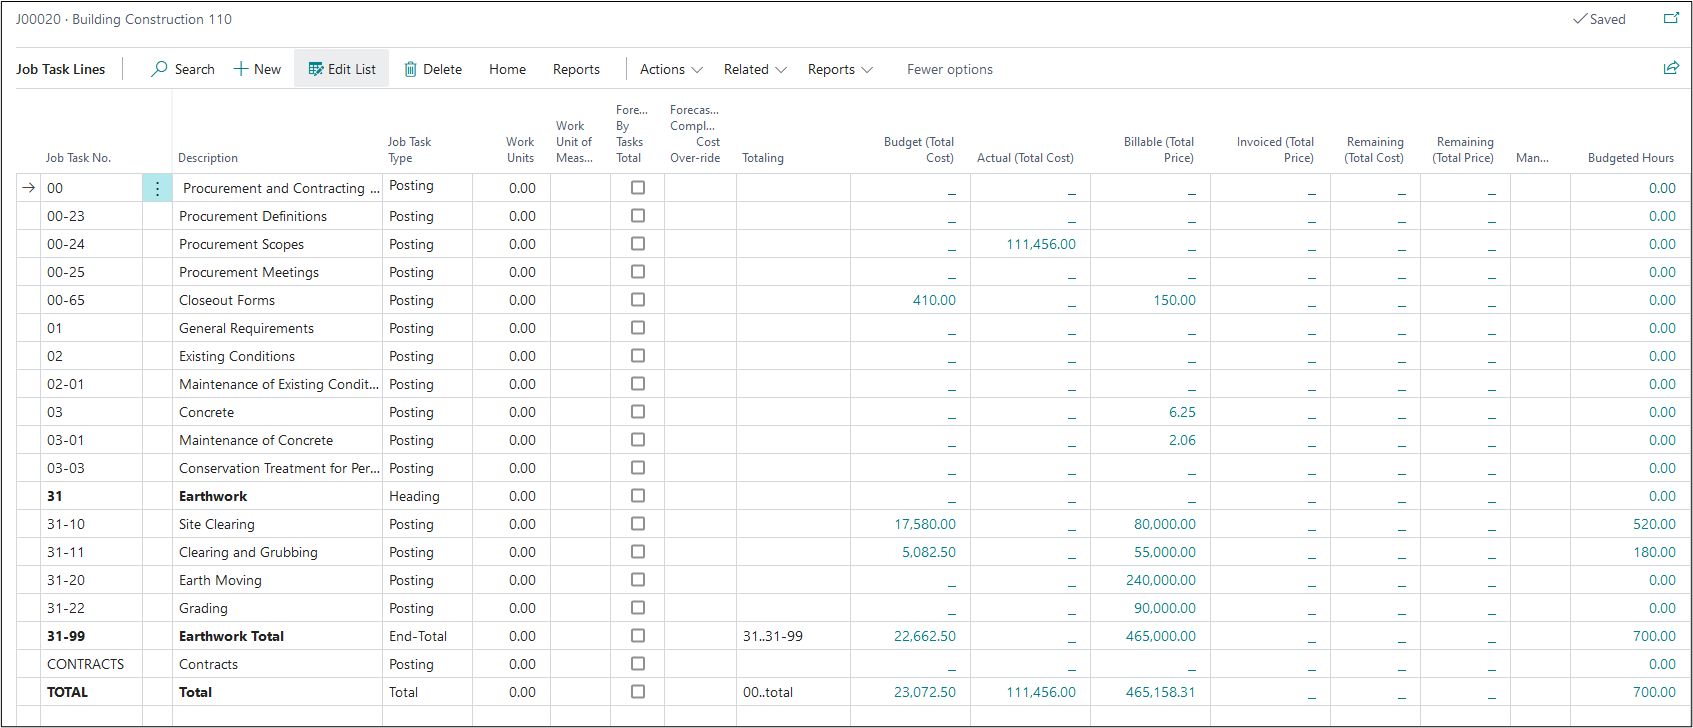
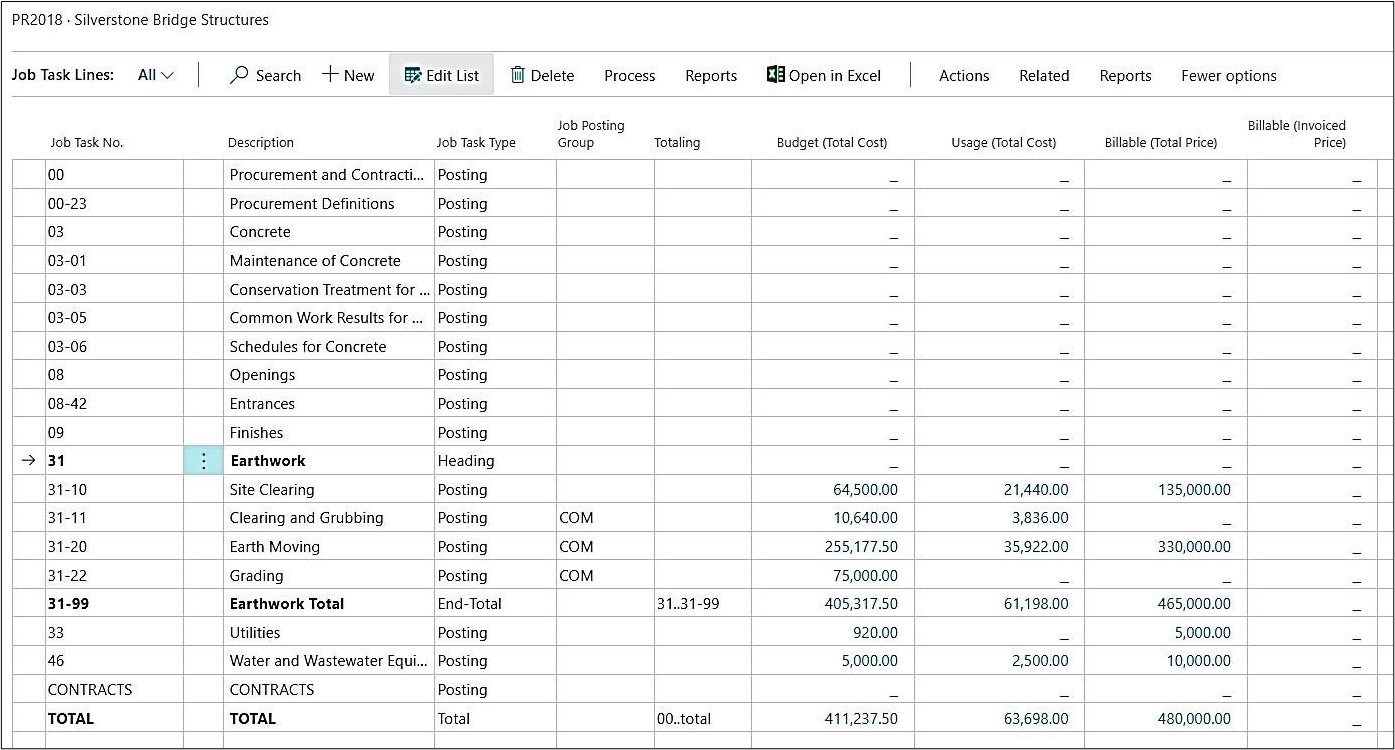
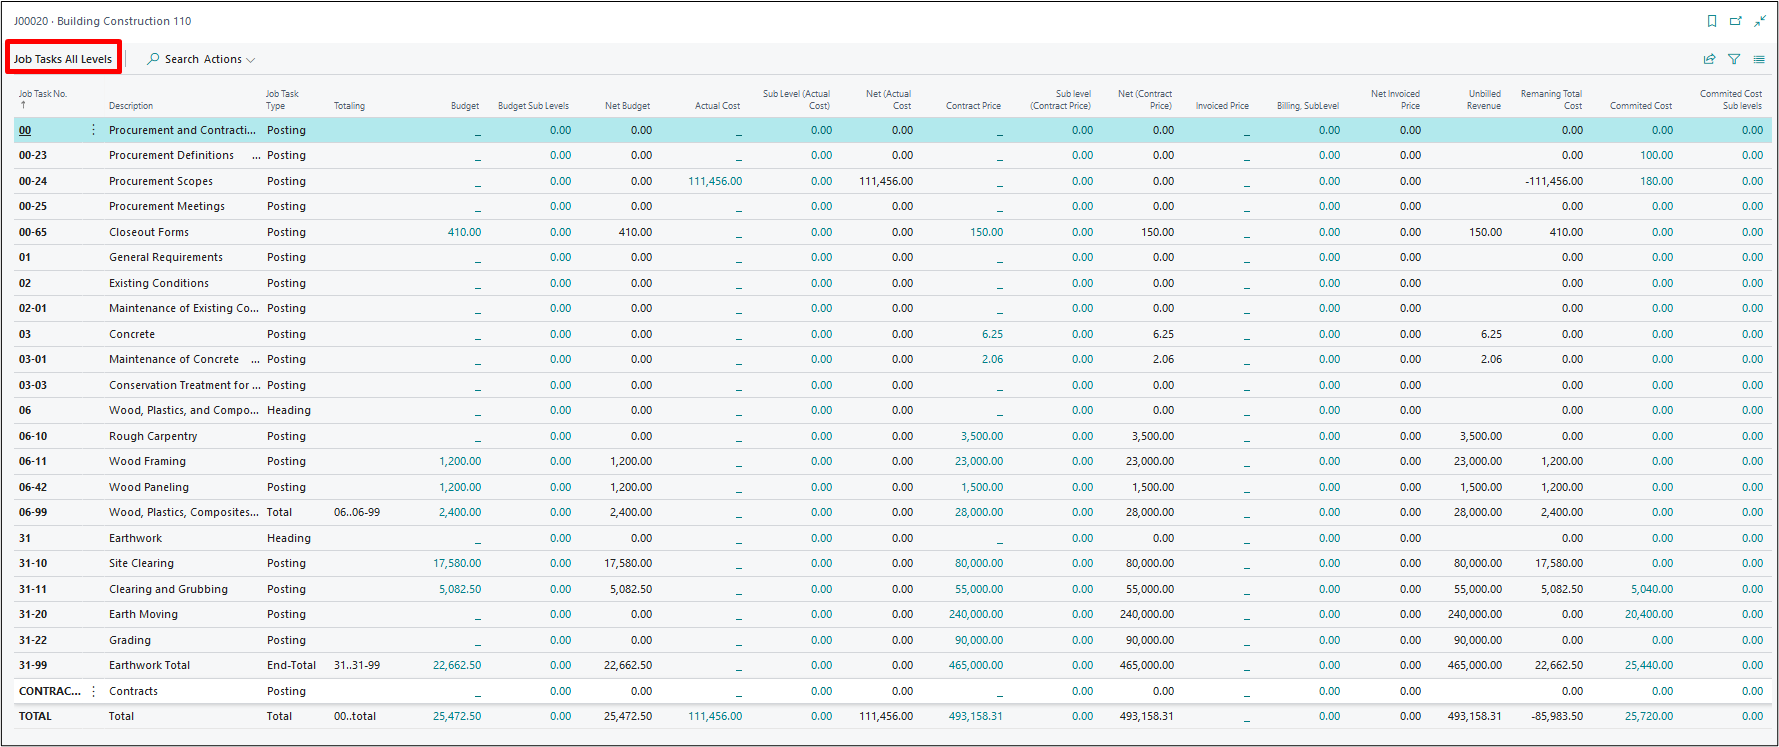
e) PROJECT TASKS (PROJECT COST/REVENUE CODES)
Project Tasks represent Cost Budgets and Contract Revenues that contain detailed Planning Lines. They are organized by Activity, Process, Operation, and Section codes.
If you are using the percentage or completion recognition method, you must set up a Project Task with both Budgeted Costs and Contract Revenues.
A Cost Budget provides the basis for comparison of the actual usage as recorded through the Project journal, thus providing the basis to determine the completion of the Project. Therefore, to fully benefit from the Project options, we recommend that you use Cost Budgets for all Projects regardless of the WIP method you use. Recording actual usage against a Cost Budget and observing any differences and variances improves the quality of any Cost Budget and estimates for future Projects, reducing the risk of underestimating the overall cost.
Before you create a Cost Budget it is recommended that you divide the Project into clearly defined activities, each activity into processes and each process into operations. The number of activities, processes, and operations you should define is determined by the detail to which you want to be able to compare the Cost Budgets against actual figures. The activities, processes and operations defined become Project Task Lines.
EXAMPLE:
Here is an example of a Project Task Line for site work at construction Project:
Activity 02000 – Site Requirements
Process 02300 – Earthwork
Operation 02315 – Excavation and Fill
Operation 02330 – Embankment
Operation 02370 – Erosion and Sediment Control
Process 02800 – Site Improvements and Amenities
Activity 03000 – Concrete
Process 03100 – Concrete Forms and Accessories
Process 03200 – Concrete Reinforcement
Activity 04000 – Masonry
…and so, on
As you enter the Project Task Line, you will see that Dynamics-BC sorts the lines alphabetically in the order of the activities, processes and operations. You can override this sorting by preceding the activities, processes, and operations with a number followed by a dash (-). To get the activities in the order shown in the previous example you would enter the activities as follows:
02000 – Site Requirements
03000 – Concrete
04000 – Masonry
If you want to use activities, processes, and operations in your Project Task Line, you must set them up first. See “Maintaining Activities, Processes, and Operation Information” for more information.
To set up a Project Task Line, do the following:
From the Project card of the Project, you want to create a Cost Budget for, click “Project Task Lines” from process tab on ribbon.

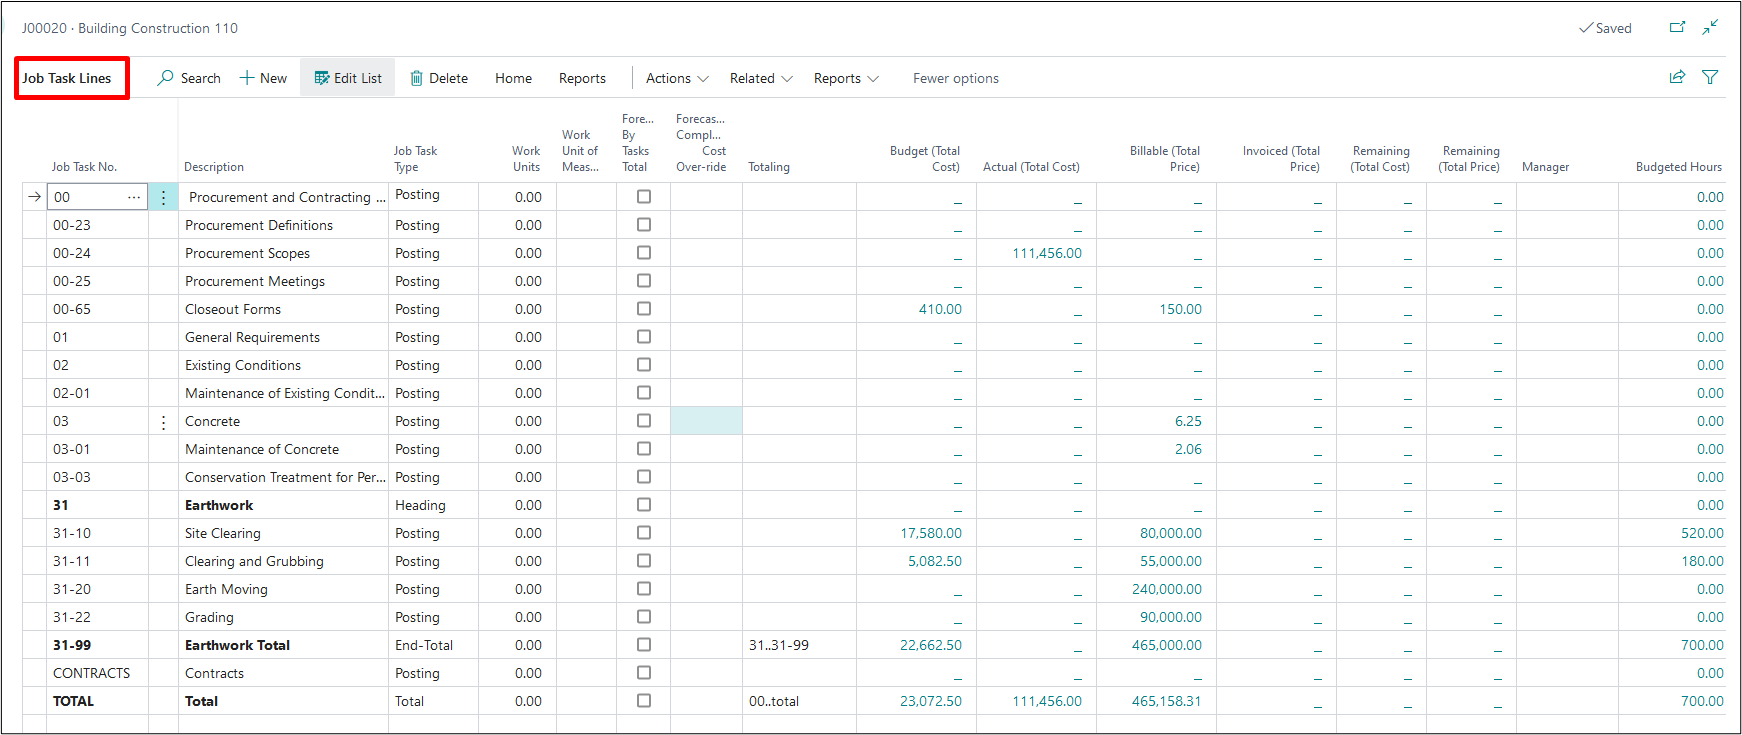
Drill into Project Task No. field
Select Activity Code, Process Code and Operation Code to create a Project Task No. Continue adding Project Task Numbers for each step in the project process. Not all levels are required but will need at least the Activity Code for a proper Project Task line.
Once each step for cost and price has been defined, to setup Cost Budget and Contract prices…click.
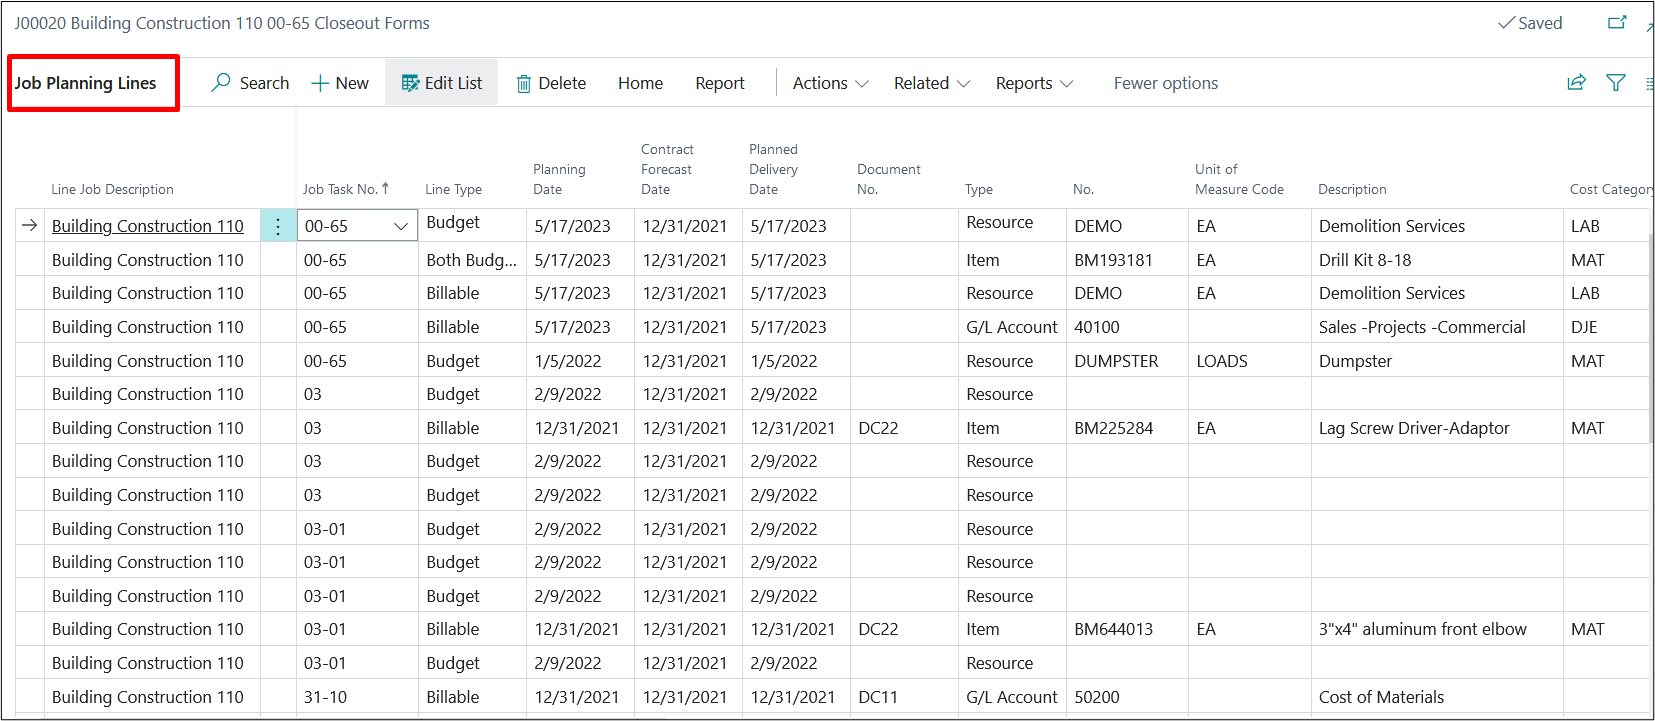
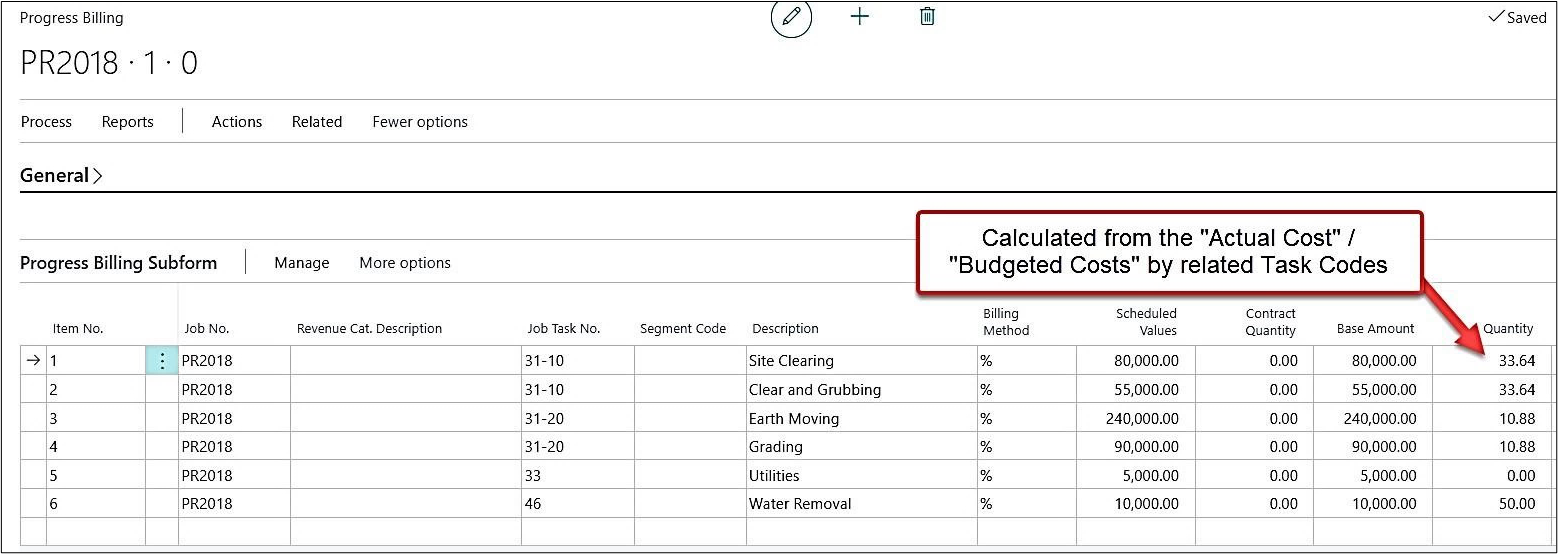
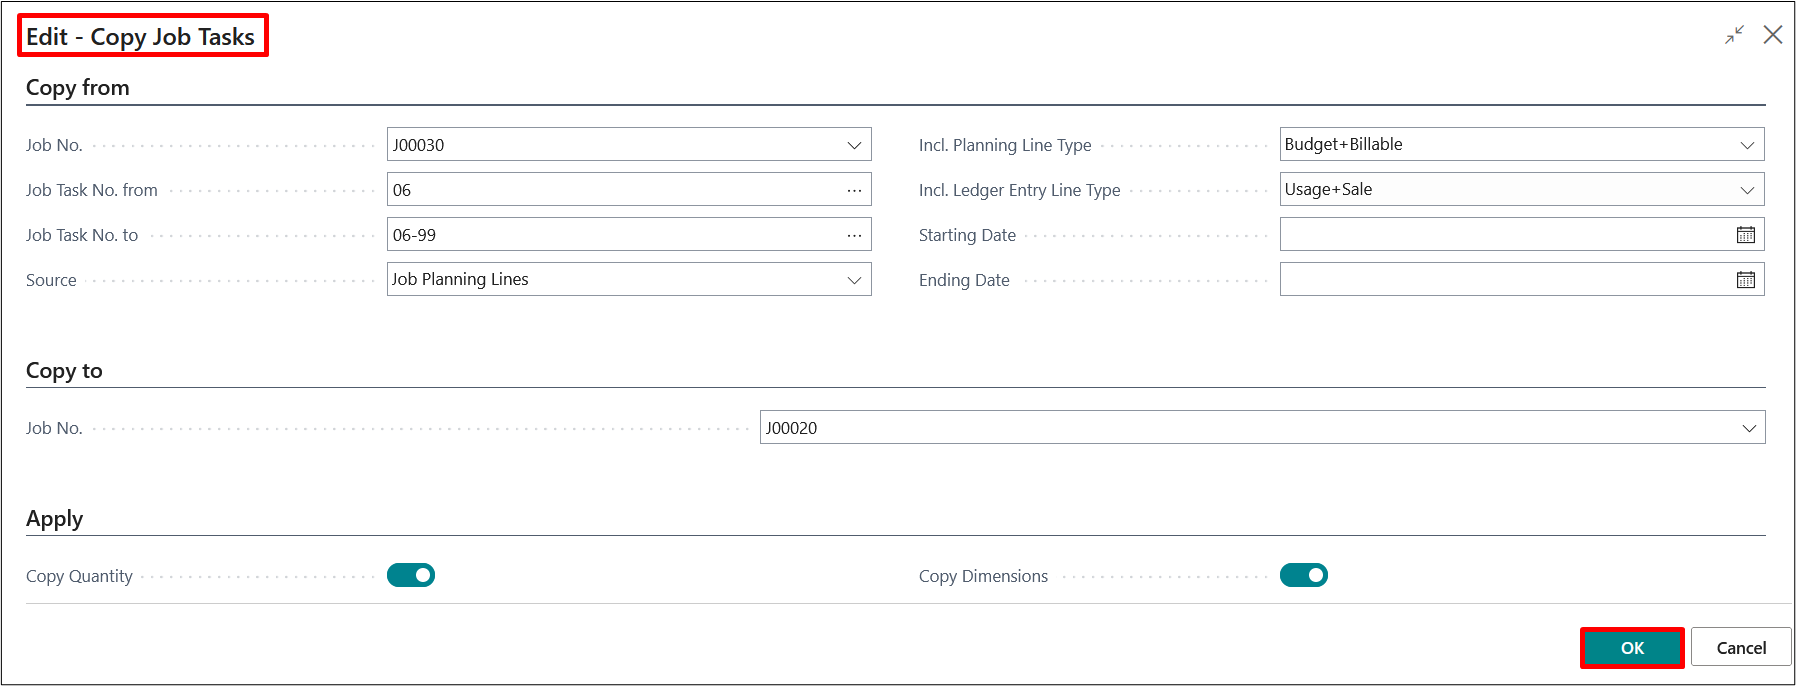
f) Project Planning Lines
This feature enables the user to define Resources, Items, and General ledgers involved and linked to the various tasks defined within the project. Many users associate this with their project budget (Budget lines) and Schedule of Values (Billable) lines.
The Project Planning lines also offer summarized information related to quantity of each line that has been transferred to an invoice, is available to invoice, has been invoiced to the customer and what has been transferred to project journals.