Ch 02 – Certified Payroll W-347 Report
Contents
INTRODUCTION
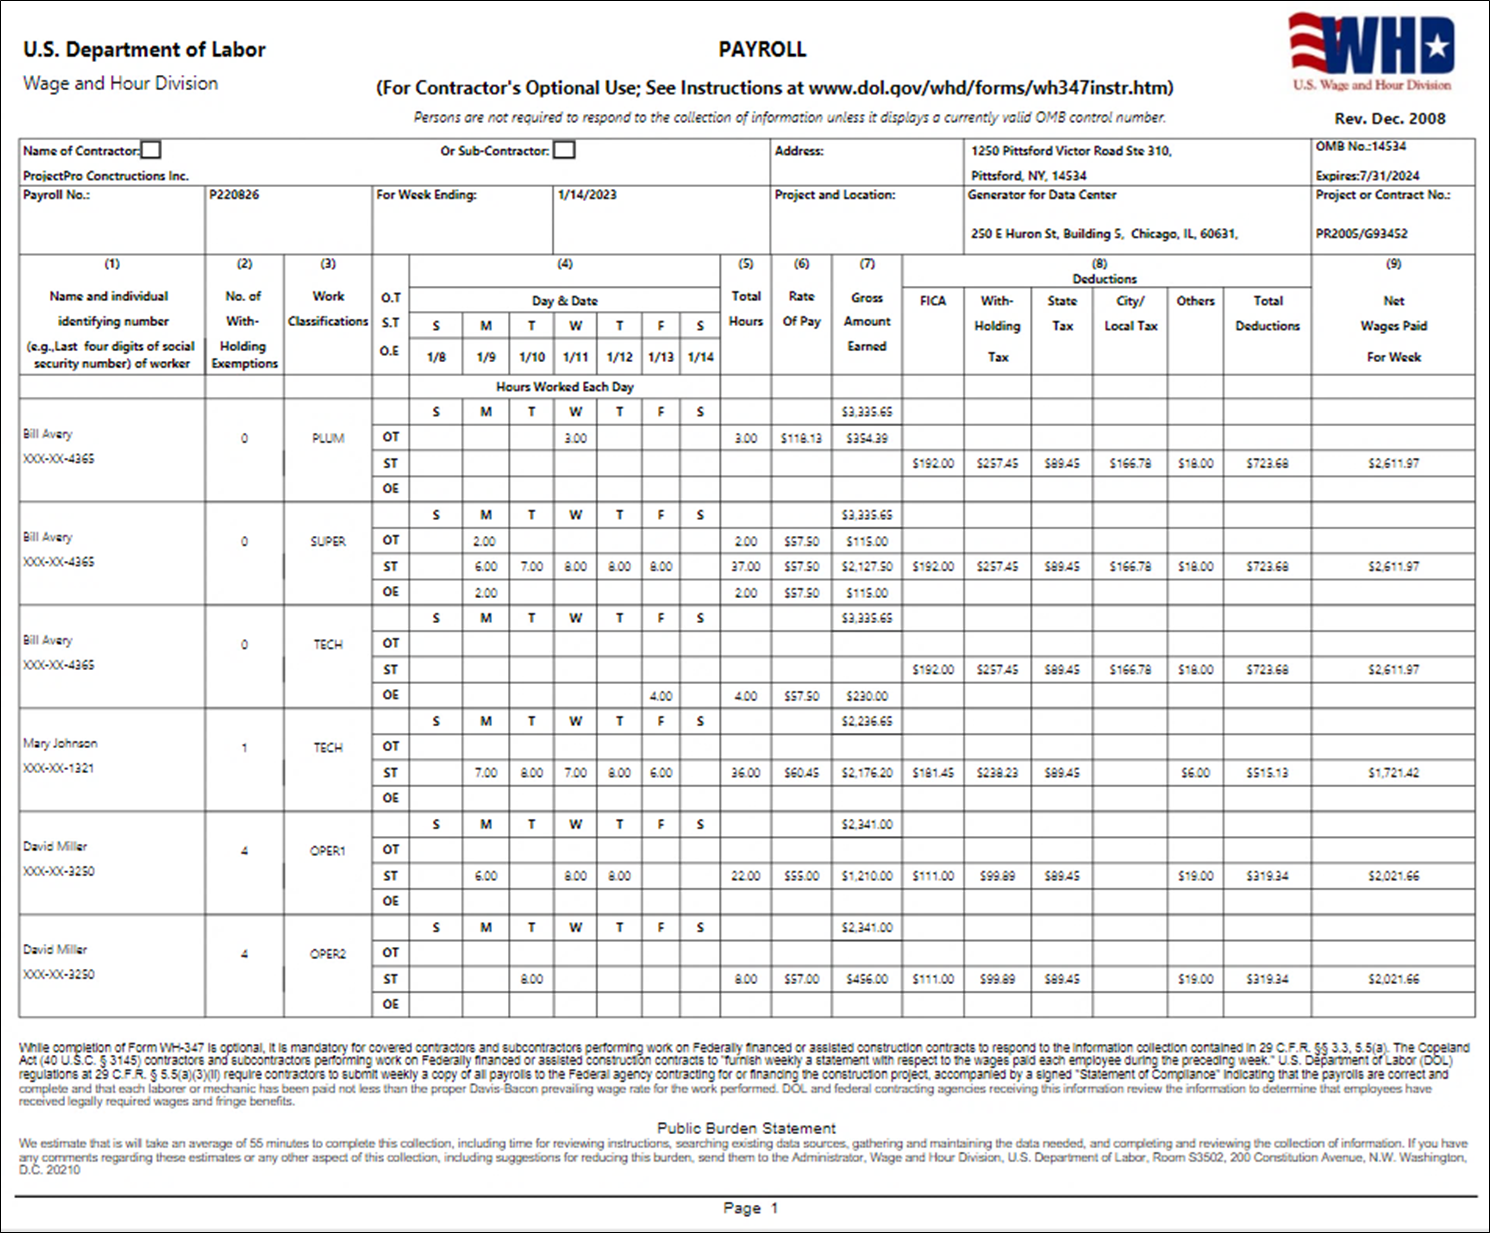
If any business works on federally funded projects as a contractor or a subcontractor, you’re required to submit a weekly payroll report. You submit this report, also known as Certified Payroll Report, to the U.S. Department of Labor.
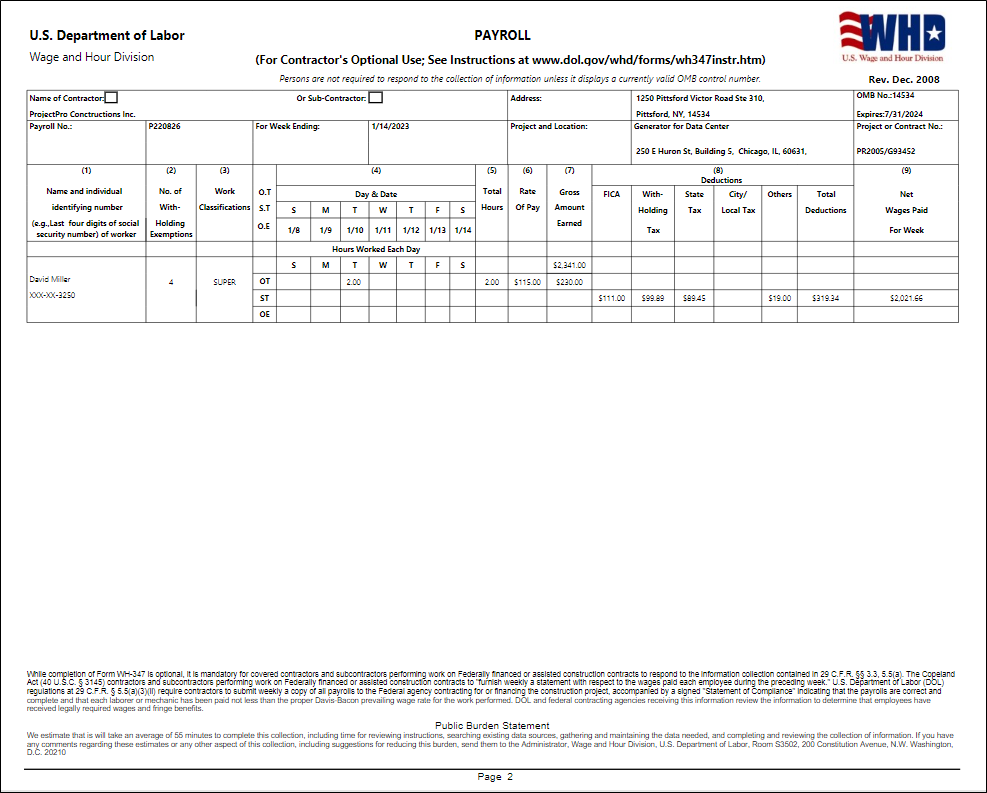
Certified Payroll is a federal payroll report. Government contractors submit Federal Form WH-347 weekly to the agency overseeing the government contract. The form lists every employee, their wages, their benefits, the type of work they did, and the hours they worked. It also shows withholdings and gross wages and includes a statement of compliance.
SETUPS
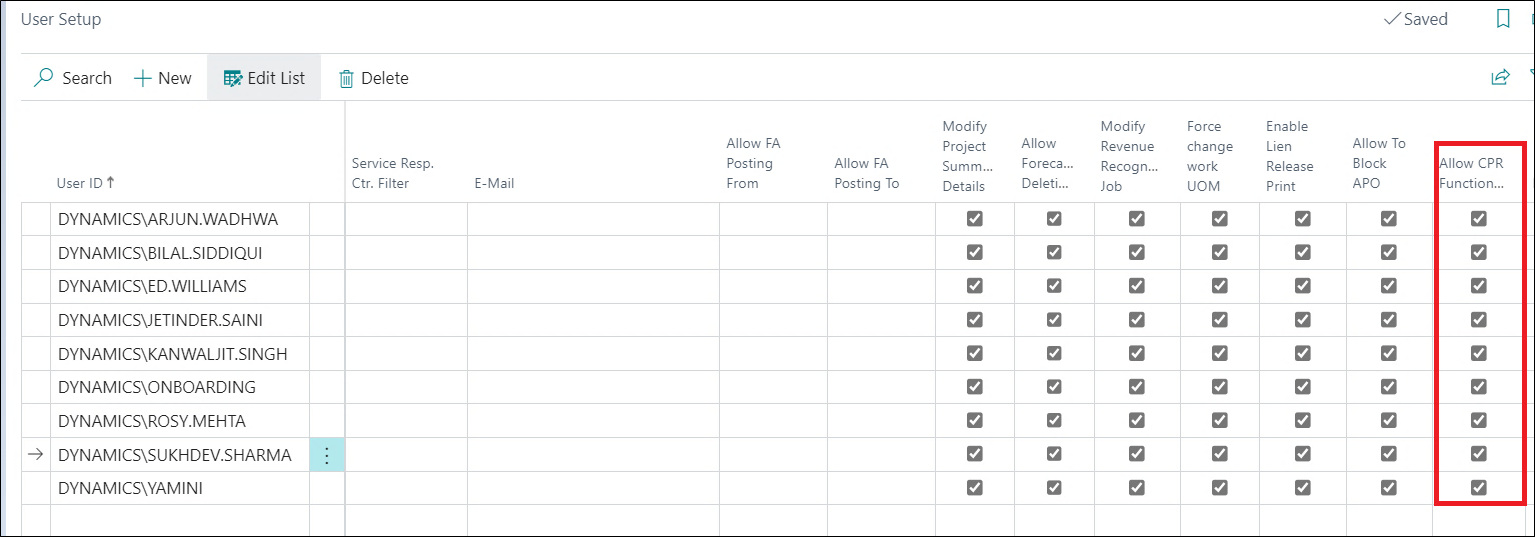
1. User Setup
To use this functionality user must be permitted with the permission “Allow CPR Functionality” on the User Setup page.
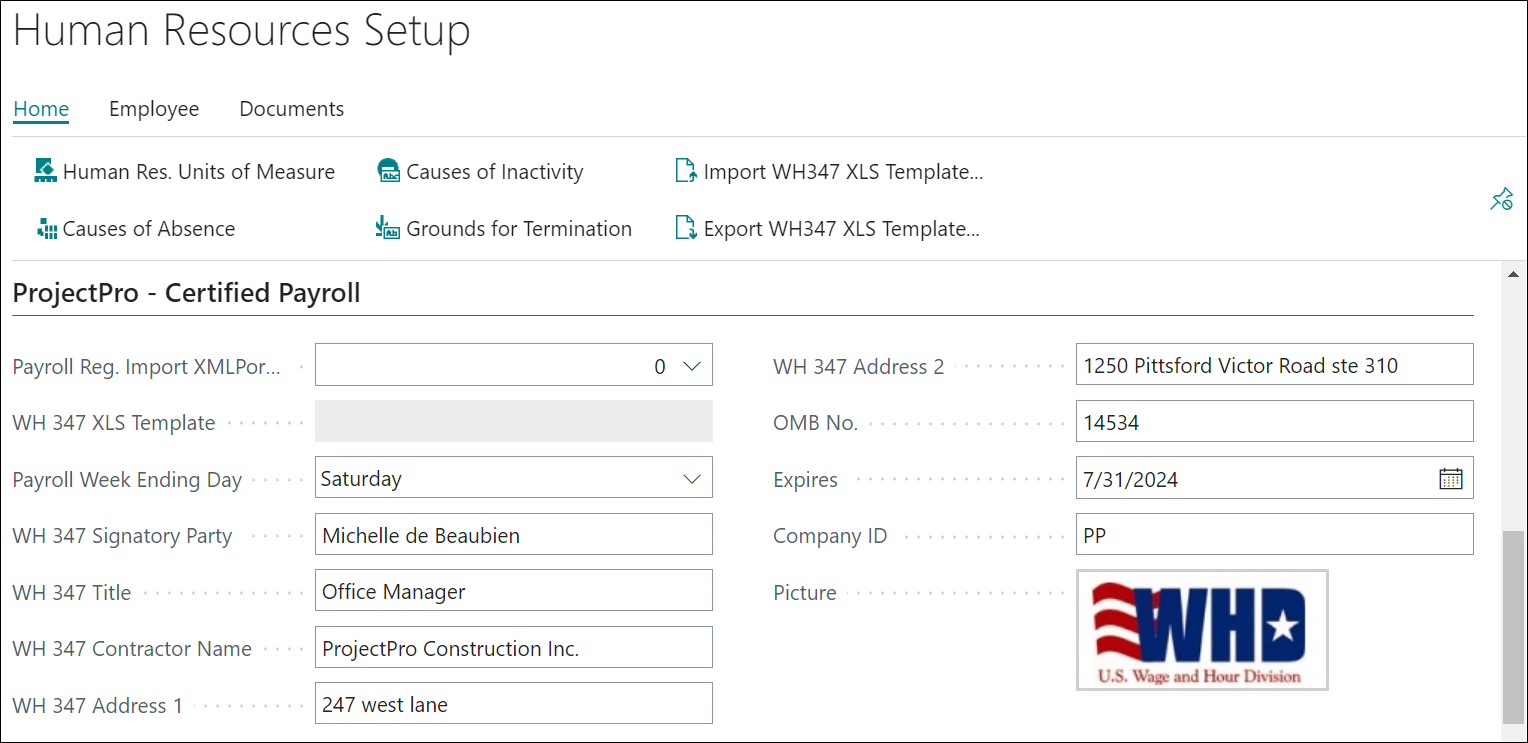
2. Human Resource Setup
On Human Resource Setup page user need to set up some of the fields under “ProjectPro – Certified Payroll” fast tab as below:
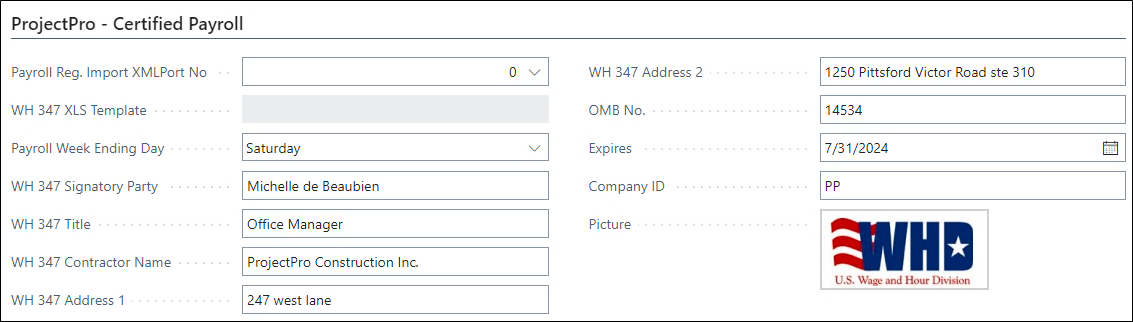
- Payroll Week Ending Date – The is mentioned in the Payroll Register Ledger Entry page, which means this date would be the ending date of the week for which we are preparing the data and the same is also necessary to run the report since it is required to mention the “Period End Date” on the request page of the report.
- WH 347 Signatory Party – This mandatory field defines the “Name of the Signatory Party” on the report.
- WH 347 Title – Mention the Title of the signatory party here, which will be printed on the report.
- WH 347 Contractor Name – Mention the Contractor Name of the contract to be printed on the report.
- WH 347 Address 1 – The Address mentioned in this field will be the Address of the Contractor on the report.
- WH 347 Address 2 – This is the long address of the contractor in continuation with the Address 1 field.
- OMB No. – OMB stands for “Office of Management and Budget”. An OMB No. is assigned with an expiration date to each government form.
- Expires – This is the Expiry date for OMB No. allotted by the government.
- Company ID – Mention the Company ID for the company which will be printed on the report against each employee working.
- Picture – This is the logo of the Contractor company which will be printed on the report.
3. Company Information Setup
On the Company Information page, the details of the Company need to be mentioned like.
- Name of the Company
- Address of the Company
- City
- Zip Code
- Country/Region Code
This information will be printed on the report which will tell the company’s information.
EMPLOYEE
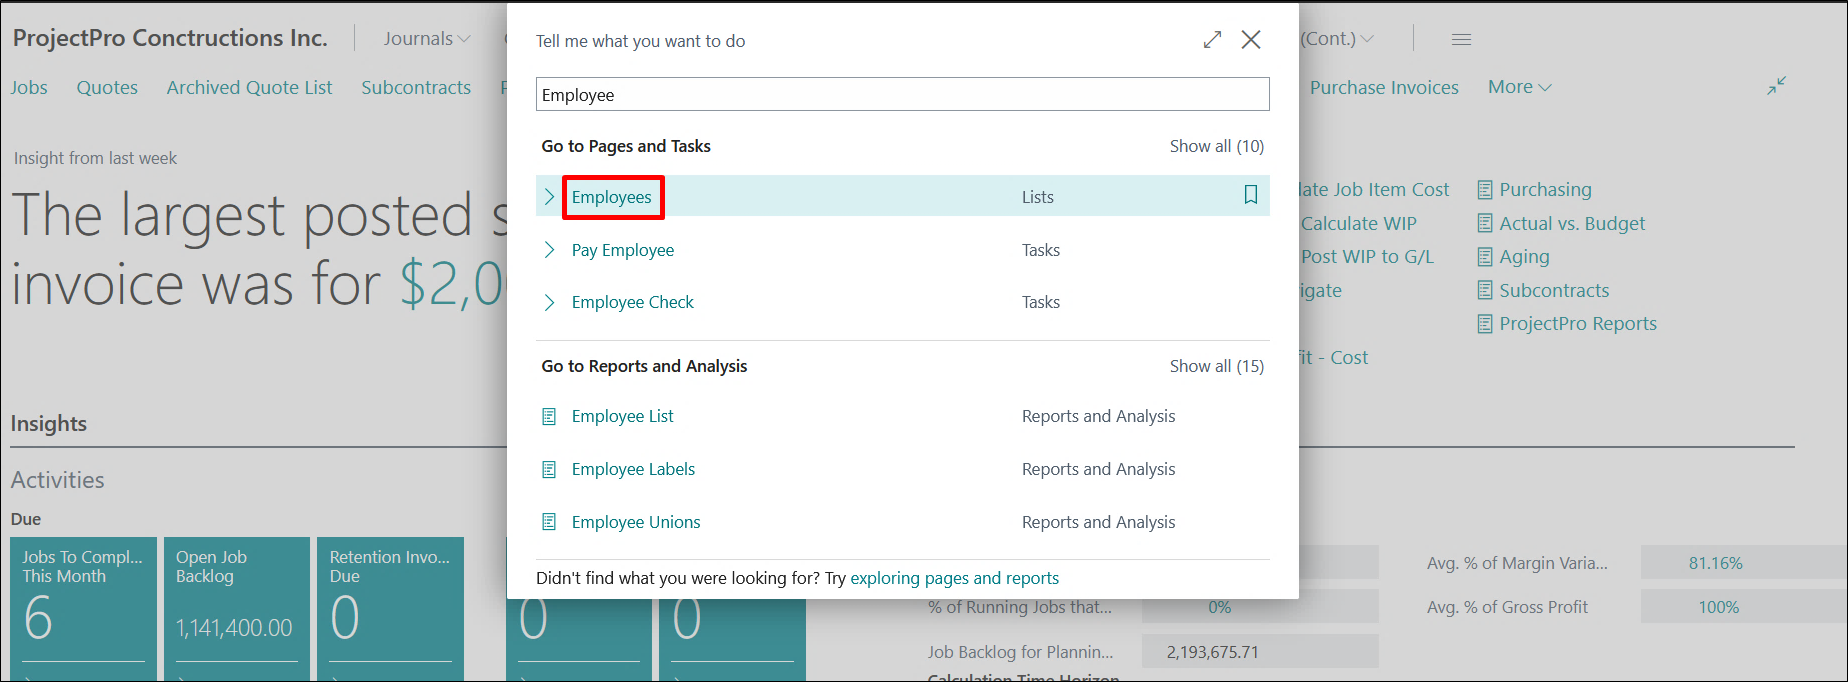
We need to create the employees in our System so that the Employees who are working and mentioned in the “Payroll Register Ledger Entry” page will be matched to each other and the data for them could be filled. To create the Employees user need to search Employee in the global search and click on the result.
Once we click on the Employees the Employee List page will open here, we need to click on the “New” button.
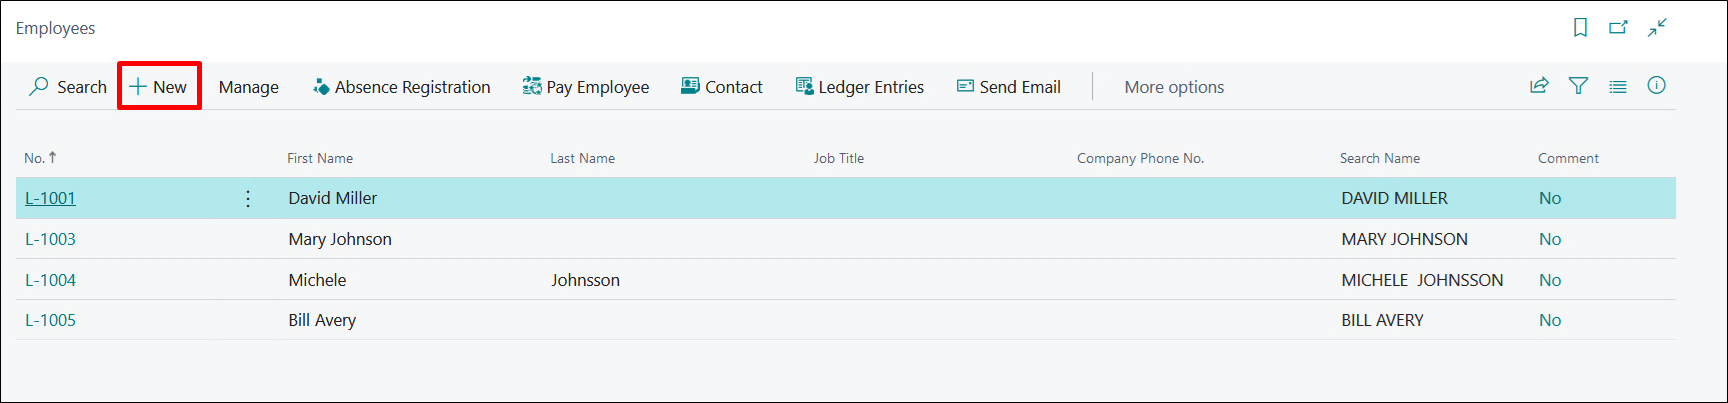
When we click on New the Employee card will get opened and here, we need to fill in the basic details of the employee like Employee No., First Name, Middle Name, Last Name, etc. we are filling in just some of the details Employee card users can fill in as per their requirements.
Note: The user needs to keep in mind that Employee No. and Employee Name must be the same as we are mentioning in the “Payroll Register Ledger Entry” page small difference will create errors while importing and exporting the data in the ledger entry page.
CREATING SKILL CLASS CODE
As we noticed that in Payroll Register Ledger Entry page there is a field “Skill Class” which denotes the skill of an individual employee.
To create the Skill Class user need to search the word “Skill Class” in Global Search and click on the result.
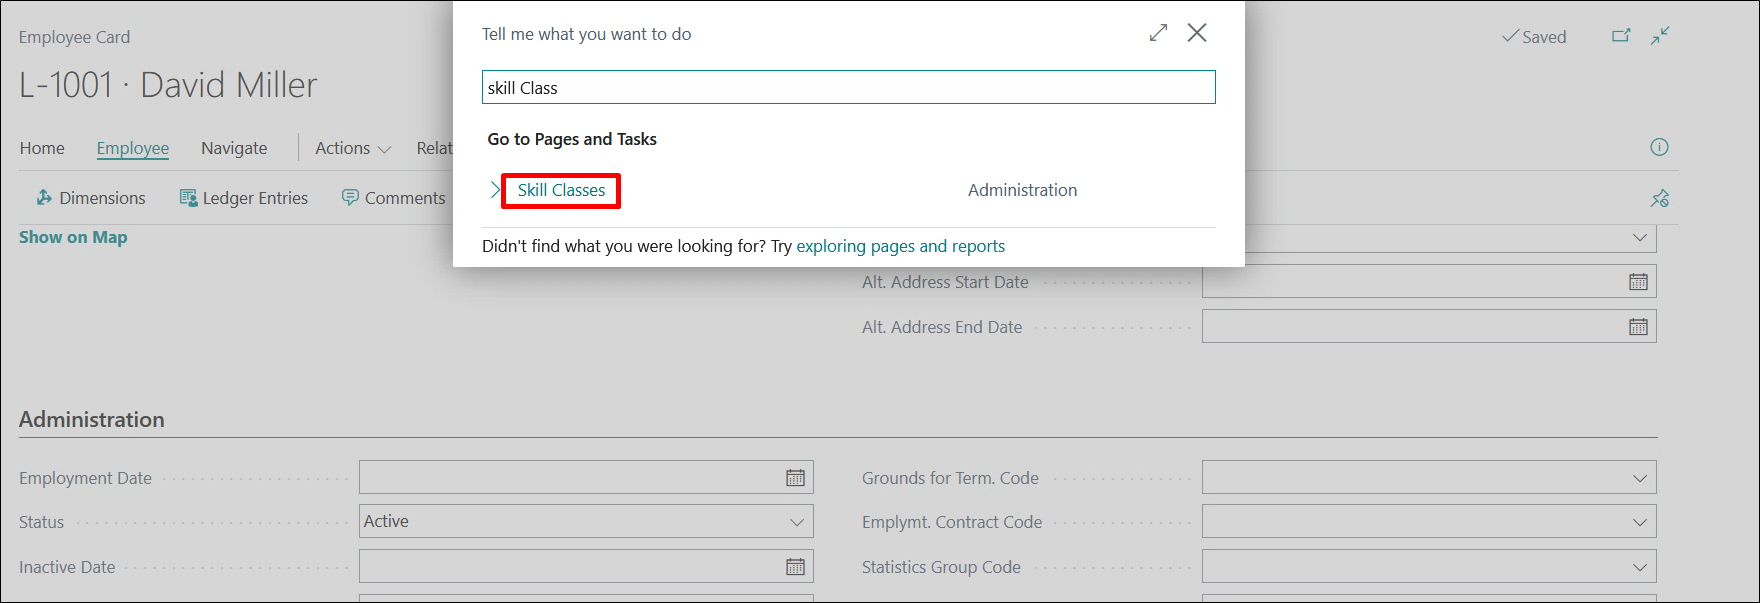
Once the user clicks on Skill Classes the list page will open and the user needs to click on “New”. Fill in the “Code” field and “Description” field and click OK.

Note: The user needs to keep in mind that the “Skill Class” must be the same as we are mentioning in the Payroll Register Ledger Entry page, small difference will create errors while importing and exporting the data in the ledger entry page.
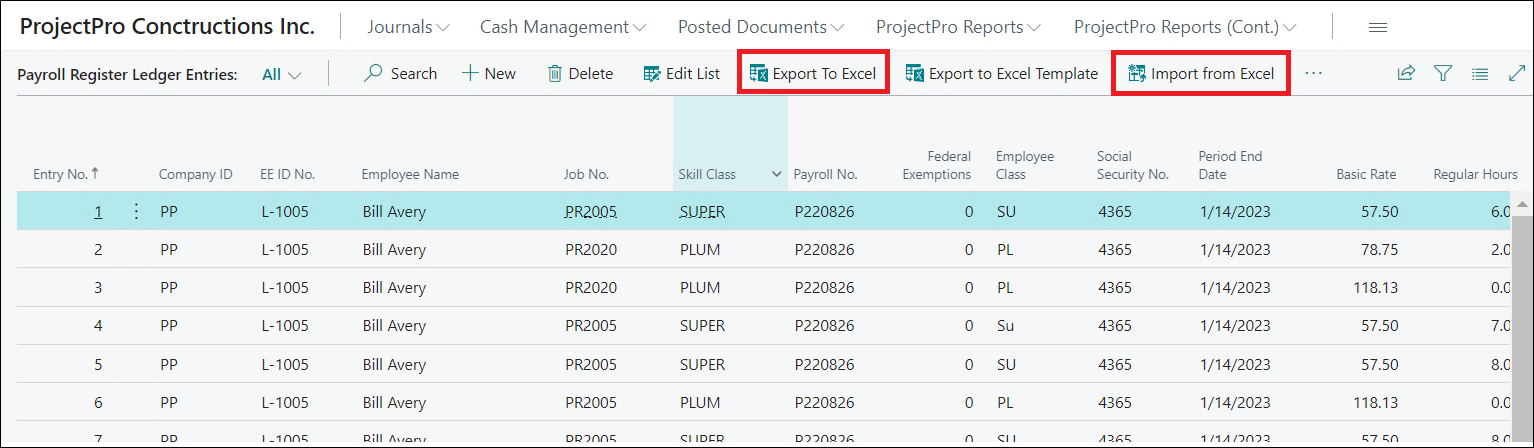
PAYROLL REGISTER LEDGER ENTRIES
To open the “Payroll Register Ledger Entries” page, user need to click on “Payroll Interface → Payroll Register Ledger Entries” on the ProjectPro Manager Role Centre.

Once we click on the same, then the “Payroll Register Ledger Entries” page will open.
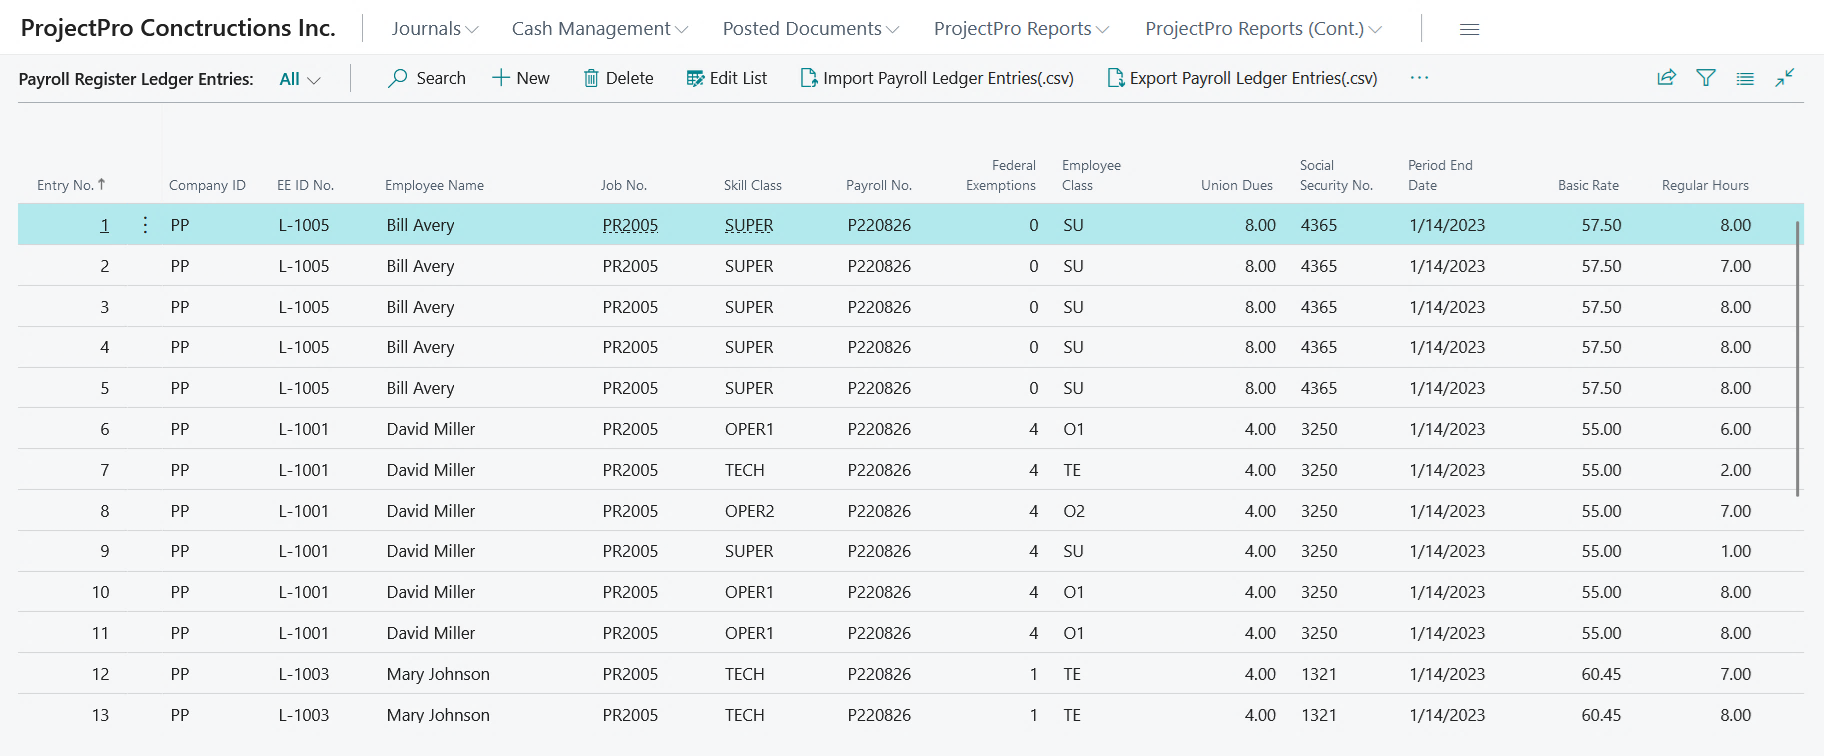
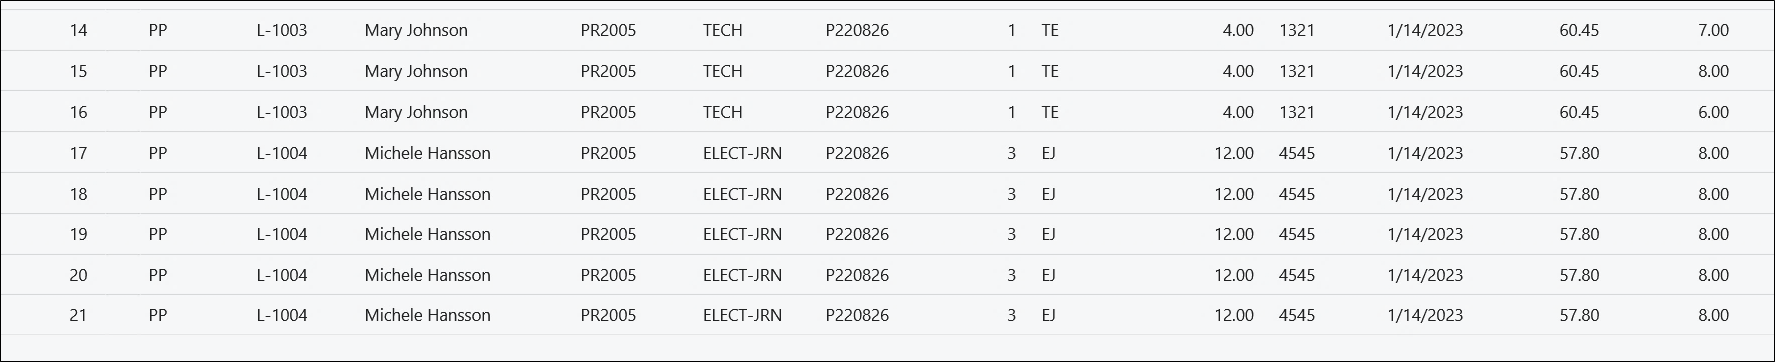
In the above screenshots, a sample data has been created for 4 different Employees.
IMPORTING/EXPORTING THE DATA IN THE PAYROLL REGISTER LEDGER ENTRIES
The data in the “Payroll Register Ledger Entries” page can be created both manually and by importing the data in an Excel file. Similarly, data can also be exported to an Excel file.
1. Manual Entry
Users can create the data manually by clicking either “New” or “Edit List” option on the ribbon and filling in the details manually in the “Payroll Register Ledger Entries” page lines.
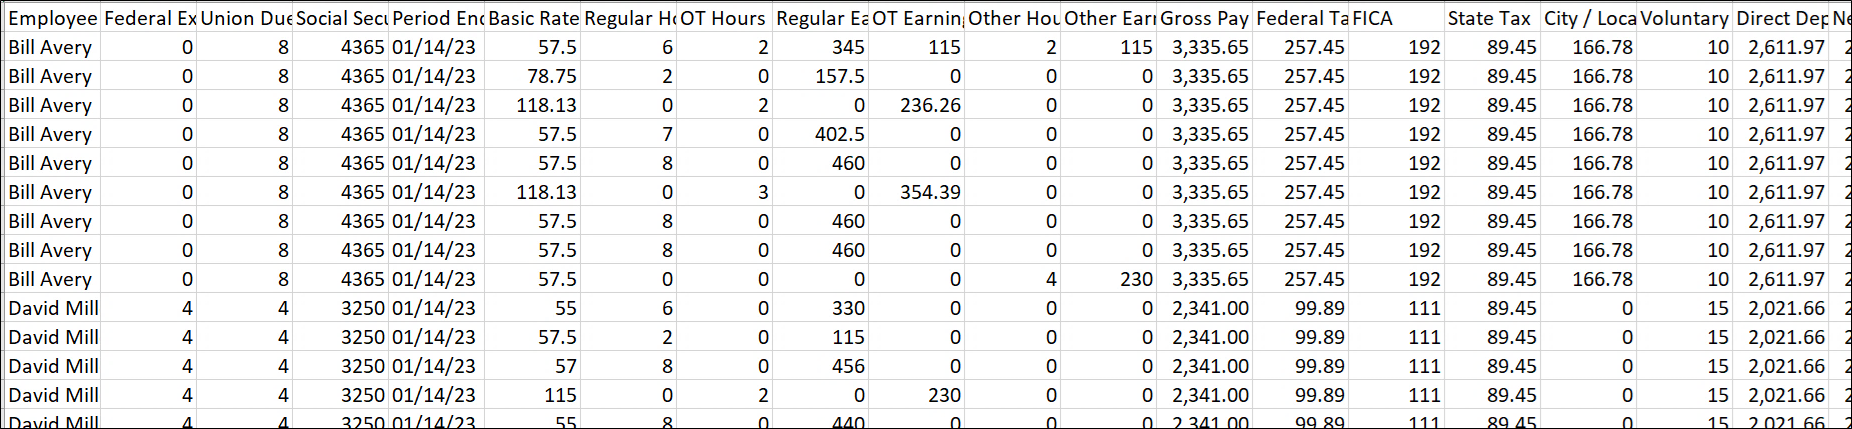
2. Import from Excel and Export to Excel
To enter bulk data employees, user can use “Import from Excel” function.
To review and make editions to the data, users can use “Export to Excel Function” as well. Once the data is reviewed, edited, or added new entries into the existing one, user can import the file again into the system using the Import function.
3. Export to Excel Template
In case, user do not have a template available to them, they can use the “Export to Excel Template” function. This will export a blank template in Excel format where they can add data and import the same by the import function.
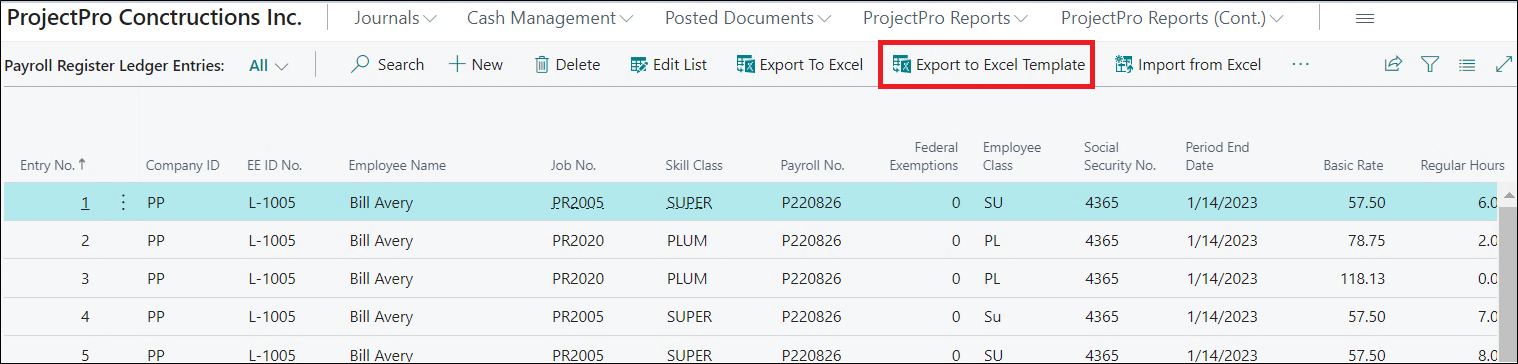
Once the user clicks on the “Export to Excel Template” button the data which is already available on the “Payroll Register Ledger Entry” page will also get downloaded in Excel format and can add more data to it easily, if required.
CERTIFIED PAYROLL WH-347 REPORT
Click on the “Certified Payroll WH-347 Report” to print the report.

On the report request page, enter the “Period End Date” and the “Project No”. for which the report needs to run as per the data entered in the “Payroll Register Ledger Entries”.

Once we click on the Preview button the report will be previewed.
Page 1
Page 2
Page 3
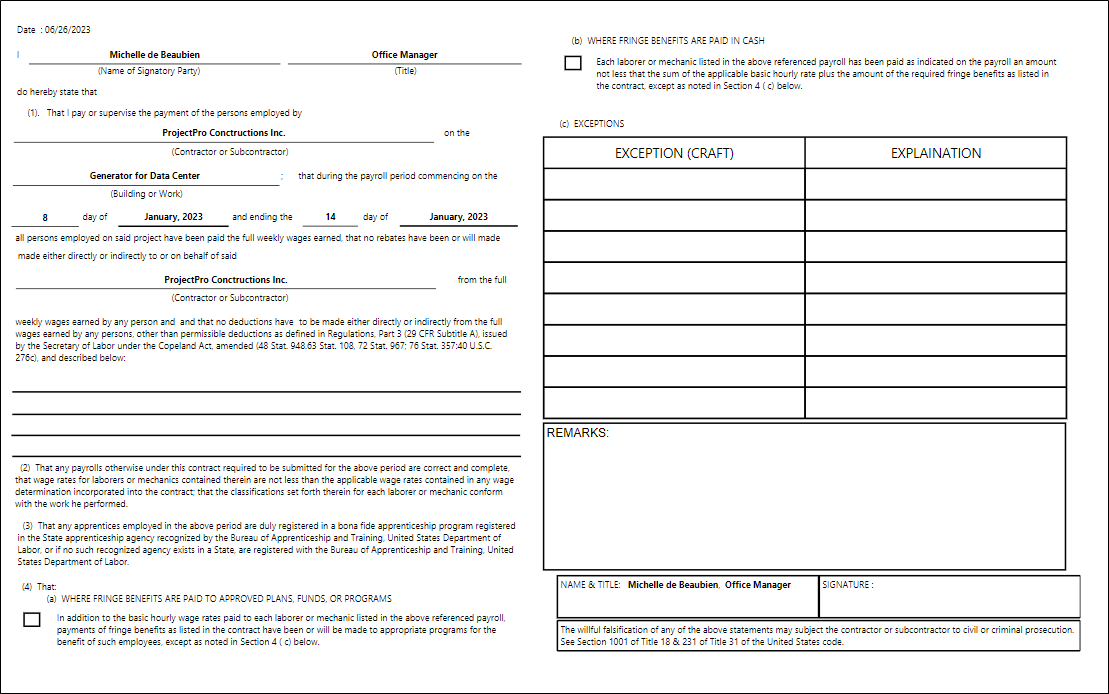
Note: The data on Page 3 is coming from the fields which we have filled on the “Human Resource Setup” under the “ProjectPro – Certified Payroll” fast tab.