Ch 01 – Project Material Planning Process
Contents
PROJECT MATERIAL PLANNING
Project Material Planning (JMP) in ProjectPro allows users to plan and manage procurement of items and resources for a given project.
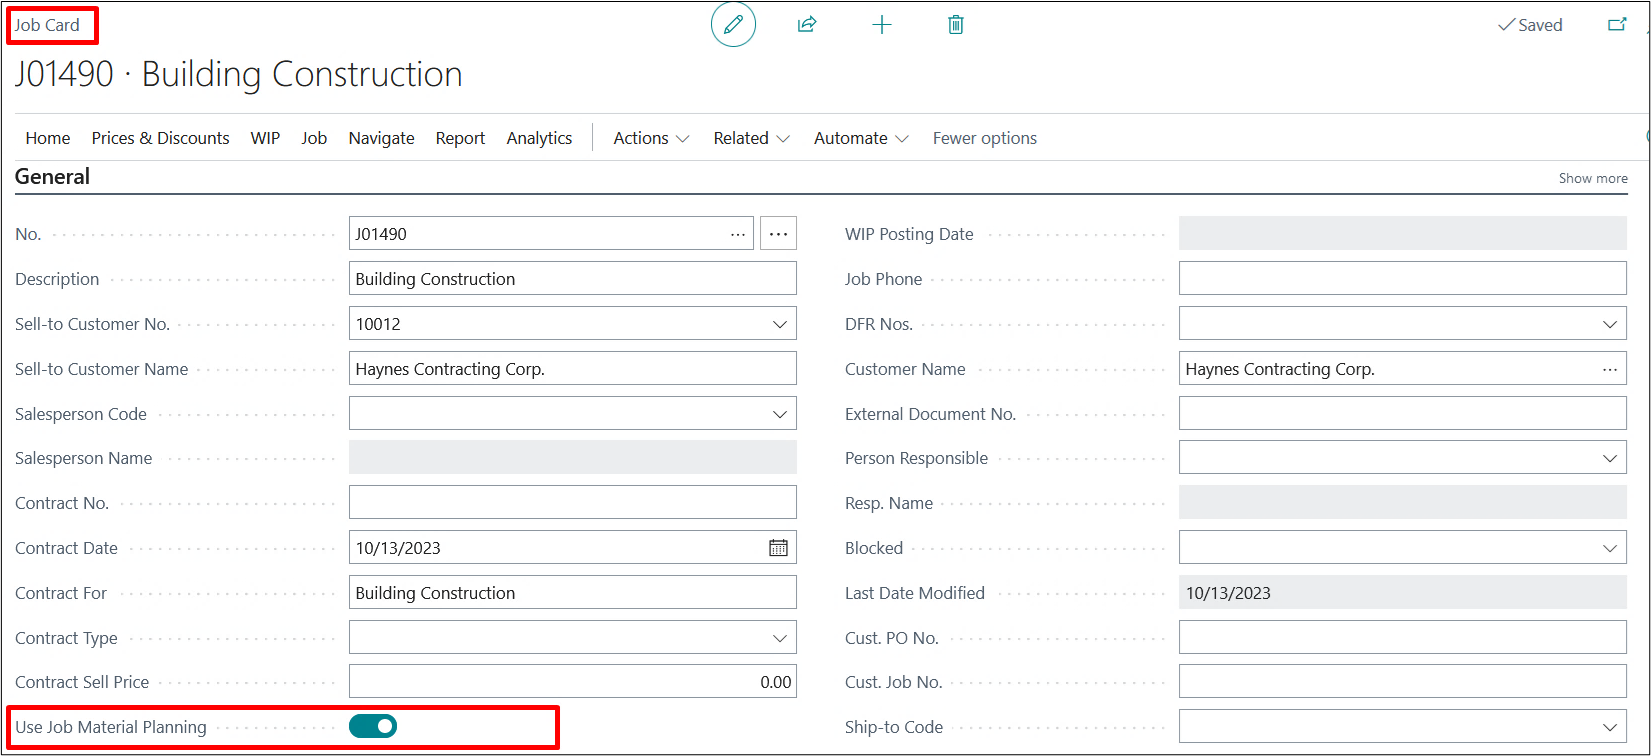
On the Project card make sure the Use Project Material Planning option is toggled “on”.
1. Schedule JMP Requisition Worksheet for Projects
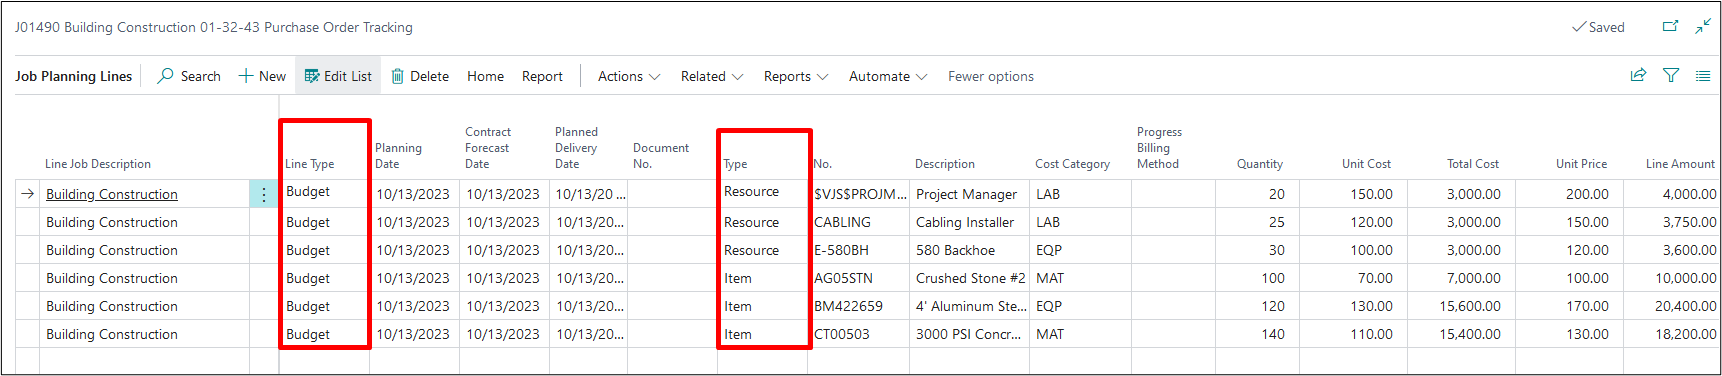
Also review your Project Planning Lines to confirm you have budget or budget and billable lines entered. JMP will only work for Budget/Both Budget and Billable lines with items and resources.
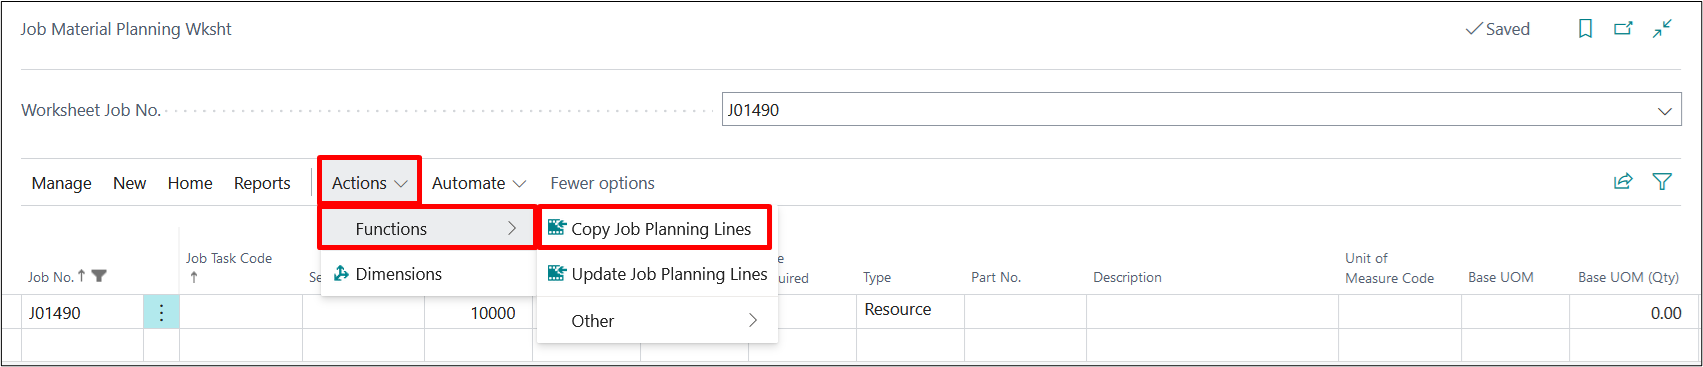
To begin the Project Material Planning, select Process from the ribbon and select Project Material Planning.

From this option the Project Material Planning (JMP) worksheet will open.
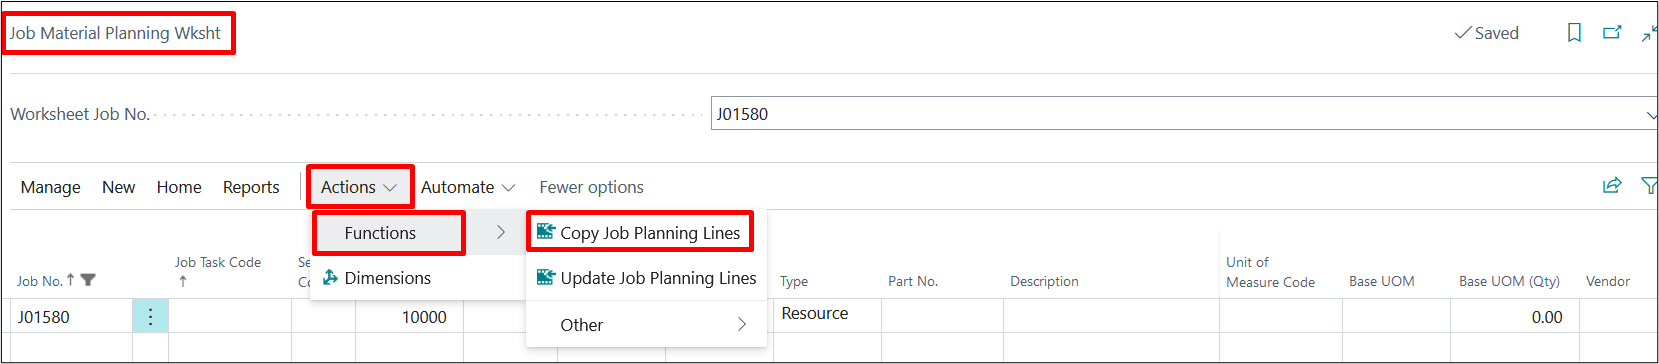
To populate planning lines from your project, select Actions → Functions → Copy Project Planning Lines.
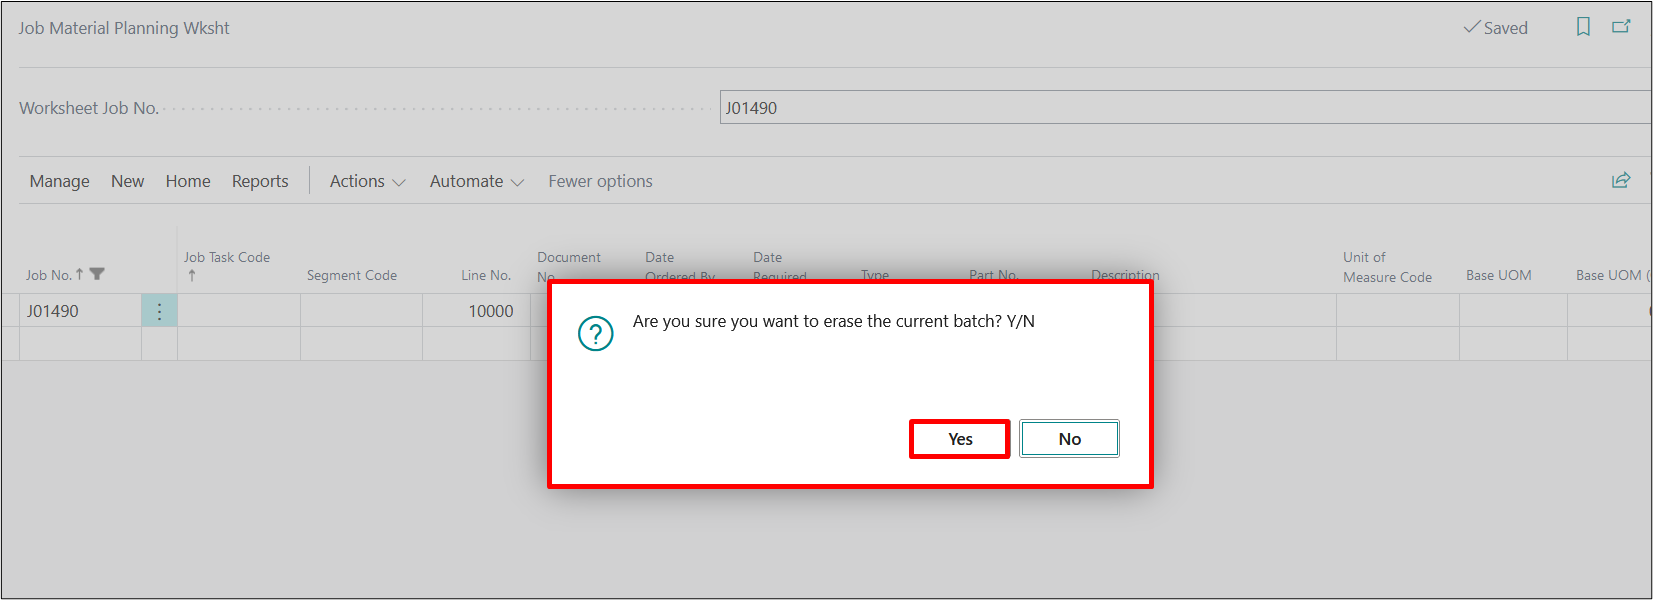
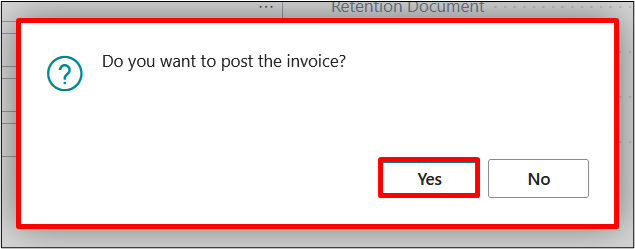
After Clicking on the Copy Project planning Lines option, the system would ask for option, select Yes and all lines would be populated.
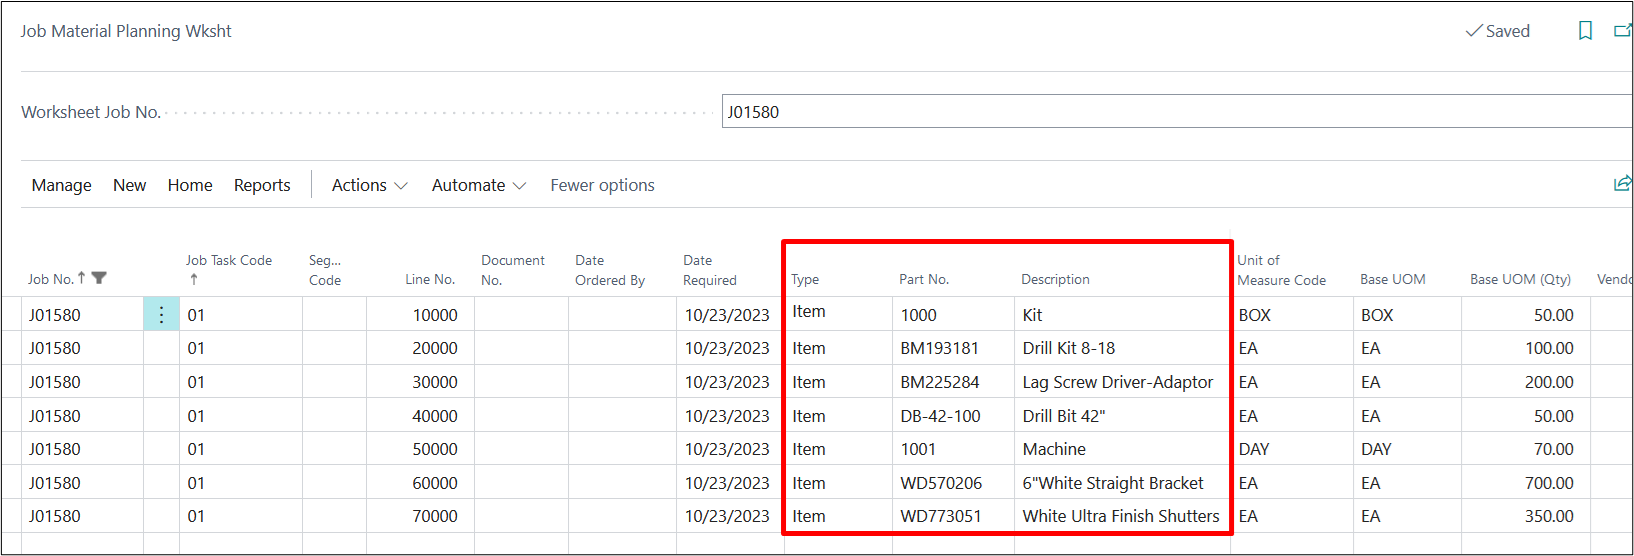
Notice at this time, your Resource and Item lines for Budget/Both Budget and Billable planning lines have been populated. If needed you can add additional items and resources during this step.
For each line, enter the appropriate “Document No.”, “Date Ordered By” and “Vendor”. These are mandatory fields.
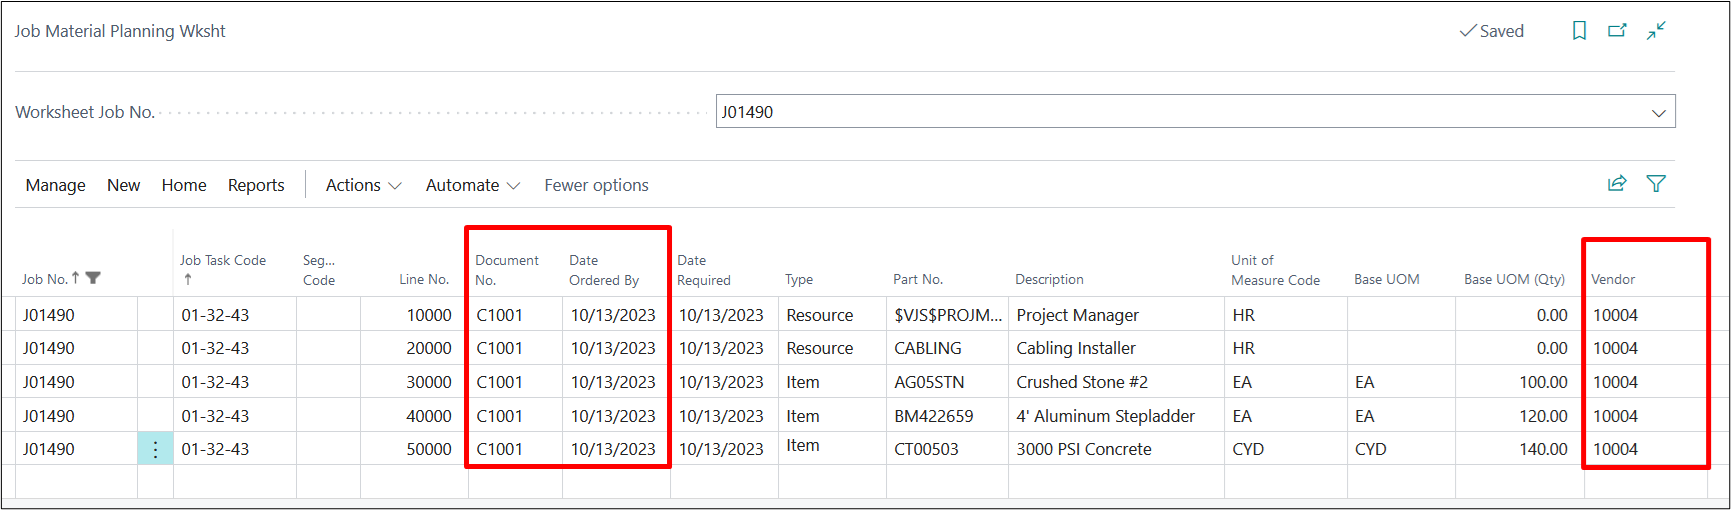
Note: If you have a vendor defined on the Item or Resource card, you will notice they are automatically populated for you in the Vendor field. If there are any changes to the vendor being used, please adjust them in this step.
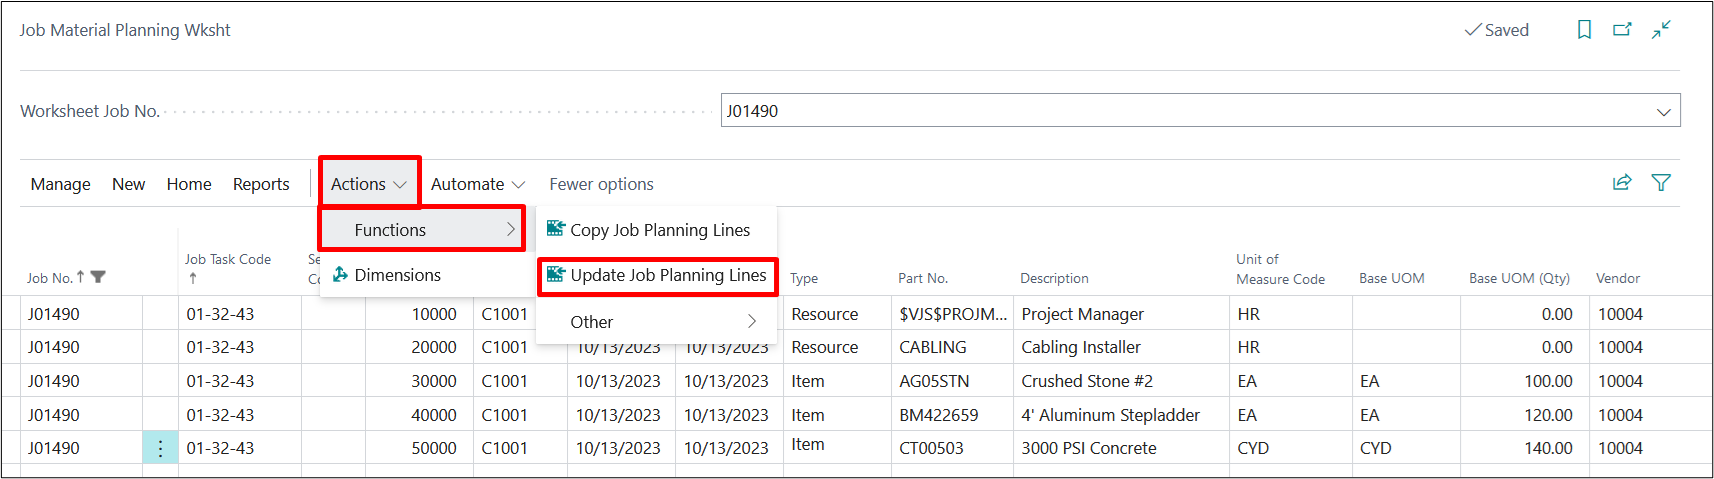
Note: If you want to include any new changes in the Project Material Planning Worksheet, use “Update Project Planning Lines” option as below
Once you have completed all required fields on the worksheet. You can procure either Items, Resources, or both by selecting the Process tab from the ribbon.
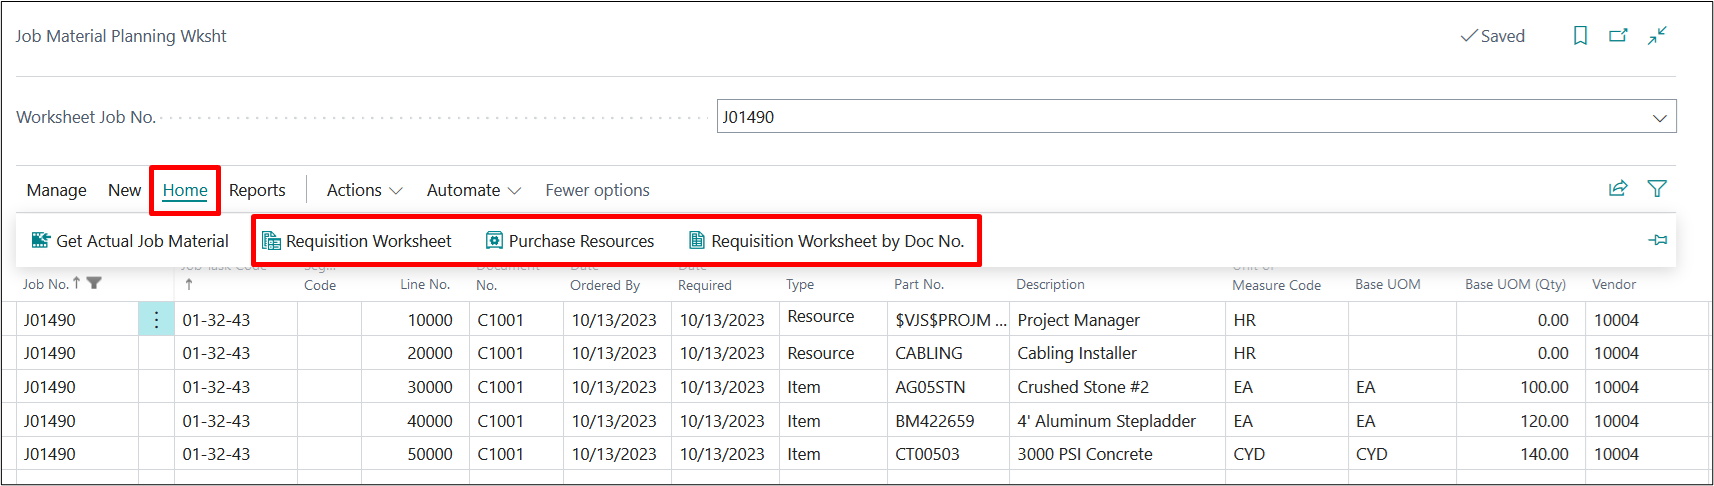
1. Go to Home → Requisition Worksheet/Requisition Worksheet by Doc No. → Select this option for procuring Items.
a) Requisition Worksheet– This option is used for selecting all items, regardless of Document No. and date mentioned on the JMP Worksheet i.e., this option would bring in all the lines at the Requisition worksheet of type Item.
b) Requisition Worksheet by Doc No.– This option is used when you have multiple document numbers on the JMP worksheet, and you would like to process each document number separately.
2. Go to Home → Purchase Resources → Select the option for the procurement of Resources.
Note: Resources must be marked as “purchasable” on the resource card, otherwise they will be excluded from the JMP process.
Now depending on the project, you may need to follow both options outlined above. Please follow the steps for each option separately.
2. Releasing Purchase of Items through Project Purchase Orders
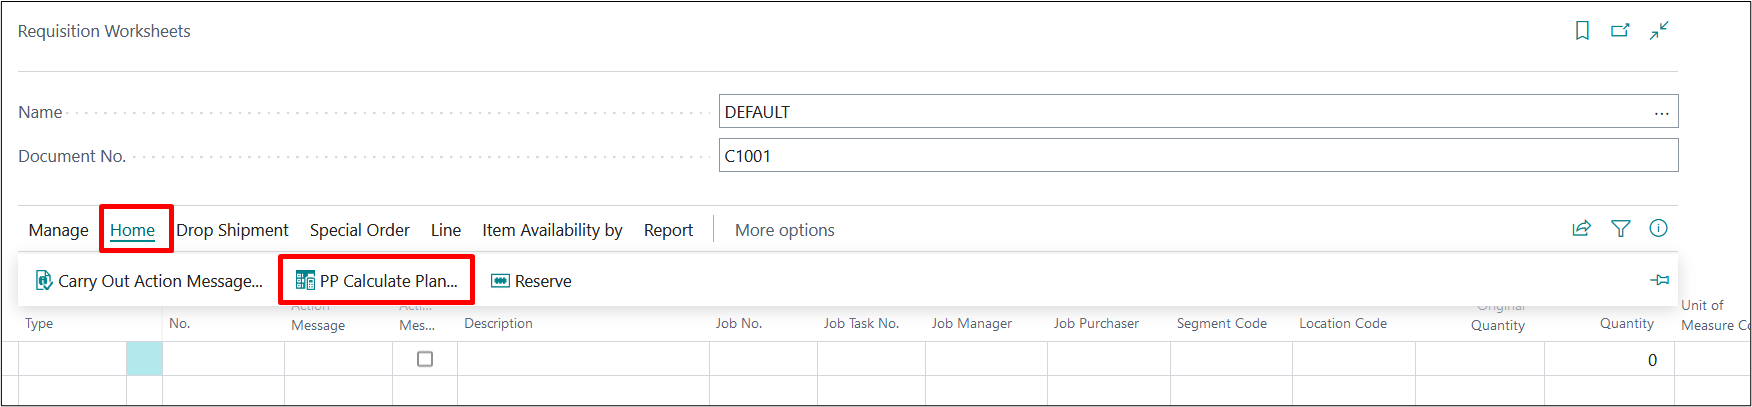
Go to Process → Requisition Worksheet: On Requisition Worksheet → Process → PP Calculate Plan.
Note: The only difference you will see between the Requisition Worksheet and Requisition Worksheet by Doc No. Is the Document No. Field filled in below the Name along with only the lines related to the Doc No. The process for procurement will be the same for either option.
Fill in the options below:
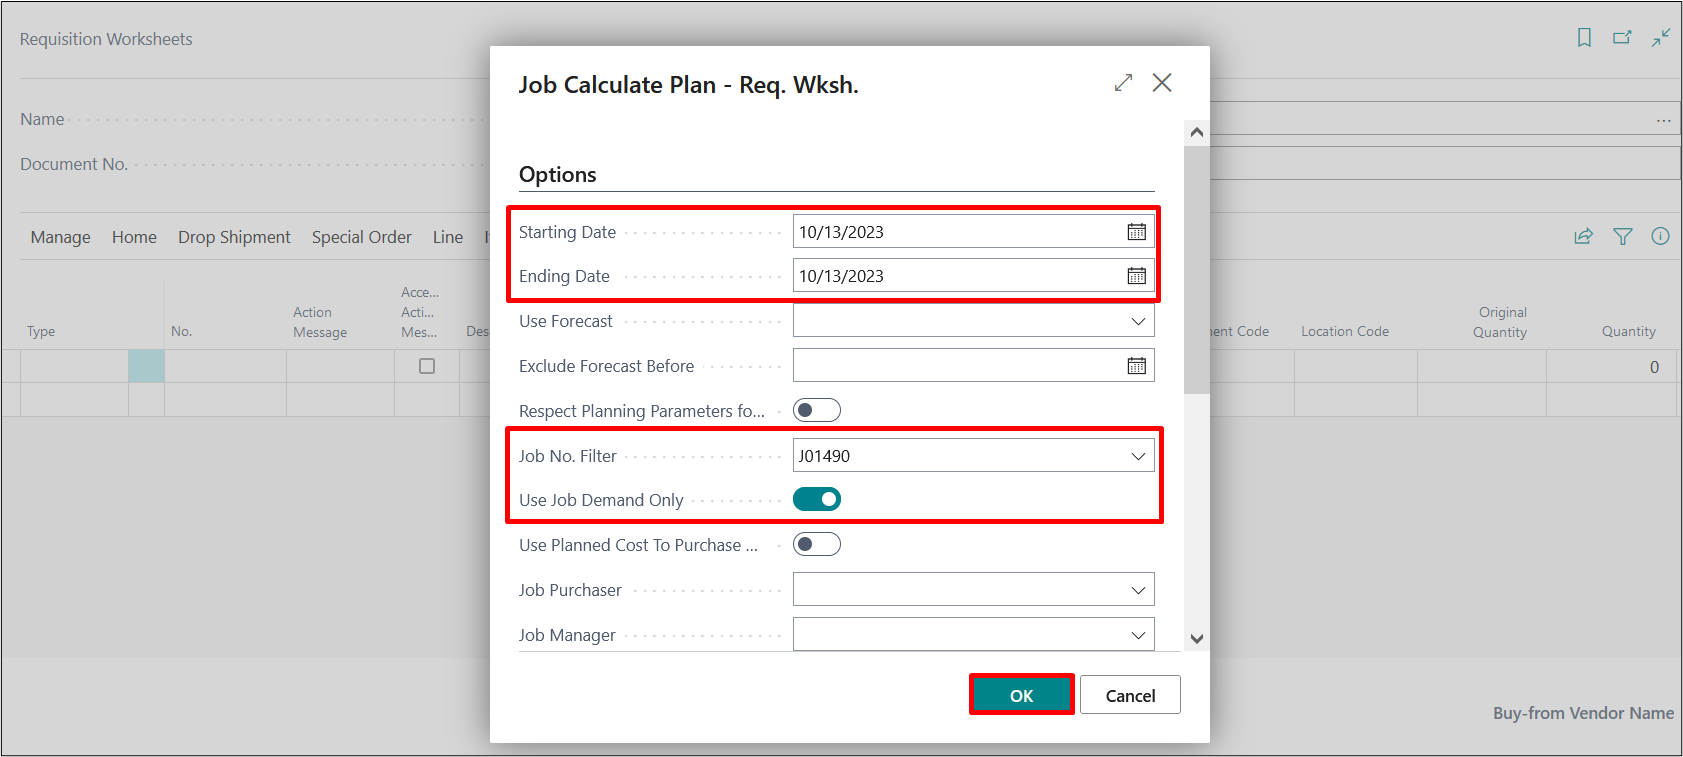
| FIELDS | DESCRIPTION |
| Starting Date: | Starting date for calculating plan corresponding to the “Date Ordered By” field on JMP worksheet |
| Ending Date: | Ending date for calculating plan corresponding to the “Date Ordered By” field on JMP worksheet |
| Use Forecast: | Specifies a forecast that should be included as demand when running the planning batch project. → Not used in ProjectPro |
| Exclude Forecast Before: | Specifies how much of the selected forecast to include, by entering a date before which forecast demand is not included. → Not used in ProjectPro |
| Respect Planning Parameters: | Specifies that planning lines triggered by safety stock will respect the following planning parameters: Reorder Point, Reorder Quantity, Reorder Point, and Maximum Inventory in addition to all order modifiers. If you do not select this check box, planning lines triggered by safety stock will only cover the exact demand quantity. → Not used in ProjectPro |
| Project No. Filter: | Filter the worksheet by Project No. to show only selected project’s lines. |
| Use Project Demand Only: | Set this as True, to get project demand for only the selected project. |
When you click on OK your requisition worksheet will display line items that fit the criteria entered.
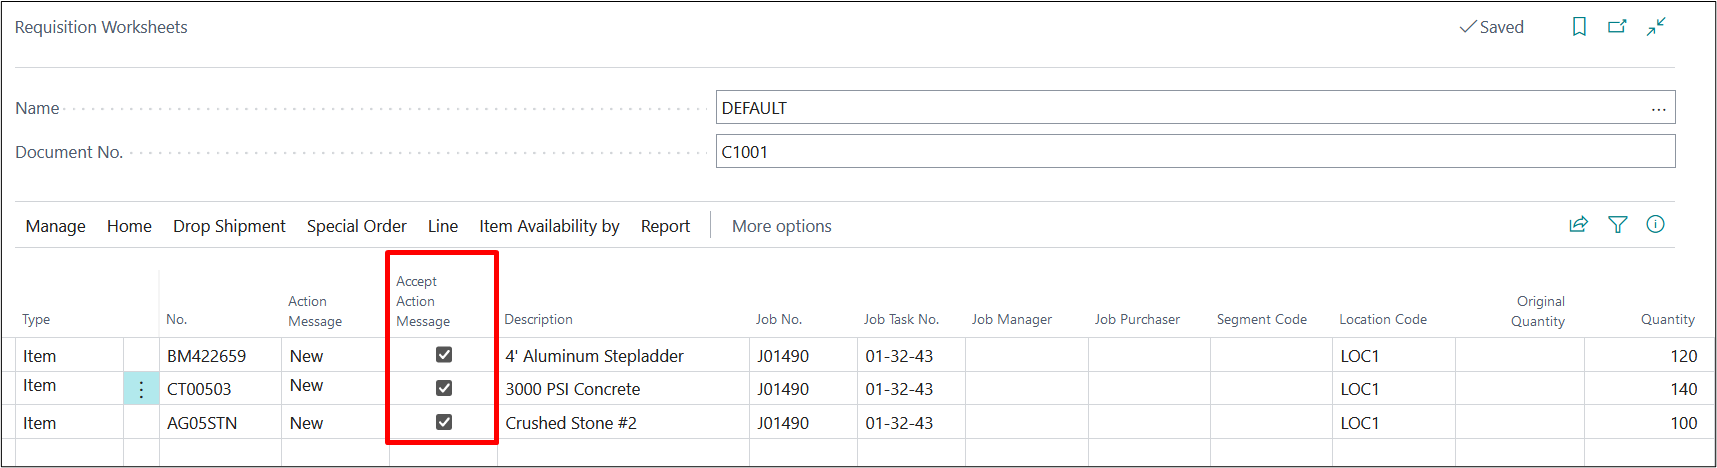
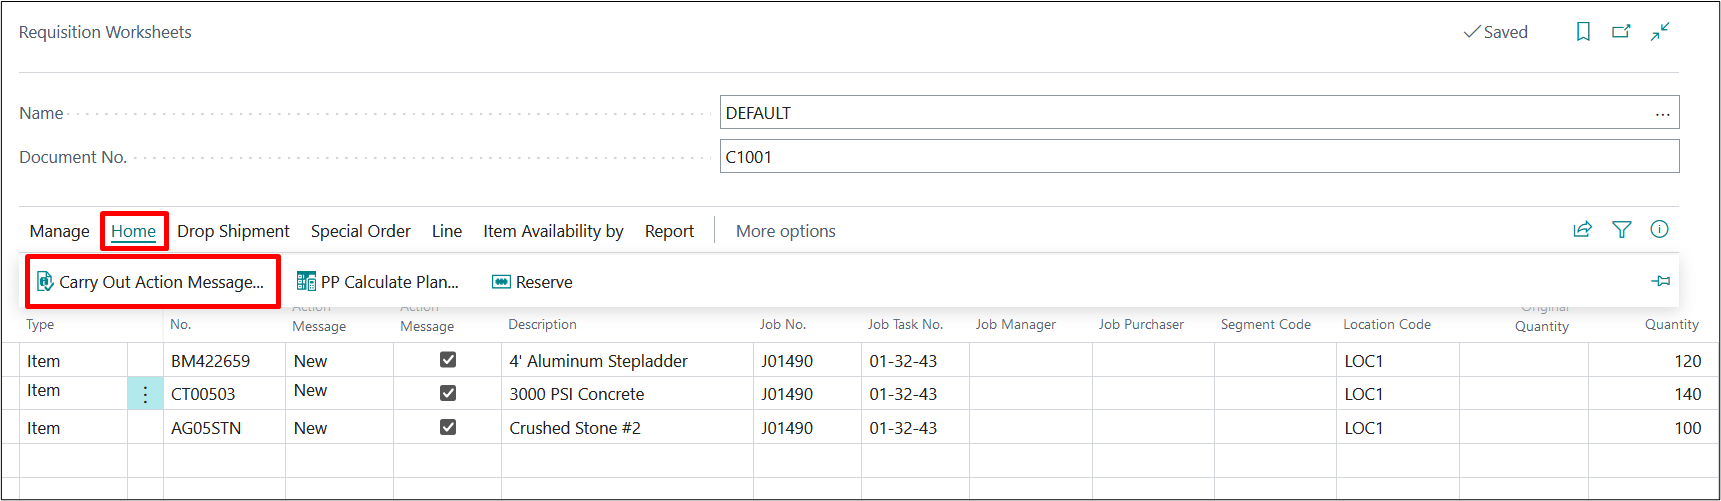
You will notice that “Accept Action Message” is automatically selected for all lines brought into the worksheet. This indicates that a Purchase Order will be created for each item. If you would prefer not to include a specific item in the Purchase Order creation process at this time, uncheck the box.
The “Action Message” indicating “New”, means it is creating a new Purchase Order since inventory is not available.
To create your Purchase Orders, click the “Home” option on the ribbon and select “Carry Out Action Message”.
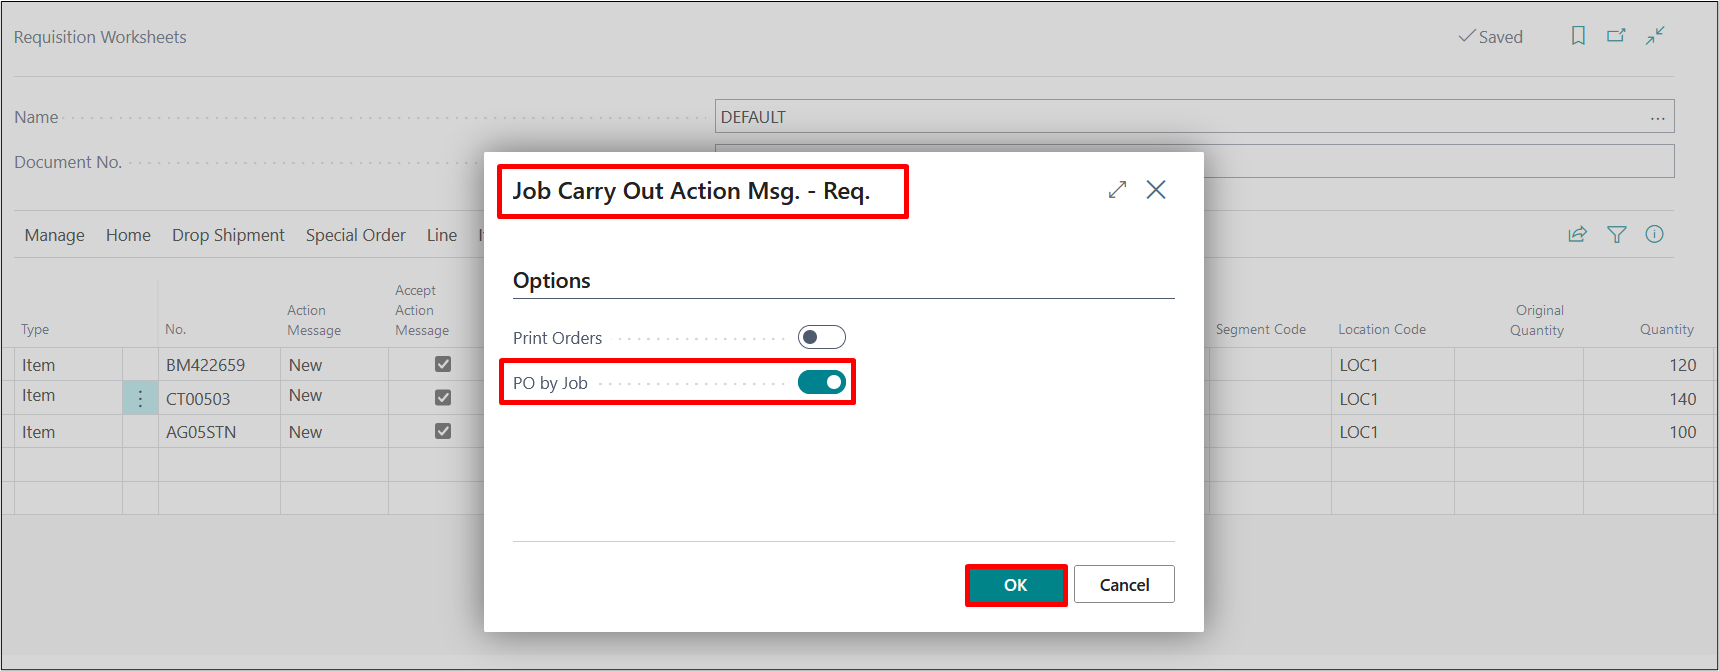
You will be prompted to select how you would like your Purchase Orders to be generated.
| FIELDS | DESCRIPTION |
| Print Orders | Toggle this “on” if you want to print or email your Purchase Orders |
| Print by Project | Toggle this “on” if you want to create a new Purchase Order for each Project. If you run the requisition worksheet wide open, without specifying a project, then you can check this option to avoid creating a blanket Purchase Order by Vendor. |
Click on OK and your Purchase Orders will be generated.
Close out the Requisition Worksheet and review the Project Material Planning Worksheet. You can see that the Purchase Order was created and can drill down from this page to view the document.
Click on the PO Qty for the line you wish to view the Purchase Order for.

For our example we will select the third line for PO Qty of 600. Below you will see the screen that pops up.

Click On “Show document” to open the PO.
3. Staging when Items are received or to be delivered to Projects & Archived.
When the item is ready to be received, you can access the Purchase Order through the JMP Worksheet (shown in the above step) or use your Purchase Orders list page to search for the PO No.
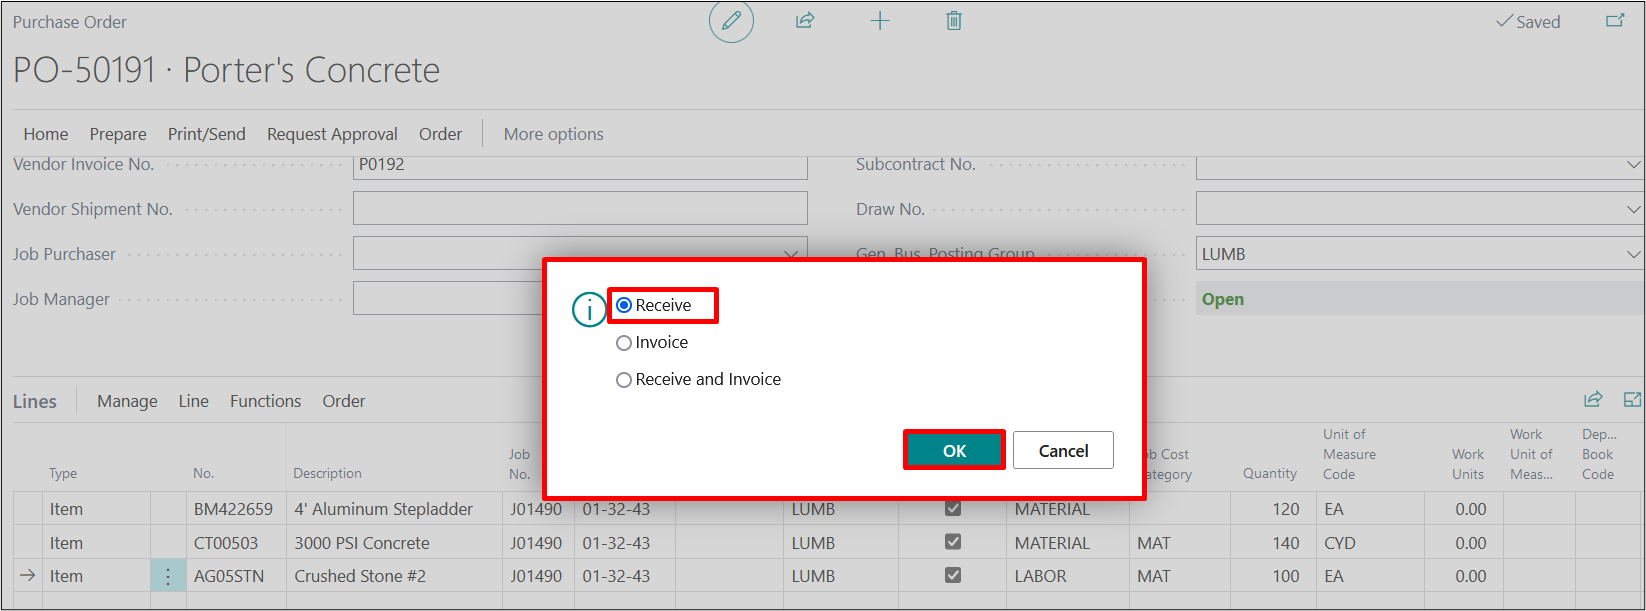
Follow your business process for receiving items.
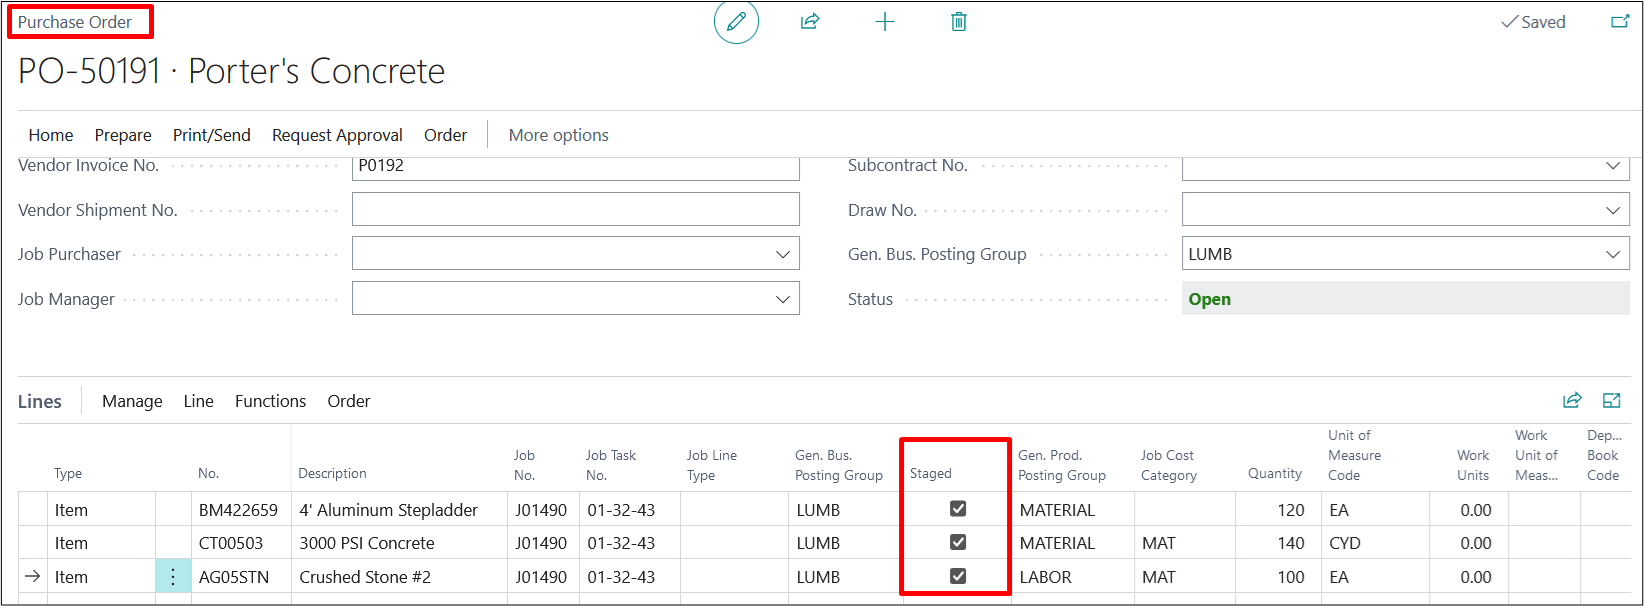
If you would like to “Stage” your items to be shipped to the project site, click the box “Staged” on the PO lines before receiving it in.
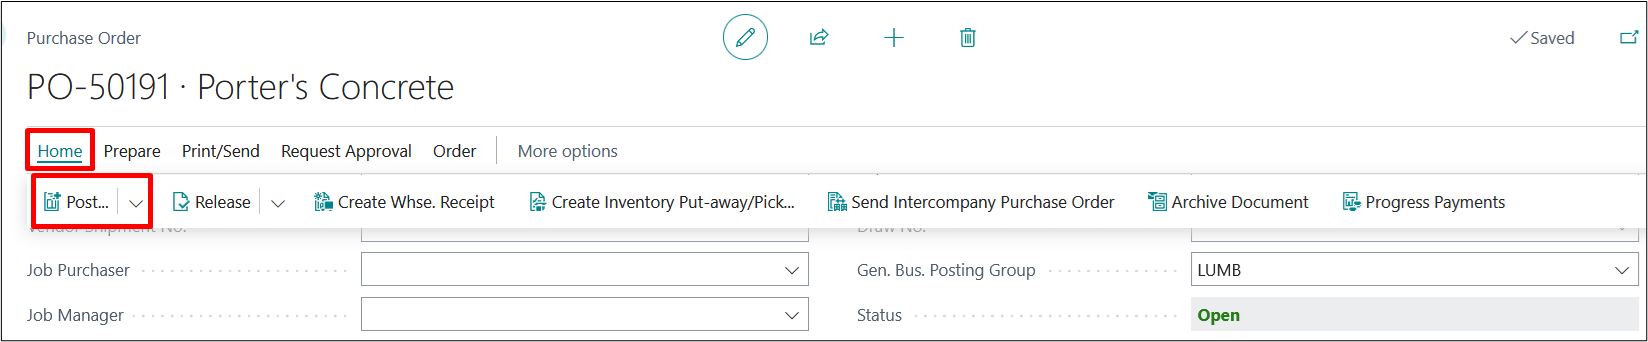
To Post, select the “Home” option from the ribbon and select the appropriate option for your business process.
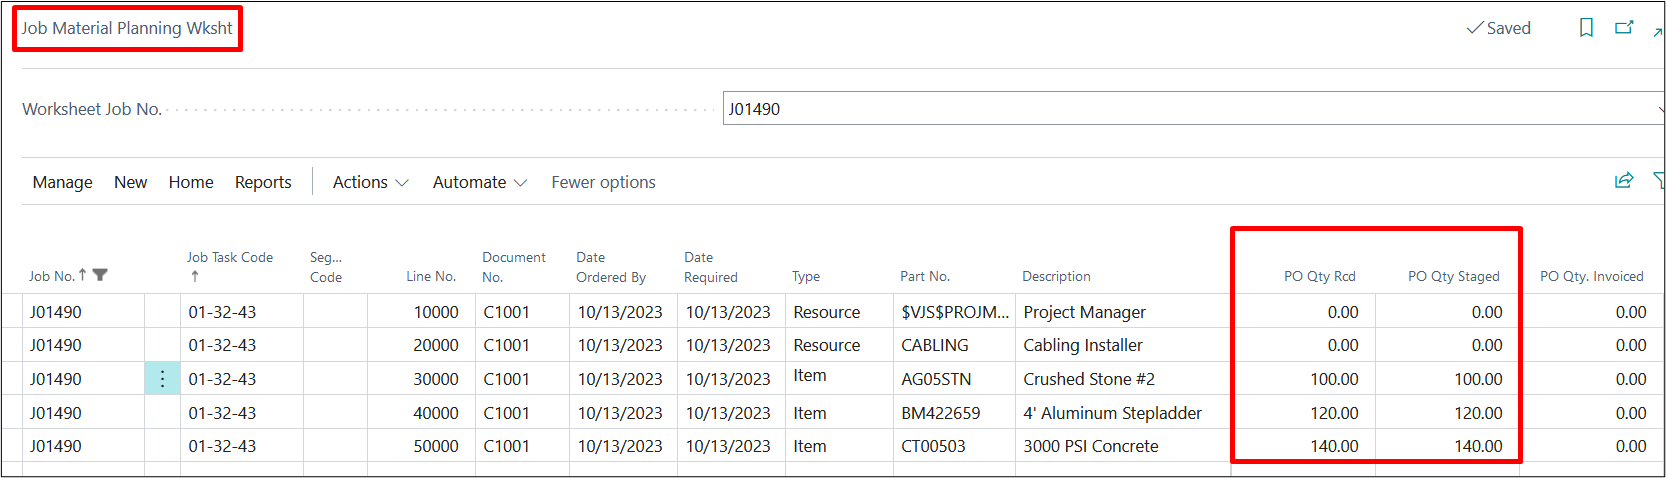
On the Project Material Planning Work Sheet, you will see that received items have now been moved from PO Qty to PO Qty Received & PO Qty Staged.
If your business process is to receive and invoice a PO in the same step, you will see PO Qty. Invoiced will also be populated. See line 4 of the example above where we have received and invoiced a quantity of 100 in the same.
When you revisit the JMP Worksheet, you will see that PO Qty Received of 150 is now displayed in the “PO Qty Staged” column.
4. Project Material Planning Reports (Include Delivery Ticket)
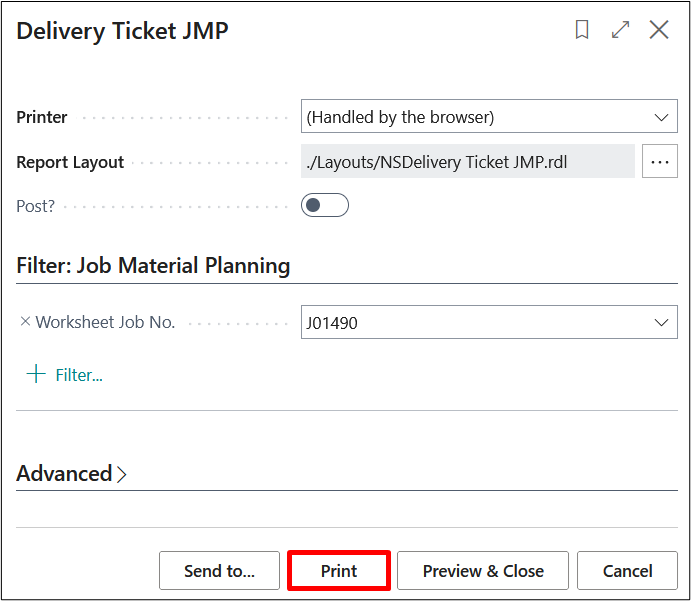
When the items are ready to be shipped to the project site, print a delivery ticket if required.
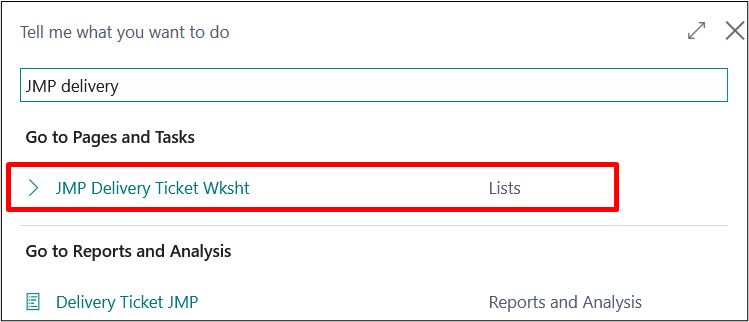
To print, select Reports from the ribbon and select Delivery Ticket.
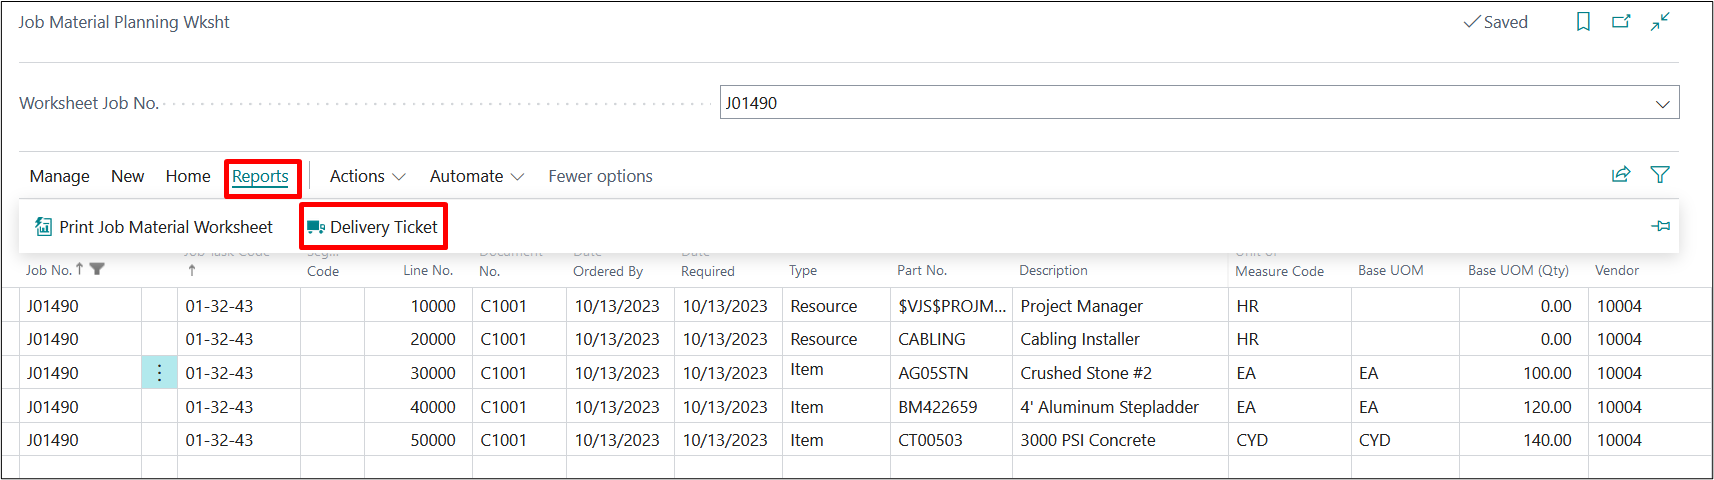
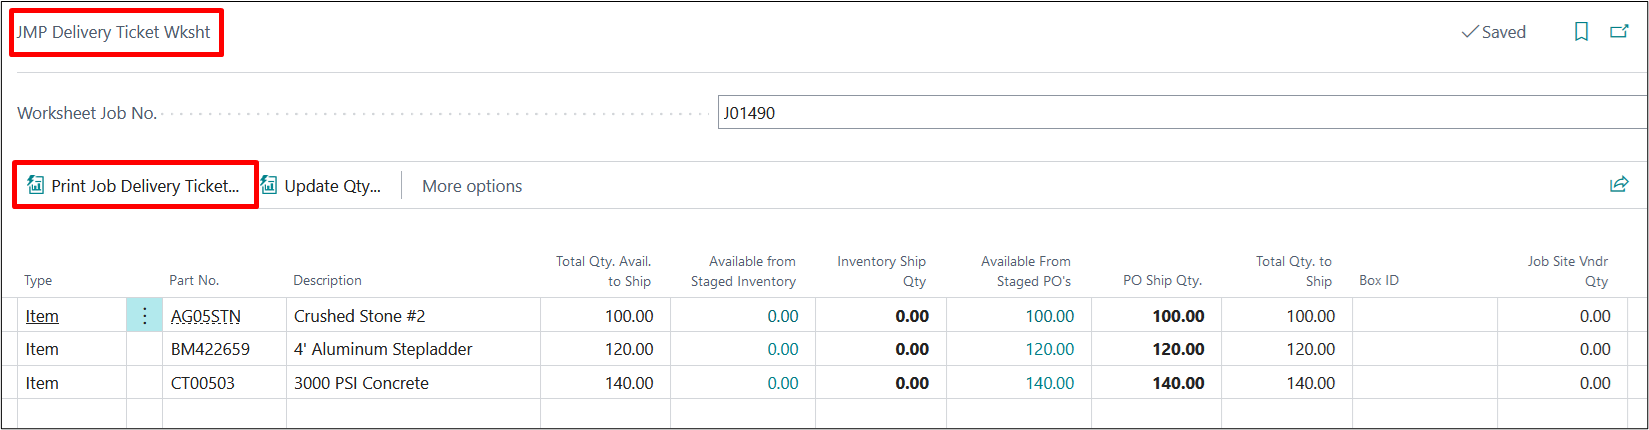
A JMP Delivery Ticket Worksheet will pop up.
Mention the Quantity in “PO Ship Qty” field & then Click on “Update Qty” and then “Print Project Delivery Ticket”
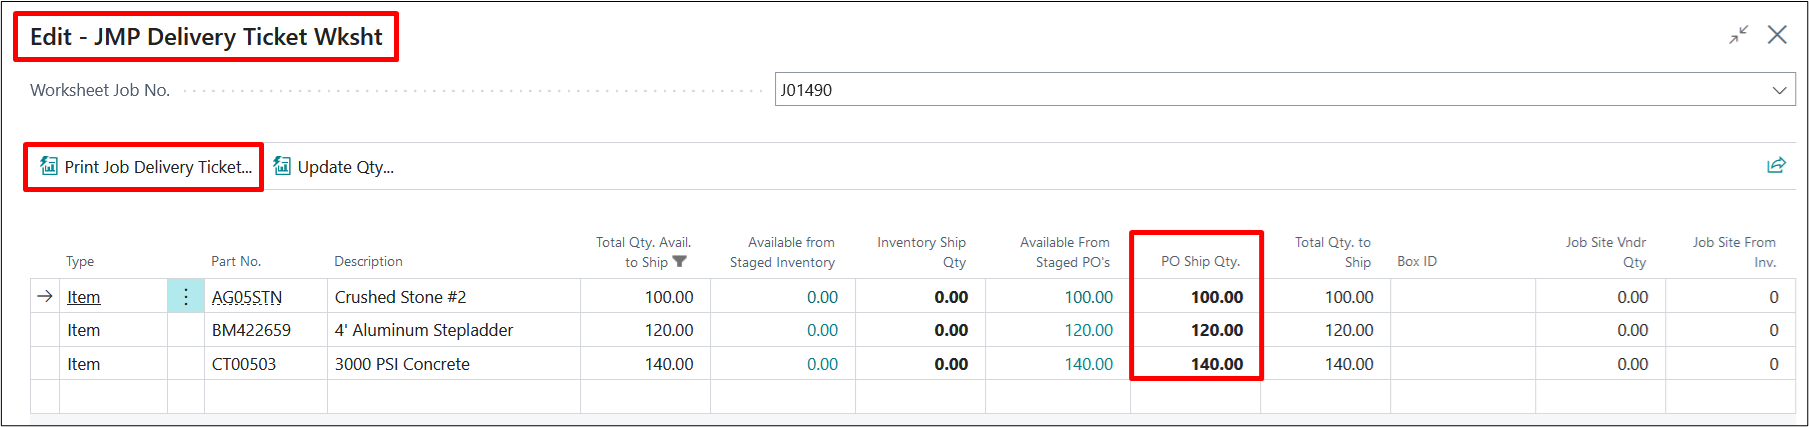
When prompted select if you would like to Post and select Print.
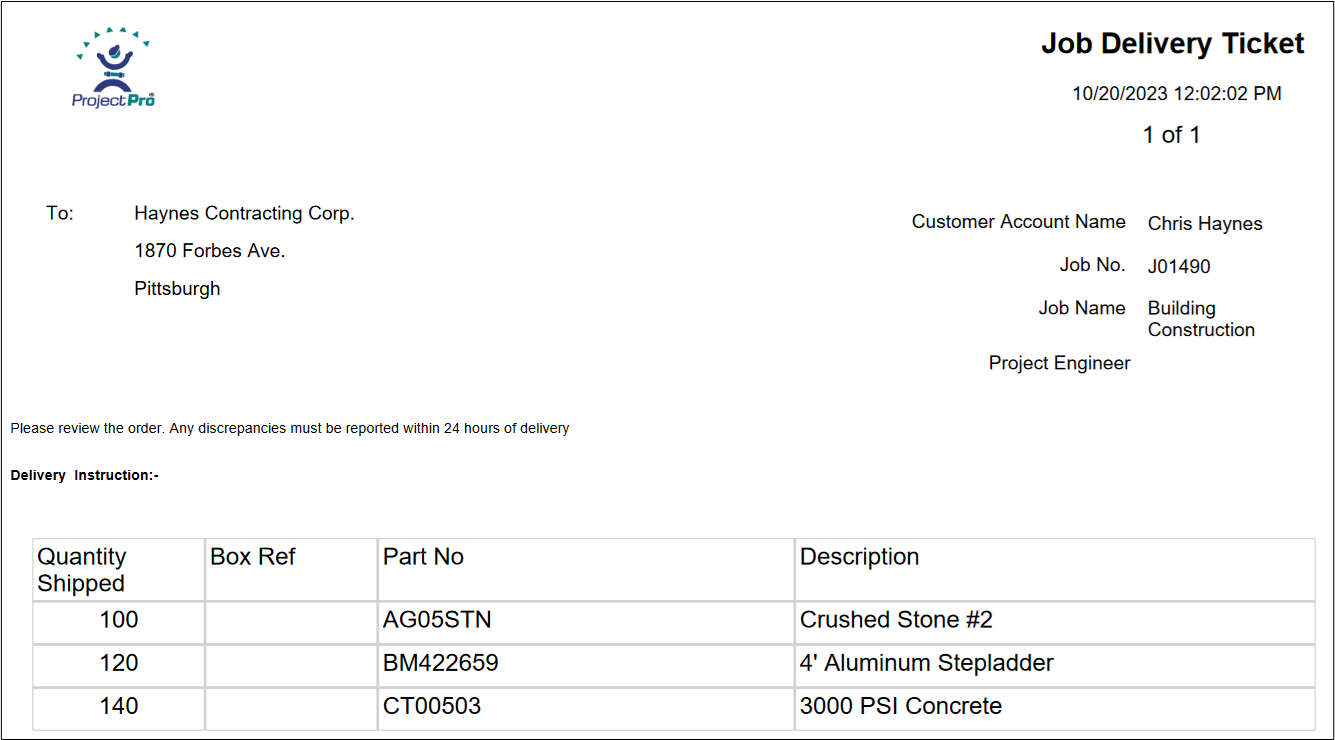
Below is the screen shot of the “Project Delivery Ticket” having “Quantity Shipped” & other details.

Now we have posted the Delivery Ticket so the “Delivery Ticket” will not be printed again using the same option. If the user wants to print the “Delivery Ticket” again then he needs to search “Delivery Ticket Archive” in search option and click on the result.
“Delivery Ticket Archive” page will open and by selecting the line, user need to click on “Print Project Delivery Ticket” in order to print it again.
Duplicate Copy of the “Project Delivery Ticket”
5. Releasing Purchase of Resources through Resource Purchase Invoice
On the JMP Worksheet, go to Home → Purchase Resources
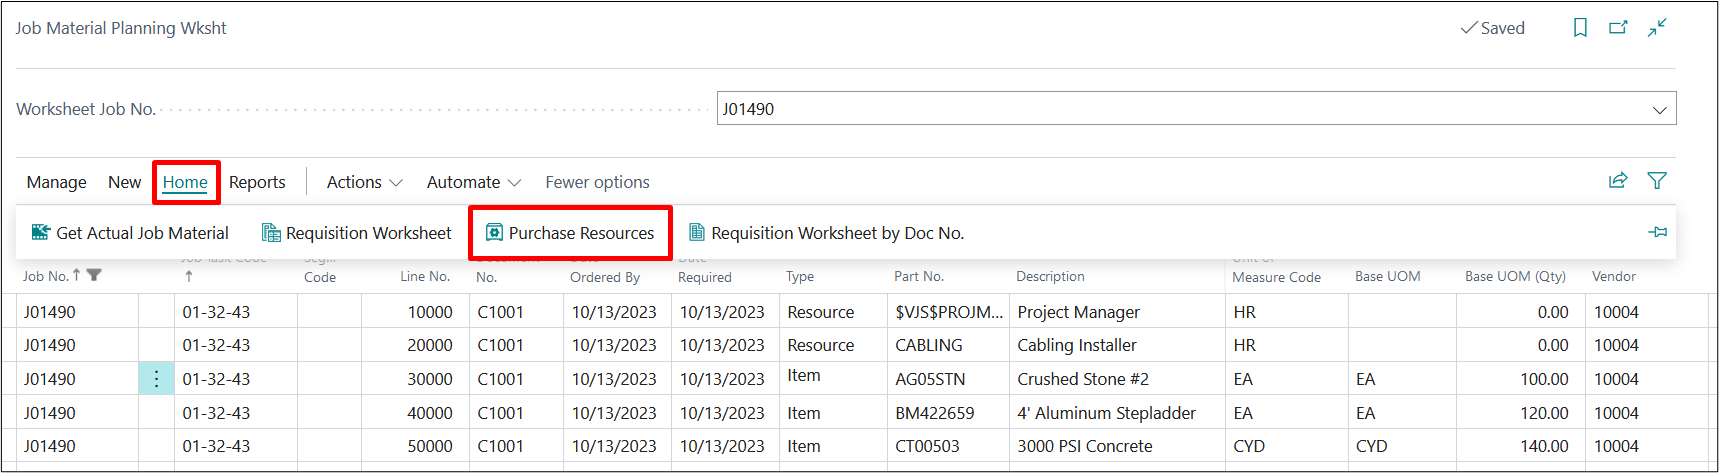
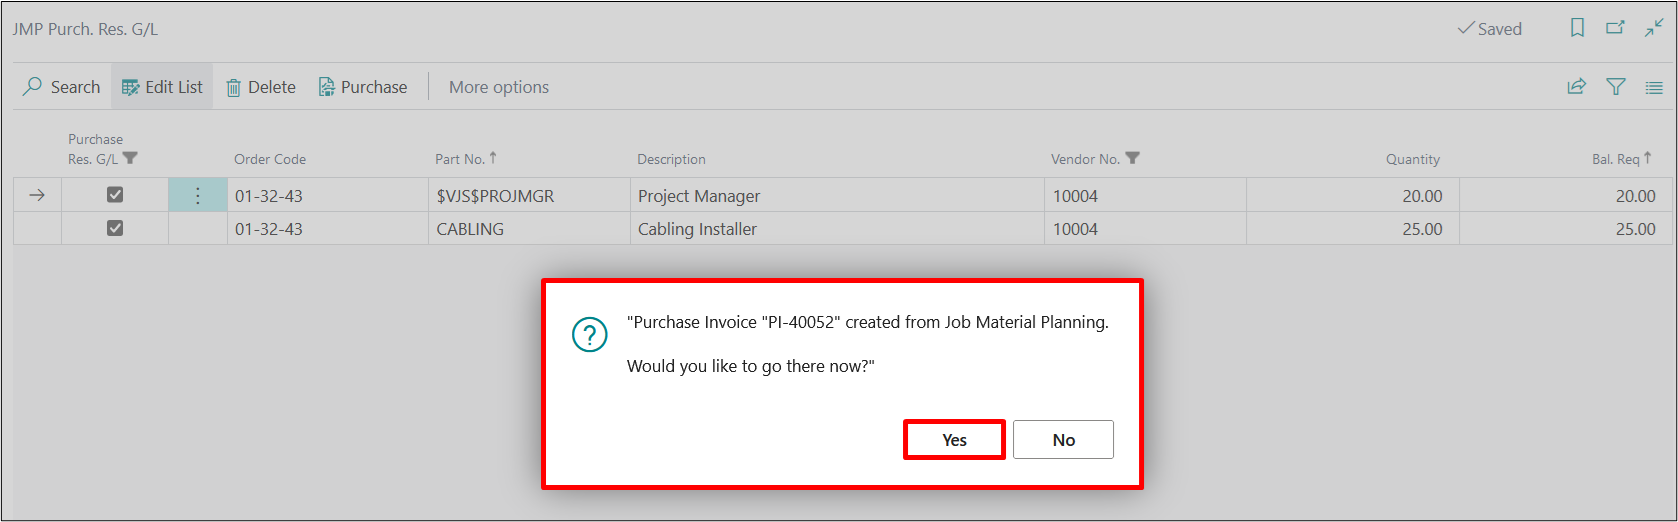
Notice that we have 3 purchasable resources that have populated from our JMP Wksht in this example.

The Purchase Res. G/L option is automatically checked to indicate that we would like to create a Purchase Order for each line item. Uncheck if there are any items you would not like a Purchase Order created for at this time.
To create the Purchase Order, select “Purchase” from the ribbon:

Confirmation of the Purchase Order creation will pop up with an option to view the PO.
When you revisit the JMP Worksheet, you will see that your PO Qty is updated. In this example, Purchase Order is only created for one item.
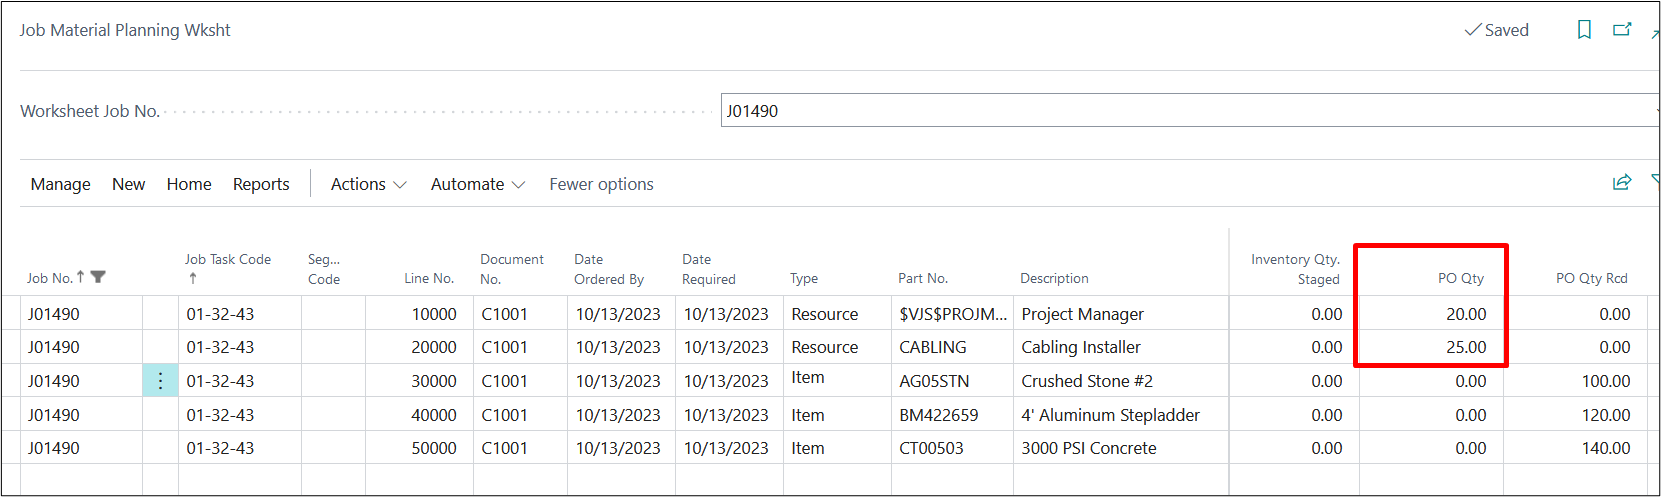
Click on the PO Qty for the line you wish to view the Purchase Order for. Click on Show Document to open the PO.

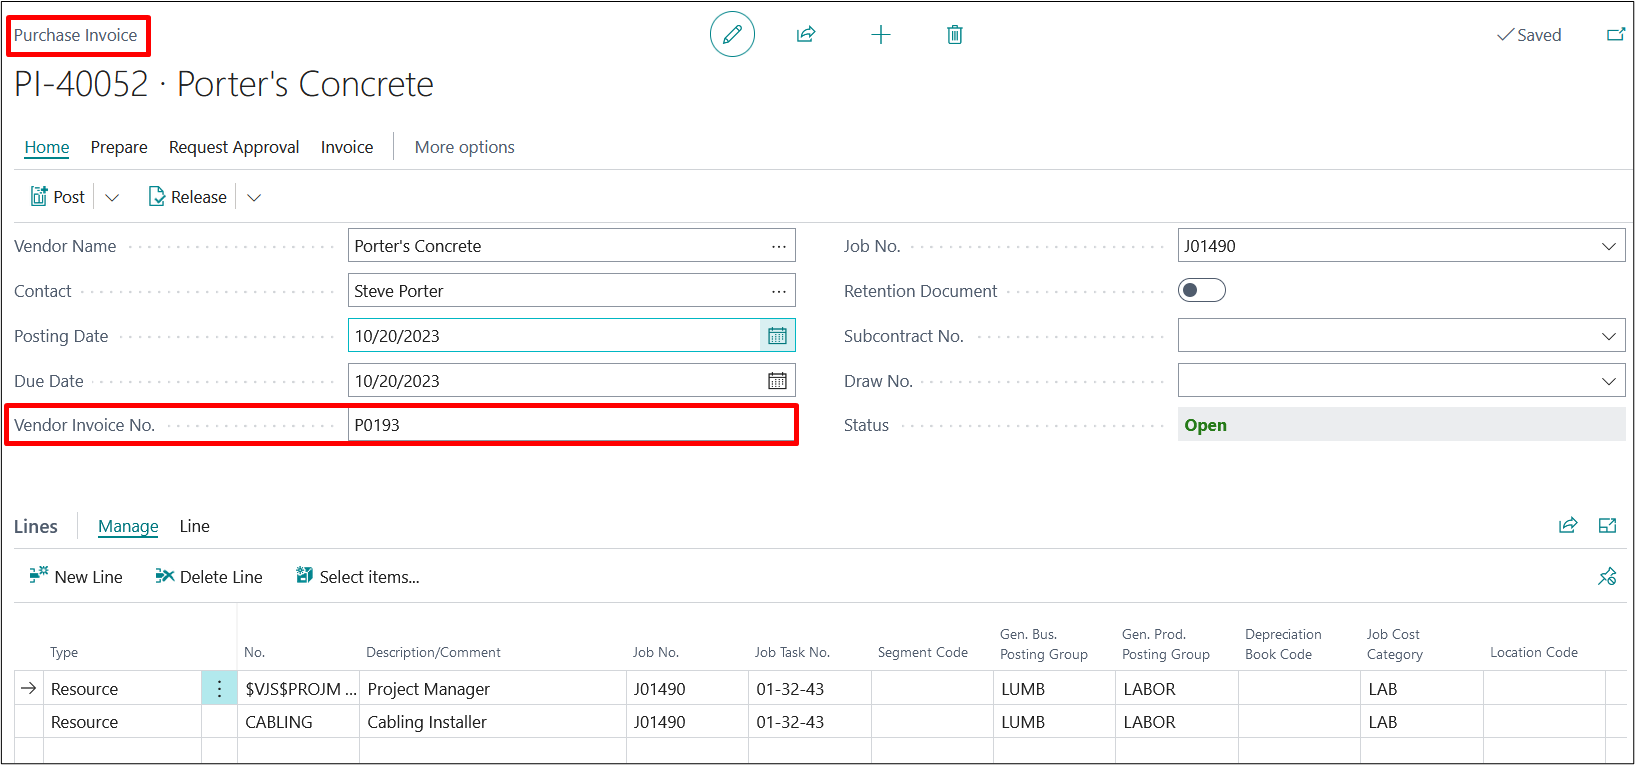
Enter Vendor Invoice No. on the Purchase Invoice.
If your business process is to stage resources, select the staged option before receiving.
From the ribbon, select “Home” and then “Post”.

Select the appropriate option for your business process and select Yes.
6. Assembly BOM feature inclusion on Project Material Planning (JMP)
An assembly item is an inventory item made up of several components but identified as a single item. Assemblies are manufactured by combining raw materials that you stock.
On Project Planning lines user take the Item is an Assembly BOM item

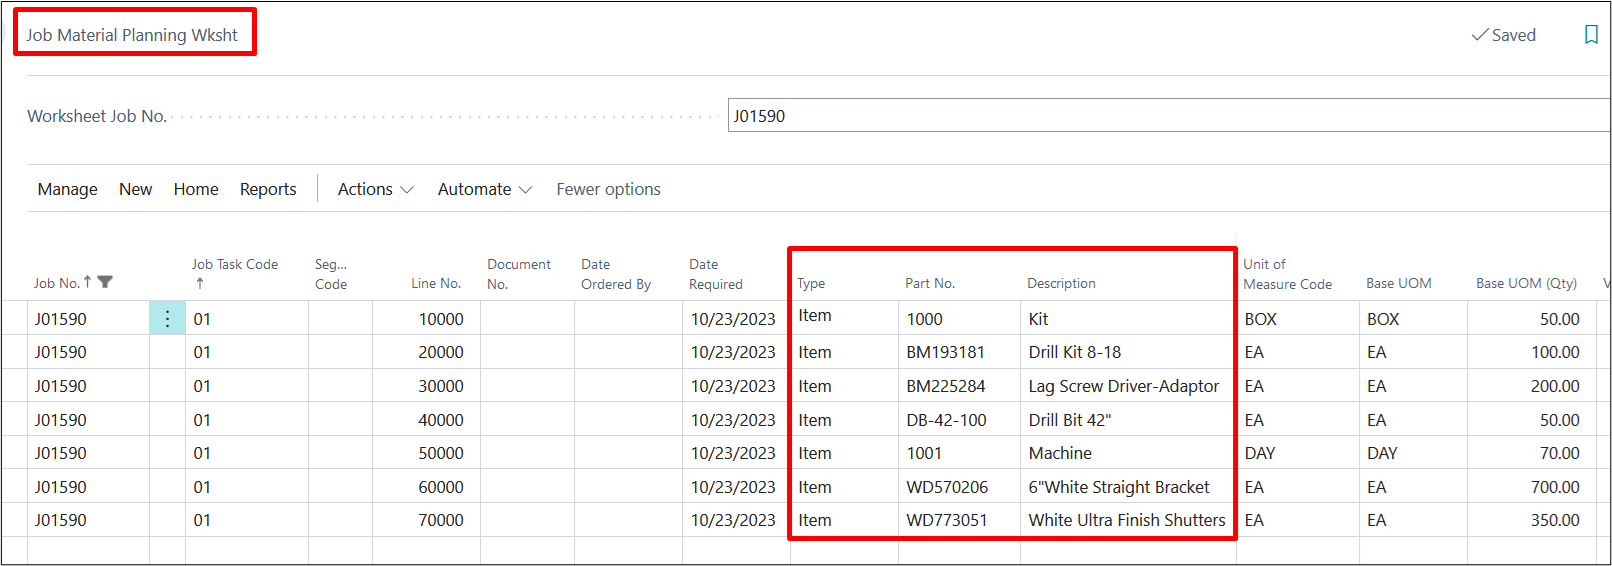
On Project Material Planning Worksheet, to populate planning lines from your project, select ActionsFunctionsCopy Project Planning Lines.
On the Project Material Planning Worksheet we can see that the Assembly BOM item has been copied and all the items under Assembly item are visible.
And after this step User needs to follow the same process from the above process of Project Material Planning.
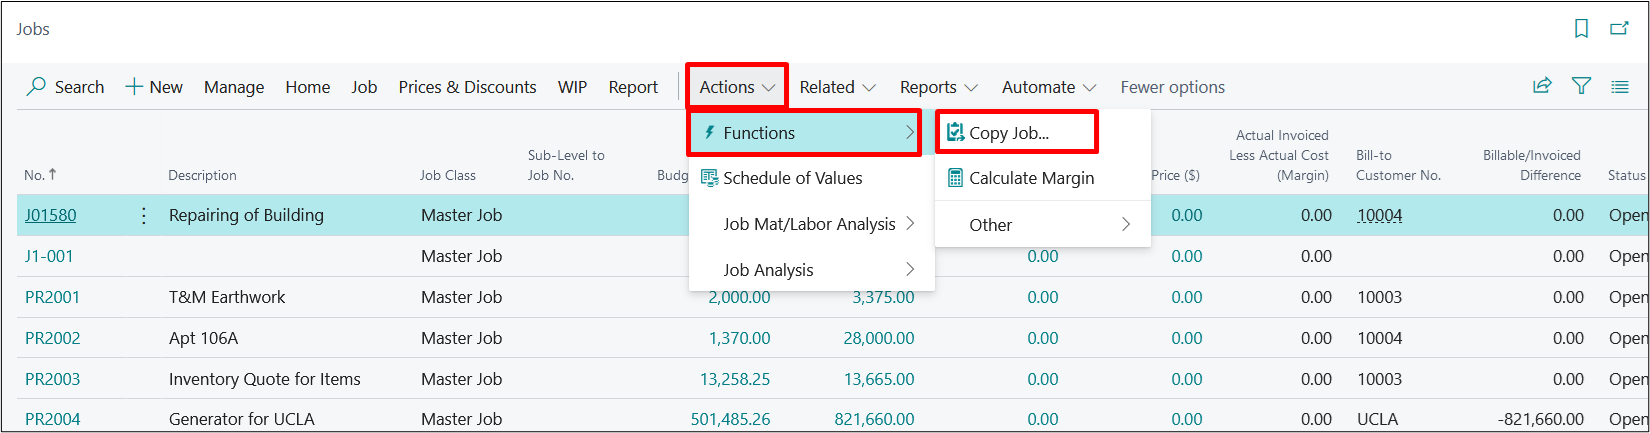
7. Copying Assembly BOM from Project to Project
To Copy Assembly BOM from Project-to-Project User needs to Copy the Project from the Project List page.
Now the user needs to select the mandatory fields and fill the required information in it.
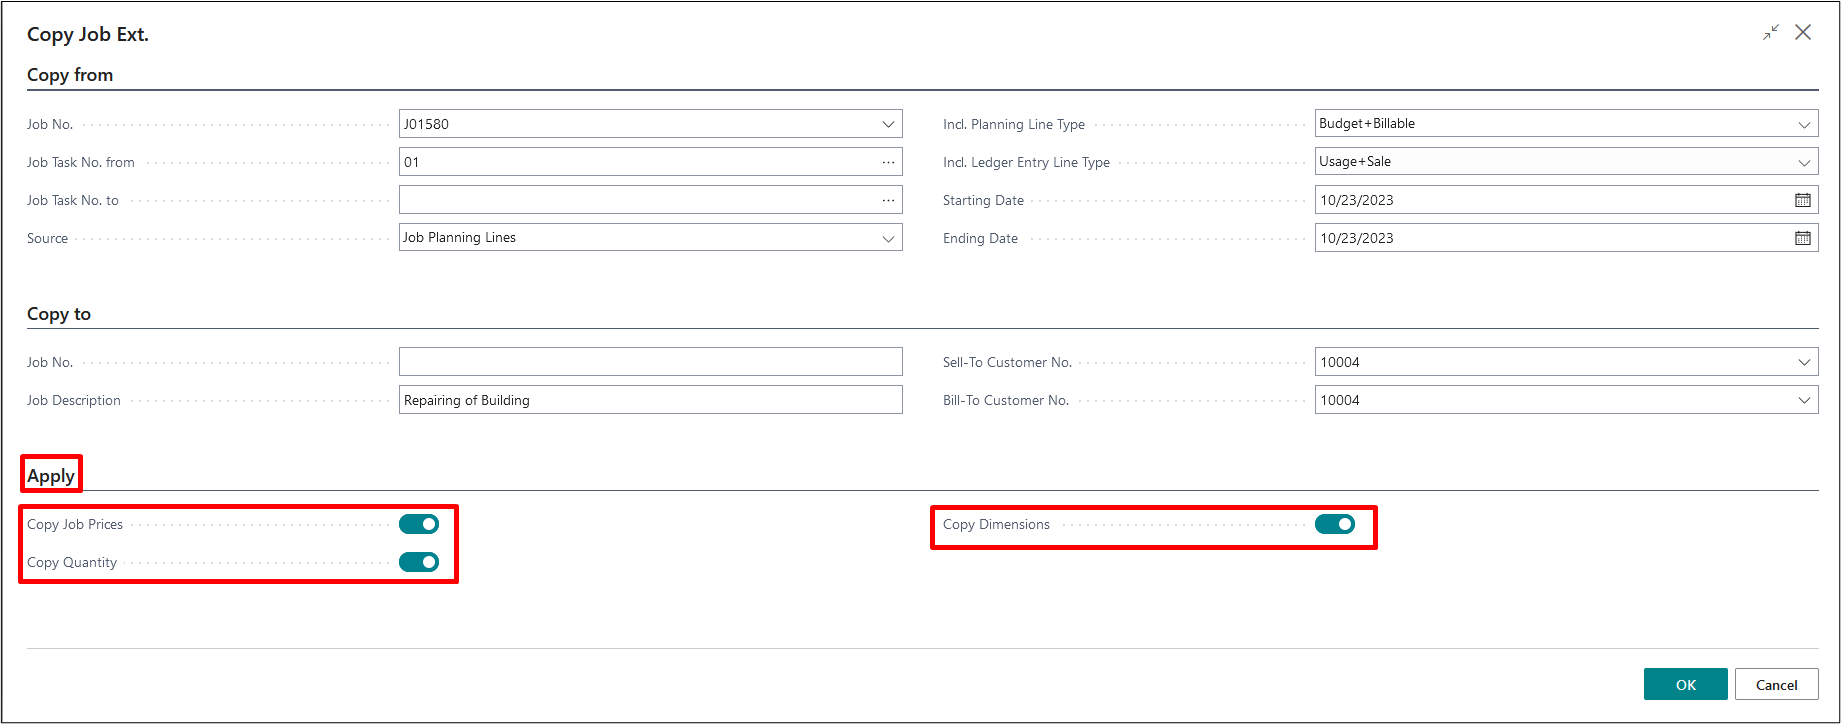
After clicking on OK a new Project has been created and planning lines have been copied to the new Project.

We can see that on the new Project all the Planning lines have been copied.

On Project Material Planning Line Worksheet after running the Copy Planning lines functionality we can see that all the Assembly BOM lines are copied.